Joining Tables
Without a Join Tables command, what's a busy design/production pro to do? Follow these simple steps to easily combine tables of any size.

Steve wrote,
I have a (hopefully) quick question about InDesign CS3 tables. If I have two tables (think about a print book -one table on each facing page of a spread); is there any easy way to combine those into one table instead of two? I’m repurposing the content and really need the table to be one very wide table. I could always write an AppleScript to do it, but if there was some way you knew about already, it would save me some time and brain-pain.
Unfortunately, there is no Join Tables command in InDesign, but it’s not too hard to do manually. There are two key steps: First, prep the “receiving table” with enough empty rows and columns to hold the contents of the table data you’ll be adding to it. The second key is to be sure and select the entire cell of where you want the new data to begin before you paste.
If you’re familiar with tables, that should be enough, otherwise, follow these step-by-steps.
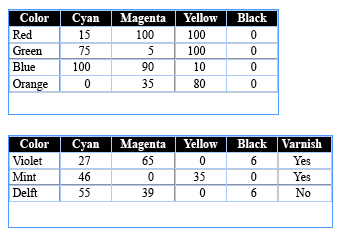
Let’s say these are your two tables (we’ll call them Table A and Table B):
To join Table B to the right of Table A, first count the number of columns in Table B. If there are a lot of columns, don’t bother counting them by eye. Just click inside the table with your type cursor and look at what the Number of Columns field reports at the top of the Table panel (Window > Type & Tables > Table). Here we can see that there are 6 columns.
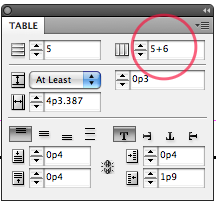
Next, add that number of columns to the first table. A fast way to do this is to click anywhere inside Table A and enter “+ [number]” to the Number of Columns field (which now shows the number of columns in Table A) in the Table panel. In this example, the field showed 5, and I added “+6”. When you press Return/Enter, InDesign does the math and adds columns to the right of Table A, regardless of which cell your cursor was in.
If there are more rows in Table B than Table A, do the same for the Number of Rows field for Table A.
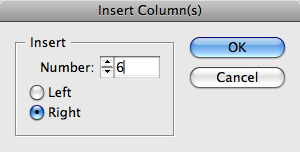
Alternatively, right-click inside the last cell (last row, last column) in Table A, and add extra columns and rows with the Insert commands from the contextual menu. Make sure that “Right” radio button is selected when you add columns, and Below when you add rows.
In this example, I just need to add extra columns:
Now select all of Table B with your Type cursor (I like to right-click inside it and choose Select > Table) and then copy or cut it to the clipboard.
Finally, select the first cell (top of the first empty column) you added to Table A by clicking inside it and pressing the Esc key. This tells InDesign where to start pasting the table cell content in your clipboard.
Paste in your table, and et voila, one table:
Troubleshooting
If nothing happens when you paste in your table, there are not enough rows/columns starting with your “Start Here” cell selection to hold all the cells in the clipboard. You need to add some. It’s okay if there are too many, not okay if there are not enough.
If the entire table gets pasted into a single cell, you probably forgot the “select the entire cell” step, and just had your cursor blinking in the starting cell. Undo, select the cell itself (press the Esc key) and try again.
Even Faster
If you convert Table B to tabbed text (Table > Convert Table to Text), you don’t need to add more than one empty row or column to Table A. Just copy the tabbed text to the clipboard, add an empty row or column to Table A (depending if you want the data to be appended to the bottom or to the right of Table A), select the starting cell as above, and paste. InDesign adds enough columns and rows as necessary to hold the data, magically reconverting the tabbed text into cell content.
This article was last modified on December 19, 2021
This article was first published on March 11, 2009


