

One of Illustrator’s greatest strengths is the ability to easily make reusable design assets like brushes and pattern swatches that can transform dull designs into eye-catching works of art in just a few clicks. Building up your personal library of design assets can be a real game-changer, allowing you to easily apply consistent style elements on projects for brands or even adding signature elements to illustrations that help define your personal art style.
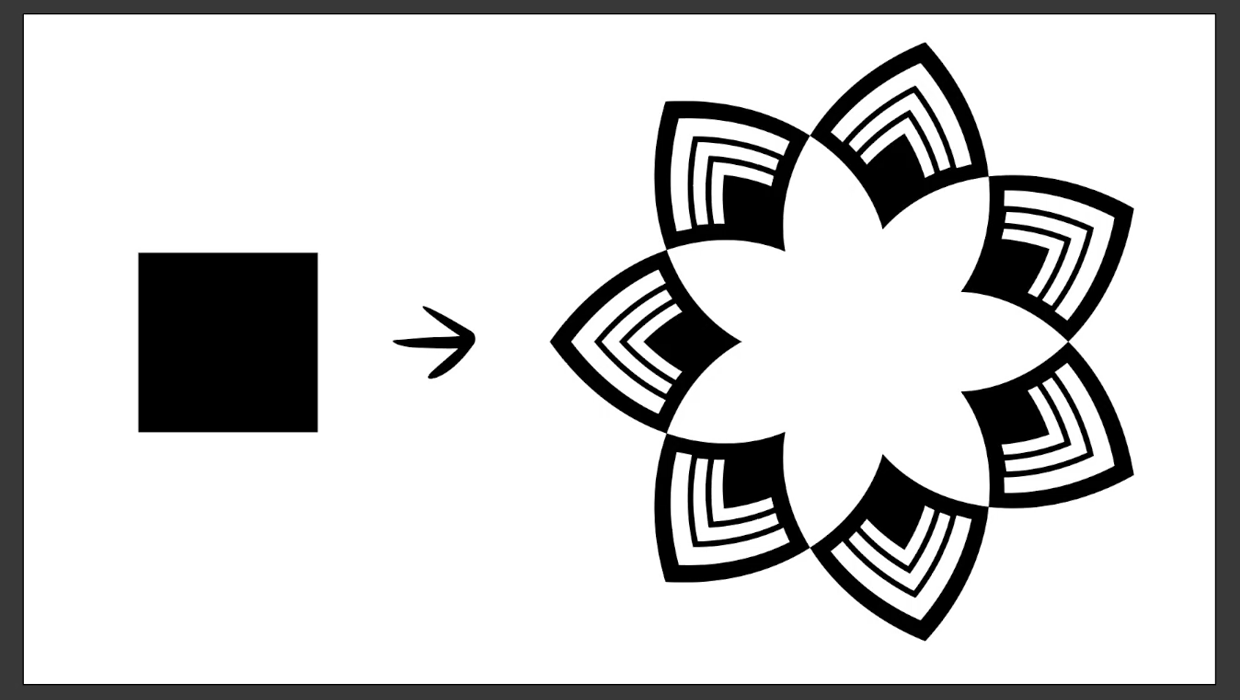
In this tutorial, we’re going to build a custom pattern brush that will let you create complex, beautiful borders with just a single click. We’ll walk through the process step by step, starting from a single, simple square and building up to a beautiful, reusable Art Deco style pattern brush. Along the way, we will explore best practices like expanding live strokes and creating compound paths to help you create efficient, professional assets.
Phase 1: Creating an Art Deco Design Element
Let’s jump in and start creating the base design element that we will use to create our pattern brush. To follow along, create a new blank document in RGB color mode with pixels as the document units. We’ll be doing most of our work today using just a few key panels: the Pathfinder panel, the Stroke panel, and, of course, the Brushes panel.
First Steps: Creating the Base Shape
The foundation of our pattern brush is a single, clean design element. We’ll start by creating a diamond shape and then use one of Illustrator’s most fundamental features, the Compound Path, to create a transparent cutout.
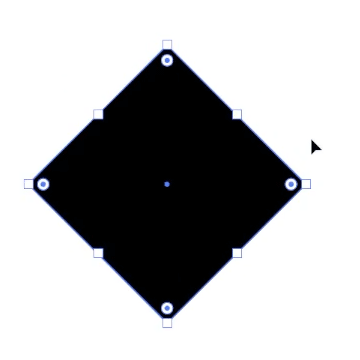
Create a Square: Using the Rectangle Tool (M), click and drag on the artboard while holding the Shift key to create a perfect square.
Rotate to a Diamond: Switch to the Selection Tool (V). Hover your cursor just outside one of the corner points until you see the curved, double-headed arrow. Click and drag while holding Shift to rotate the square and snap it to a 45° angle, turning it into a diamond.
Create the Cutout: To create the first transparent area of our design in the center of the base diamond shape, we’ll create a Compound Path by cutting out a smaller copy of the shape.
Make two copies of your diamond shape using the shortcut (Ctrl/Cmd + C) to copy, then paste the copies directly in front of the original shape by using the shortcut (Ctrl/Cmd + F) twice to Paste in Front.
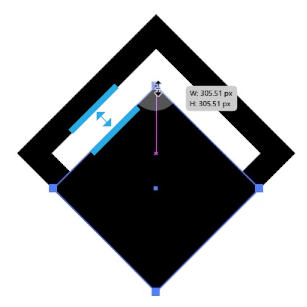
In the Layers Panel, you should now see three copies of your shape. Lock and hide the bottom copy to save it for a later step.Select the top diamond shape in your Layers Panel and scale this shape down from the center point by holding Shift + Alt/Option while dragging a corner handle. The Shift key will constrain the proportion of your shape as you scale, and the Alt or Option key will make the shape scale from its center point.
Next, select both diamond shapes, and in the Pathfinder Panel, click the Minus Front button. This subtracts the top shape from the bottom one, creating a single Compound Path with a transparent cutout.
Creating Style: Adding Details and Style with Stacked Shapes
Now that we have our base, we can add the intricate lines and stacked geometry that give the design its Art Deco style.
Unlock and turn on the visibility of the bottom copy of the diamond shape in your Layers Panel. Scale the shape from the top by holding Shift to constrain the scaling proportionally and dragging from the top center handle of the bounding box. Try to leave about the same amount of space between this diamond and the outer diamond that matches the thickness of the border on the outer diamond.
We need to save one additional copy of this solid diamond for the final step, so use (Ctrl/Cmd + C) and (Ctrl/Cmd + F) to create the copy, then lock and hide the new copy for later use.
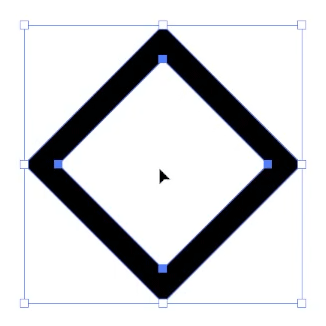
Select your unlocked solid diamond and drag it to the top of your layer stack. We want this diamond to be slightly smaller and to have a thinner outline. This shape currently has a black fill color and a transparent stroke color, but we need it to have a transparent fill color and a back stroke color. You can use the Swap Fill & Stroke command (Shift + X) to easily reverse these.
Next, adjust the thickness of the outline in the Stroke Panel by setting the stroke size to 10 points.
Tip: To ensure the stroke doesn’t hang over the edge of your base shape, set the Align Stroke option to Inside.
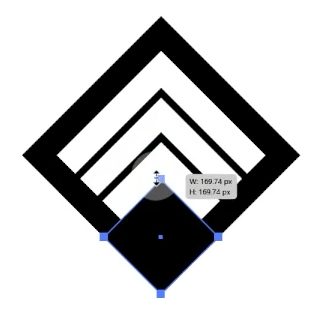
Make a copy of this stroked diamond and again, scale it down proportionally from the top (holding Shift) to create the second, smaller inner diamond and continue building the nested effect.
For the finishing touch, unlock and turn on the visibility of the remaining copy of the diamond and scale it down from the top to create the small diamond at the bottom of the design.
Before we can create our brush, it’s essential to consolidate these separate pieces into one clean object. Working with a single, finalized compound path is best practice when creating reusable assets, especially when repeating elements multiple times, like we do in the case of a pattern brush.
This step helps prevent scaling issues, ensures predictable results in printing, and keeps your files clean and efficient, which helps Illustrator run more smoothly.
Finalize the Asset:
First, we need to expand our live stroke effects into solid shapes. Select the two stroked diamond paths and go to Object > Expand Appearance. This converts the stroke into a single filled shape in the form of a Compound Path.
Now, select all the separate shapes that make up your design and click the Unite button in the Pathfinder Panel. This merges everything into one single, clean compound path, ready to be turned into a brush.
Tip: Always keep a copy of your original artwork before performing actions like Expand Appearance or merging paths. These actions cannot be easily reversed, so it’s good to keep copies of objects with live strokes and effects that you can easily edit further if needed.
Phase 2: Creating and Applying Your Pattern Brush
Here’s where the magic happens! With a clean, finalized asset, creating and using a powerful, flexible Pattern Brush is incredibly simple.
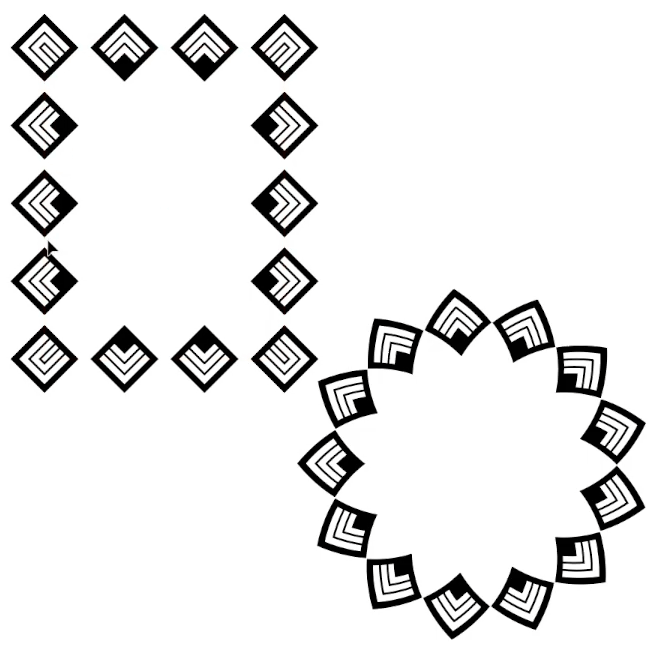
Create the Brush: Simply drag your final, united shape into the Brushes Panel. When the dialog box appears, select Pattern Brush and click OK.
Set Colorization: In the Pattern Brush Options window, find the Colorization Method dropdown and set it to Hue Shift. This is a crucial step that allows your brush to take on any stroke color you choose.

Apply the Brush: To use your new brush, draw any path or shape (like a rectangle or circle). Make sure it has a stroke color and no fill, then simply click your new brush in the Brushes Panel to apply it.
- Adjust the Brush: The beauty of a pattern brush is its flexibility.
- To change the size of the border, simply select the object and change its Stroke Weight in the Stroke Panel.
- To change the color, select the object and choose a new Stroke Color.
Tip: Save your custom brushes to reuse in other files or to share by selecting the option in the brushes flyout menu to Save Brush Library.
There’s an almost endless variety of effects you can achieve with custom brush designs, so be sure to experiment with different base art, brush types, and brush settings. As a bonus, you can save your custom brush sets to start building your own asset library that can save time and help you quickly apply complex design elements to your future designs.
Panels, Tools & Shortcuts Reference
| Item | Menu Path or Shortcut | Adobe Documentation |
| Panels | ||
| Pathfinder Panel | Window > Pathfinder | Combining Objects |
| Brushes Panel | F5 | Brushes |
| Stroke Panel | Ctrl/Cmd + F10 | Stroking an object |
| Layers Panel | F7 | Using Layers |
| Properties Panel | Window > Properties | Properties Panel |
| Tools | ||
| Rectangle Tool | M | Drawing simple shapes |
| Selection Tool | V | Selecting objects |
| Commands | ||
| Copy | Ctrl/Cmd + C | Copying objects |
| Paste in Front | Ctrl/Cmd + F | Pasting objects |
| Swap Fill & Stroke | Shift + X | Fill and Stroke |
| Expand Appearance | Object > Expand Appearance | Expanding objects |
Commenting is easier and faster when you're logged in!

Recommended for you
How to Create a Geometric Unicase Font in Illustrator
Learn how to create a unicase font in Illustrator using the Live Paint bucket an...
How to Make Plaid Flannel Patterns in Photoshop
See how to digitally weave smaller, individual patterns together to create a tex...
How to Create Layered Font Styles in Illustrator
Learn how to create a font style that has the appearance of a stackable, layered...