
CC Libraries: Check Them Out
Why, when, and how to use CC libraries with your favorite Adobe Creative Cloud apps

This article appears in Issue 43 of CreativePro Magazine.
CC Libraries are a cross-application productivity tool included with Creative Cloud. More than that, I believe they’re among its best features—but many people don’t take advantage of them.
I often hear, “Yeah, I tried to use libraries, but they were confusing and clunky.” Admittedly, Adobe could have made a few things clearer. If you invest a bit of time to learn the finer points of how libraries work, however, you’ll be rewarded with greater convenience and efficiency in your workflow—whether in a single app or across several.
Let’s spelunk through some library dark corners to debunk the myths you may have heard and shine a light on some useful shortcuts.
The Basics of CC Libraries
It doesn’t help that Creative Cloud Libraries are referred to differently across the various Creative Cloud apps. For example, in Photoshop, Illustrator, After Effects, Premiere Pro, Animate, Bridge, Dimension, Adobe Express, Adobe Stock, Adobe Fonts, and mobile apps they are referred to in the interface as Libraries. In Photoshop, for example, you choose Window > Libraries to display the Libraries panel. But in InDesign and Dreamweaver, you must choose Window > CC Libraries because each app already has a totally separate Libraries feature. For simplicity in this article, I’ll refer to CC Libraries as libraries, and trust me: They’re well worth seeking out.
Quite simply, these libraries are an ideal place to store all the stuff you might need to frequently reuse in your Creative Cloud apps. They are ideal for storing design assets (artwork, logos, styles, colors, and more) outside of, and separate from, an individual project. The libraries then provide easy access to the assets later when you need them for another project.
Five unique characteristics make libraries such a valuable productivity feature:
- Libraries aren’t specific to any single document. You can create a library item in one document and use it in another.
- Libraries work across applications (within some app-specific limitations). Assets added to a library in one application can be used in another. For example, a color swatch added to a library in Photoshop can be used later in Illustrator or InDesign.
- Libraries can be easily shared with other Creative Cloud users, either with Edit access, so that they can contribute to and collaborate on library assets, or View access, so that they can use assets but not modify the library.
- Libraries are stored on your local hard drive as well as in the cloud, so you can still use the assets when you don’t have internet access.
- Because they are cloud-based, libraries connect not only with Creative Cloud desktop apps, but also with such online tools as Adobe Fonts, Adobe Stock, and Adobe Express, as well as mobile apps like Photoshop and Illustrator for iPad, Fresco, and Capture.
If your organization uses a digital asset management (DAM) system, you might conclude that libraries are redundant or superfluous. You’d be wrong. Libraries and DAMs are complementary in their features and intended use. DAM systems are incredibly useful for workflows in larger organizations, where they are typically used and shared by many departments. They are often locked down and can be updated and managed by specific authorized users only. Libraries, on the other hand, can be quickly created by any Creative Cloud user, are much more flexible, and are tightly integrated with CC applications.
Another difference between a CC Library and a DAM is that a library can house a wide variety of asset types.
Depending on the app, you can store colors, color themes, gradients, paragraph and character styles, text, and graphics in almost any format. You can also store InDesign objects; Illustrator artwork; and Photoshop layers, layer groups, and layer styles. You can also use libraries for bitmap and vector patterns; pixel and vector brushes; animations; 3D models, lights, and materials; audio and video; Lumetri color looks; templates; and references to Adobe Fonts (Figure 1).

Figure 1. Libraries make it possible to store and reuse a wide variety of asset types across Creative Cloud apps.
Add Assets to CC Libraries
With so many types of assets, and many apps, it follows that there are several different ways to add items to a library. It is tempting to just drag objects from a layout into the Libraries panel, but it’s better to select what you want to add and then click the Add (+) icon at the bottom of the Libraries panel. Why? Because this will prompt you to select how you want the object(s) to be added to the library. For example, do you want to add the entire object, or just the fill color, or just the text in the object (Figure 2)?
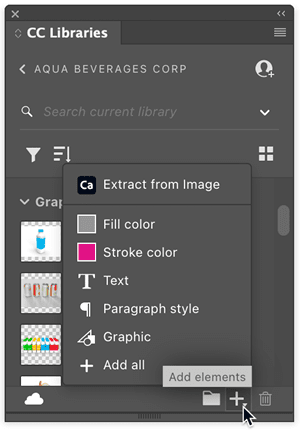
Figure 2. Instead of dragging assets from a layout into a library, it’s better to click the Add (+) icon and choose which elements of the selection you wish to add.
When adding to a library, think carefully about where you are adding the asset from and how you may want to reuse that asset.
In InDesign and Illustrator specifically, an image resides in a frame. If you select the frame and add it to a library, the frame and all its attributes are added. These attributes include the image’s scaling, its cropping, and its link—the image itself isn’t added to the library. This is fine if the image is not going to be moved, renamed, or deleted, but problematic if you ever share a library with others.
Another approach is to embed the image in InDesign or Illustrator before adding the frame to the library. This will make the frame and image portable between users, but with potential downsides that accompany embedded images.
In many cases, a better approach is to add the graphic itself, without the frame, to the library. Either open the image in the source application (such as Photoshop) and add it from there, or drag the image from your hard disk or network drive directly into the Libraries panel in any Creative Cloud app. In fact, you can load a bunch of graphics all at once this way (Figure 3).
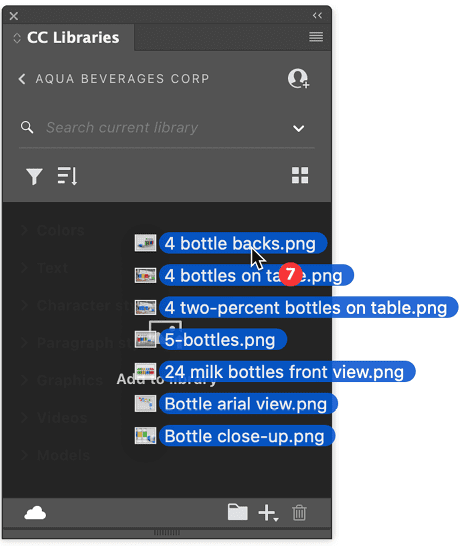
Figure 3. You can drag any number of files directly from the Finder (macOS) or Explorer (Windows) directly into the Libraries panel in any Creative Cloud app to add the images directly to a library.
To add swatches, character and paragraph styles, and other asset types to a library, look for the icon in those respective panels in Illustrator and InDesign.
AI, PNG, BMP, PSD, SVG, GIF, JPG, TIF, PDF, HEIC, HEIF, DNG, PSDT, AIT,
INDT, FLA, MP4, MOV, WMV, MPEG, WAV, AAC, MP3, MP2, M4A, AIFF,
AIF, AIFC, MDL, SBSAR, GLB, GLTF, OBJ, DN, USDZ, IBL, FBX, EXR, HDR
Organize Your CC Libraries
One reason libraries have the “unintuitive and difficult to use” reputation is that the Libraries panel, which is small and admittedly clunky, handles most interactions. Once you master its basics and learn a few tips and tricks, however, I’m convinced you won’t want to turn back to life without them.
Tip: View Your Storage
To view how much storage remains in your Creative Cloud account, launch the Creative Cloud Desktop app and click the cloud icon in the upper-right corner.
Keep things organized with multiple libraries
To create a new CC Library, just visit the Libraries/CC Libraries panel in your favorite Creative Cloud app and choose Create New Library from the panel menu. You can create as many libraries as you need, and each can store up to 10,000 elements. You’re limited only by the amount of storage in your Creative Cloud account (Figure 4).
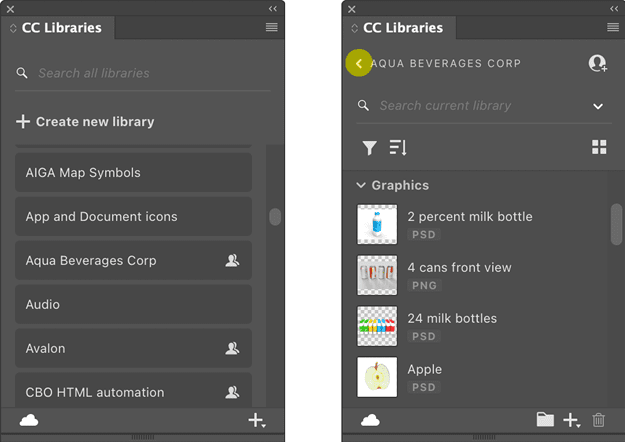
Figure 4. The Libraries panel has two views. You can view a list of all your libraries (left) or a list of all the assets within a single library (right). When viewing a single library, click the back arrow to view all your libraries.
Although you can use the folder icon at the bottom of the Libraries panel to create custom groups within a library to keep things organized, I find this method awkward. I prefer to just create multiple libraries instead.
For example, if I want to create a library of colors for Acme Corp., instead of creating one library that contains an RGB group and a CMYK group, I prefer to make two libraries, one named Acme Colors-RGB and another named Acme Colors-CMYK. Because you can easily move an item between libraries (right-click it and choose Move To), this is an easy way to keep things organized. If you don’t create groups, you’ll want to choose Type in the Libraries panel sort options (Figure 5).

Figure 5. The Sort Options button in the Libraries panel lets you group objects by Type and choose a sort order.
Name your assets
Clicking the or icon in the upper-right corner of the Libraries panel allows you to switch between List view and Grid view. Because the asset thumbnails are quite small even in Grid view, you’ll want to take a moment to carefully name each asset after you add it to a library. Just double click the name of the asset and type a new name. You may also want to take a moment to right-click the asset and choose Add Description. This lets you add 130 characters of additional information about the asset (Figure 6).
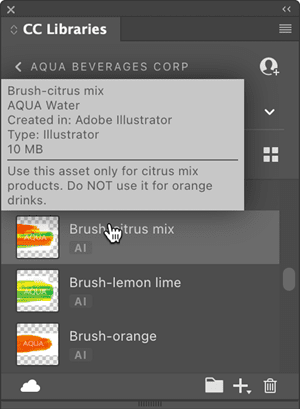
Figure 6. When you hover over a library asset in either List view or Grid view, you see additional useful information, including any extra descriptive text.
Search for assets
At the top of the Libraries panel is a Search field. If you are at the top level of the panel where you see a list of all your libraries, this field will search across all of your libraries. If you are viewing a single library in the panel, you can choose whether you want to search only the current library, all of your libraries, or for an asset on Adobe Stock (Figure 7).

Figure 7. Use the Search In menu to specify the scope of your search.
This is a deep search. It searches within the asset name, in the asset description, and in all the text of any text assets. In my tests, it doesn’t seem to search XMP metadata that is saved in an image.
View and manage assets
For heavy-duty work in cleaning up and organizing a library or to see larger thumbnails of each asset, you might find it more convenient to view it on the web. Choose View On Website from the Libraries panel menu.
You can then use your browser’s zoom shortcuts, usually Command+Plus/Command+Minus (macOS) or Ctrl+Plus/Ctrl+Minus (Windows), to enlarge the thumbnails, or you can click a thumbnail to view a full-screen preview of the asset.
You can also view and manage your libraries in the Creative Cloud Desktop app and in Bridge, but I find the web view to be the most useful.
TIP: Pay Attention to Color Space
Libraries do not offer a method to filter assets by color space, but you can use these workarounds:
- Make the information part of the asset name, such as Logo (RGB) and Logo (CMYK) or Apple Red (RGB) and Apple Red (CMYK). This is the method I usually employ.
- Create separate RGB and CMYK groups within a single library.
- Create separate RGB and CMYK libraries.
- Thankfully, when you hover over a color swatch in a library, you can view the color breakdown.
Use Assets from CC Libraries
It’s tempting to just drag an asset from a library into your layout, but it’s better to get in the habit of right-clicking the asset in the library to see what options appear for using it.
When placing graphic assets from a library into an InDesign or Illustrator layout, you’ll see two options: Place Linked and Place Copy. In Photoshop, you’ll see Place Linked and Place Layers.
When you choose Place Linked, the document asset becomes linked to the library asset. If the library asset is edited and updated, the asset updates in every document to which it is linked. A linked asset is indicated by a library icon in the Links panel in InDesign and a cloud icon in the Illustrator Links panel and the Photoshop Layers panel. When you choose File > Package, any linked library assets are copied to the packaged Links folder.
When you add an InDesign frame, group, line, or other page object to a library, the position of the object on the page is stored with the asset. Normally, if you don’t have a text insertion point and you right-click and choose Place Copy, a loaded place cursor appears, and you can click wherever you want the item to appear.
But if you hold down the Option/Alt key when you click with the loaded place cursor, the object will appear exactly where it was in the original. This is useful for storing and recalling the precise location of header and footer objects, for example.
Bear in mind that the coordinates are relative to the spread, not the page. If an item is added to a library from a left-hand page, it will reappear on a left-hand page.
Use text assets in InDesign and Illustrator
Graphics assets remember all attributes of a text frame, but text assets do not. To add a text asset to a library in InDesign or Illustrator, select some text, or a text frame, and click the Add (+) icon at the bottom of the Libraries panel. Select the Text option and click Add. Now this text can be easily recalled anywhere you need it, without the constraints of the text frame that it originally came from. This is a powerful feature, but it can be a bit confusing.
How to use this text in InDesign depends on whether you have an insertion point selected (meaning that the text cursor is flashing in some text). With an insertion point, right-click a text asset in the Libraries panel and choose Place Inline. The text will be placed at the location of the text cursor with formatting that matches the original formatting, but it will not be linked to the original text. Unfortunately, there isn’t a feature for placing text inline without the original formatting.
Without an insertion point, right-click a text asset and choose Place Linked to place it on the page in a new text frame. The text will be linked to a copy of the text stored in your library. If you update the text in the library asset, it will change on the page.
Choose Place Copy to place the text on the page in a new text frame. The text will not be linked to the asset in the library.
Choose Place Without Styles to place the text on the page in a new text frame. The text will not be linked to the asset in the library, and the text formatting will not match the original text formatting.
If a text asset saved to a library from InDesign contains any anchored objects or tables, those are retained in the asset and will reappear when the text is placed in another InDesign document from the Libraries panel. This makes this feature very flexible and powerful.
Update or edit library assets
To edit a graphic asset in a library, you can double-click it in the Libraries panel (or right-click and choose Edit). The asset will open for editing in the application that created it. When you save the modified asset, it is updated in the library. To edit a color in a library, right-click the color and choose Edit.
To edit or update paragraph or character styles, you must create a new style, add it to the library, and then delete the old style from the library. Currently, you can’t simply replace a style in a library with another style.
Sharing CC Libraries
You can easily share libraries with other Creative Cloud users via two methods: Get Link and Invite People.
Choose Get Link from the Libraries panel menu to create a public link that you can share with anyone, even users who aren’t Creative Cloud members. Nonmembers will be able to view the assets only in a browser. Creative Cloud members will be able to create a copy of the library for their own use, unless you restrict this. No one else will be able to modify your library with this sharing method.
Choose Invite People from the Libraries panel menu to invite specific Creative Cloud members to either view or edit a library (your choice) (Figure 8). View access allows them to use the assets in the library but not modify it in any way. Edit access gives them full access to add, delete, rename, and modify library assets.

Figure 8. Choosing Get Link gives anyone you share the link with access to view the library (left). Choosing Invite People shares the library only with invited Creative Cloud members (right).
You might want to create and share a corporate style guide containing your fonts, logos, colors, and styles with others in your company. In this case you’d probably want to choose Invite People and allow colleagues to view the library only. If you’re collaborating on a large layout with a group of people, you may want to create a library just for that project, choose Invite People, and give coworkers Edit access.
Additional Library Tips
Because libraries work across so many applications, they’re a deep subject. At Adobe’s main Help page about libraries, you can find basic guidance as well as links directing you to help pages for using libraries in specific Creative Cloud apps.
The sections that follow offer a few more tips that you might find helpful.
Store object, table, and cell styles
InDesign features object, table, and cell styles, but these kinds of styles aren’t directly supported in libraries. You can, however, store them in libraries for reuse by adding assets that use these styles. For example, to store an object style named Blue Sidebar Text Frame, create a small text frame, apply the object style, then save the text frame as a graphic in a library. Take an extra moment to name the asset in the library as OS Blue Sidebar Text Frame.
Then, to retrieve the object style to use in another document, right-click the OS Blue Sidebar Text Frame asset in the Libraries panel, choose Place Copy, place the text frame somewhere on the pasteboard, and then delete it if you don’t need the frame. You’ll see that the object style is added to your Object Styles panel ready for you to use.
The process is similar for saving table styles: Create a table, apply a table style, and save the table to a library as either a graphic or text asset. Later, place the table from the library, and the table style and any cell styles applied to the table will appear in the Table Styles and Cell Styles panels.
I like to add OS at the start the name of each object style asset I add to a library and TS at the start of each table style asset. This way, all the object styles and table styles are sorted together in the Libraries panel.
Fonts in libraries
If you frequently use fonts from Adobe Fonts, you might find it useful to store references to those fonts in a library. This feature can be useful for building and distributing a corporate style guide, for example, eliminating the need to instruct each user which fonts to activate. It can also be useful as a way to store the fonts needed for a specific project or campaign so that you can quickly activate them when you revisit the project.
On the website, select a font, click the Save To Library button, and choose a library. Then, in the Libraries/CC Libraries panel in InDesign, Illustrator, Photoshop, Bridge, or Express, you’ll see a Fonts category that lists the fonts you just added. You can quickly activate the font by clicking the cloud icon or right-clicking and choosing Add Font (Figure 9).
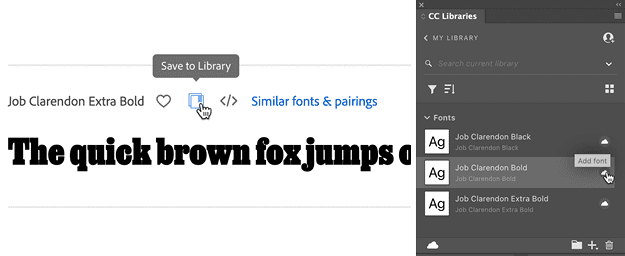
Figure 9. Save a font to a library on Adobe Fonts, and you can then quickly and easily activate and deactivate the font right in the Libraries panel.
Back up a library to local storage
If having libraries of assets stored in Adobe’s cloud environment makes you nervous, you can back up a library to the storage media of your choice. Make sure the Libraries panel is displaying a list of all your libraries, then right-click a library name and choose Export.
A single CCLIBS file will be exported that contains the entire structure of the library as well as each of the assets. You can restore the CCLIBS file back to a library (even on a different computer or for a different user) by choosing Import Library from the Libraries panel menu.
Use libraries offline
In addition to being stored in your Adobe cloud storage, every asset in your libraries is also stored in a hidden location buried deep on your local drive. This makes it possible to work with libraries and library assets even when you don’t have an internet connection. You can place assets from your libraries into your layouts, delete and rename assets, and even add assets to a library. Once an internet connection is re-established, all the local changes to your libraries will re-sync with the cloud automatically.
Keep an eye on the cloud icon at the bottom of the Libraries panel. The appearance of this icon changes when an internet connection is lost or when items are actively syncing to the cloud.
Convert legacy libraries to Creative Cloud Libraries
If you have one or more InDesign Libraries (the “legacy” libraries stored in your local storage as an INDL file), you can choose Migrate Item(s) To CC Libraries from the legacy Libraries panel menu to convert the library to a Creative Cloud Library.
Use libraries with Microsoft 365
The Adobe Creative Cloud Add-in for Word and PowerPoint allows Creative Cloud members to use library assets in Word and PowerPoint, as well as save assets to your libraries from both programs. Graphics, colors, character styles, paragraph styles, and text elements are supported.
Tip: Team Libraries
Creative Cloud for Teams and Enterprise users have access to libraries that are shared with a larger group within your organization as well as individual libraries. These group libraries are indicated by a building icon in the Libraries panel. These group libraries have some sharing features and benefits beyond individual libraries. For example, these libraries aren’t tied to a specific individual’s Adobe ID, so if a user leaves the company, the library lives on.
Give CC Libraries a Try
Armed with these tips and techniques, find ways to integrate Creative Cloud Libraries into your workflow. I’m confident that once you master the user interface and these techniques, libraries will become an indispensable part of your daily work.
Commenting is easier and faster when you're logged in!

Recommended for you

What Good Are Free Fonts?
How to tell if a font is trash or treasure, regardless of its cost.

How to Paste Tables from Microsoft Word or Excel into InDesign
Learn the simple trick for pasting tabular data from Microsoft Office apps into...

QuarkXPress 7 to Run Natively on Intel and Power PC-based Macs
Quark Inc. today announced that QuarkXPress 7, the next version of its desktop p...