
Aligning and Distributing Objects in InDesign
Explore the features of the Align panel in InDesign

This article appears in Issue 23 of InDesign Magazine.
You’ve seen it, or you’ve done it: Leaning into the monitor, staring intently at an InDesign layout zoomed in at 4000% while dragging an object an infinitesimal distance to line it up perfectly with other items in the layout. Stop! Don’t waste your time working by eye. Instead, you need the Align panel (choose Window > Object & Layout > Align). The Align panel is your headquarters for setting up relationships among the objects on your page, letting you line up or distribute (evenly space) selected objects. As we’ll see, many of these features also appear in the Control panel, ready for a quick click when you most need it. InDesign offers some features that can help even more by accelerating page layout. These features go beyond the alignment and distribution capabilities of many vector drawing programs.
Aligning and Distributing Objects: The Basics
The Align panel appears to have two sections, but there are really four: Align Objects, Distribute Objects, an unlabeled pop-up menu that applies to both the Align Objects and Distribute Objects buttons (Figure 1), and a fourth (often-hidden feature called Distribute Spacing, which I’ll explore later in this article.

Figure 1 (left): The Align panel.

button.” width=”461″ height=”348″ /> Figure 2: Aligning selected objects: Before (top) and after (bottom) clicking the Align Vertical Centers button.

Figure 3: Distributing selected objects: Before (top) and after (bottom) clicking the Distribute Horizontal Centers button.
Figure 4: The align and distribute buttons are also available in the Control panel.
Why So Many Distribute Objects Buttons?
Many users are confused by the various Distribute Objects buttons because sometimes, clicking any one of them appears to have the same result as clicking the others. This response occurs when all of your selected objects are the same size. If you select differently sized objects, you’ll see why InDesign provides choices here. The four objects in Figure 5 have different widths, so when I click Distribute Left Edges, Distribute Center Edges, and Distribute Right Edges, the results are different because the distances between the corresponding edges of each object are different.

Figure 5. The Distribute Object buttons produce different results when objects aren’t the same size. From top to bottom, with the affected edge marked in red: Original positions, Distribute Left Edges, Distribute Horizontal Centers, and Distribute Right Edges.
Aligning Objects to the Layout
Centering to the layout is easy and instant, thanks to the pop-up menu at the bottom of the Align panel (Figure 6). Let’s call it the “Align To” pop-up menu. By default, you’ll see that the Align To pop-up menu says Align to Selection. As I mentioned earlier, this means that InDesign aligns or distributes within a rectangle based on the outermost selected objects. In other words, if you click the Align Left Edges button, everything aligns to the left edge of the left-most object. To align objects to the page instead of aligning to other objects, choose Align to Page from the pop-up menu. You can also choose Align to Margins or Align to Spread.
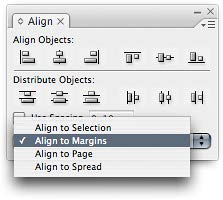
Figure 6: New options in the Align panel pop-up menu simplify tasks such as centering an object on the layout.
A Perfect Layout in Two Steps
You can quickly organize objects on a layout by combining alignment and distribution with one of the options in the Align To pop-up menu. In Figure 7, l’ve dragged four image frames onto the page, but they’re a mess. I want them to be a nice, even row along the top margin. Fortunately, I can straighten this out in only two quick steps.

Figure 7: Four objects laid out in two steps. From top to bottom: original positions, Distribute Horizontal Centers within page margins, and Align Top Edges within page margins.
- In the Align panel, I choose Align to Margins from the pop-up menu, and then I click the Distribute Horizontal Centers button. The left-most object snaps to the left margin, the right-most object snaps to the right margin, and the other objects are then evenly spaced between those two, based on their center points.
- I click the Align Top Edges button. Because the Align panel pop-up menu is set to Align to Margins, the top edges of the objects align to the top margin of the page. And it’s done!
Spacing Objects Numerically
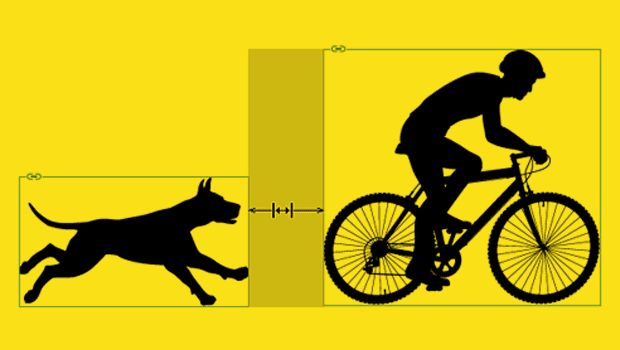
The space between distributed objects depends on their original positions, but sometimes you want to specify a precise amount of space between each object. You can do this with the Use Spacing option in the Distribute Objects section of the Align panel. When you turn on the Use Spacing checkbox and click a Distribute Objects button, the spacing between object edges is the value you enter for Use Spacing. The catch is that the spacing is measured between the same edge of each object, just as you saw in Figure 5. For example, if I turn on Use Spacing, enter 1 pica, and click Distribute Left Edges, this puts 1 pica between the left edges of each object (Figure 8). Unless my objects are smaller than 1 pica, these settings create an unwanted overlap. I’d have to enter a Use Spacing value that’s wider than an individual object. But when the objects are different widths, one value won’t produce even spacing between them. Am I out of luck?
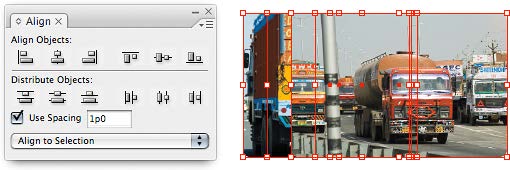
Figure 8: The Use Spacing option for Distribute Objects lets you specify a precise distance between the same edge of all selected objects, which does not account for object widths. Small values result in overlaps.
Aligning and Distributing from the Keyboard
The default shortcut for the Align panel is Shift-F7, but you can change this in the Keyboard Shortcut editor (choose Edit > Keyboard Shortcuts). If you frequently align or distribute objects, you may want direct keyboard access to Align panel features. To see and edit shortcuts to each Align Panel button, choose Object Editing from the Product Area pop-up menu in the Keyboard Shortcuts dialog box. For example, you could assign a shortcut to Align Left or Align Top. Alternately, the Quick Apply feature (press Command-Return, or CtrI-Enter on Windows) also lets you apply an alignment or distribution option. When objects are selected, typing horiz, verti, top, bott, left, or rig into Quick Apply can help list alignment options more quickly. (Assuming, that is, that you haven’t turned off Include Menu Commands in the Quick Apply flyout menu.)
Tips for Aligning and Distributing
If alignment and distribution aren’t working the way you want, see if the following objects and attributes might be factors: Locked objects. When a selection includes a object that’s locked (by using the Object > Lock Position command), all other selected objects align to it. When distributing objects, locked objects won’t move. This can be annoying, but you can take advantage of it. For example, if you want to align the right edges of objects to an object that isn’t the right-most selected object, just lock that object. Stroke weights. Thick strokes affect how objects align. The Align options always use the outside of an object’s stroke. This is not usually a problem unless you change an object’s stroke weight after you’ve aligned the object (Figure 10) or if you wanted to align to the path rather than their strokes. If you have lots of objects and expect to change their stroke weights, plan ahead. You might want to defer alignment until you finalize your stroke weights.

Figure 10: If you change a stroke weight of an object after you align it with others, it won’t be aligned anymore.

Figure 11: Although the text frames of the photo captions are perfectly aligned, the captions themselves are not, because of inconsistent text frame options and formatting applied to the frames and the text inside them.
- The Vertical Justification and Inset options in the Object > Text Frame Options dialog box ›
- The Align buttons, Align to Baseline Grid button, and indent options in the Paragraph panel )
- For tables, the Cell Insets and Vertical Justification options in the Cell Options dialog box
Everybody… Get in Line
Once you unravel the secrets of the Align panel, you’ll find it to be an indispensable tool for fast, precise layout production.
Commenting is easier and faster when you're logged in!

Recommended for you

Tip of the Week: Adding Keyboard Shortcuts for Alignment Commands
This InDesign tip on adding keyboard shortcuts for alignment commands was s...

InDesign How-to Video: Use the Align Panel
In this week’s InDesignSecrets video, Laurie Ruhlin shows off the power of InDes...
Setting Exact Space Between Objects in InDesign
Learn two methods to use when you need a precise amount of space between items i...