
How to Preserve Italics in an InDesign Index
How to use GREP Find/Change to apply formatting to text in an InDesign index


This article appears in Issue 25 of CreativePro Magazine.
If you work on long documents with indexes in InDesign, you may have encountered a common problem where you can’t preserve italics and other character-level formatting in the index. You can only specify paragraph styles to format the index content. So, the italics applied to book titles, film titles, etc., is lost and must be manually re-applied each time you generate the index. However, as is the case with many of InDesign’s shortcomings, clever folks have figured out a workaround, using one feature’s strength to compensate for another’s weakness. In this case, you can use the power of GREP Find/Change to fix your index. It won’t really preserve the italics, but it will allow you to reapply any formatting in one quick step after you’ve set things up. Here’s how to do it. Start by opening the Index panel and locating one of the references where you want to have character-level formatting. Double-click the page number to open the Page Reference Options dialog box. 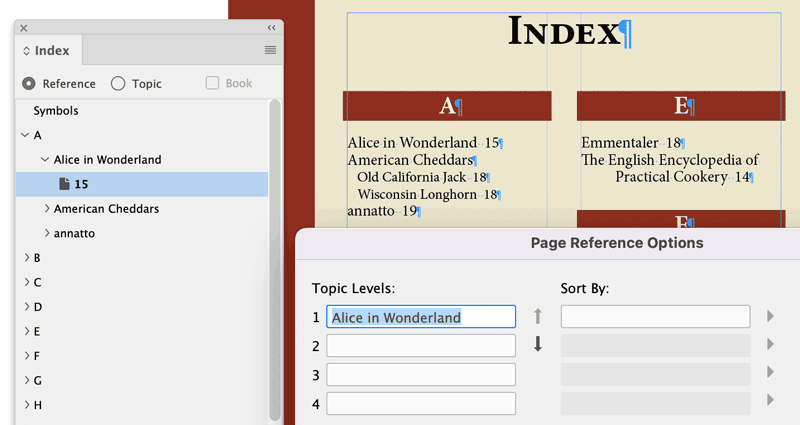 The content in the Topic Levels field is what InDesign will put into the index. We need to put some tags here that we can use as a “hook” to write a GREP Find/Change expression that will apply the right formatting to all such references. You can wrap the reference in whatever tags you like. For italics, I like to use square brackets and a lowercase i. So, I put
 [i] before the title and [/i] after it, like so: 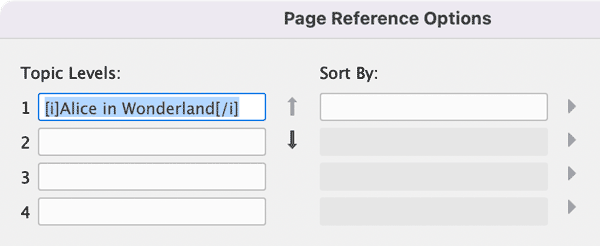
book title” width=”600″ height=”246″ /> But I don’t want the tags to affect the sorting of content in the index. If I left things as they are now, this reference would go into the symbols section of my index instead of the letter A where it belongs. To prevent that from happening, just copy the words for the reference and paste them into the Sort By field.  Click OK to close the dialog box and then click the Generate Index button at the bottom of the panel. The reference is now wrapped in tags.
 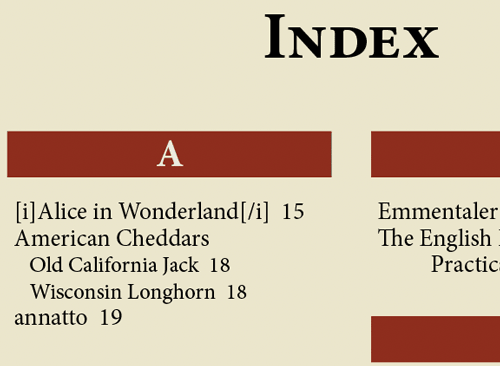 Repeat that process for all references that you need to make italic. Open Find/Change and click on the GREP tab. In the Find What field we need a GREP expression that will find all the tagged index references. It needs to be composed of three parts: starting with one to match the opening tag, followed by one to match any text, followed by one to match the closing tag. Each part gets wrapped in parentheses. So the whole expression is:
 (\[i\])(.+)(\[i\]) Note: square brackets have special meaning in GREP so you must put the backslash before them to tell InDesign you mean a literal bracket. Same goes for the forward slash. (\[i\]) matches the opening tag: opening bracket \[, lowercase i, closing bracket \] (.+) matches the enclosed text: any character . repeated one or more times + (\[i\]) matches the closing tag: opening bracket \[, forward slash , closing bracket\] In the Change To field, enter $2 for Found 2, or the stuff in the second set of parentheses. This is the actual text you want to appear in the index. Click in the Change Format area and choose or create a character style that applies italics (or whatever formatting you need).  Run the Find/Change to replace the tagging with italics.
 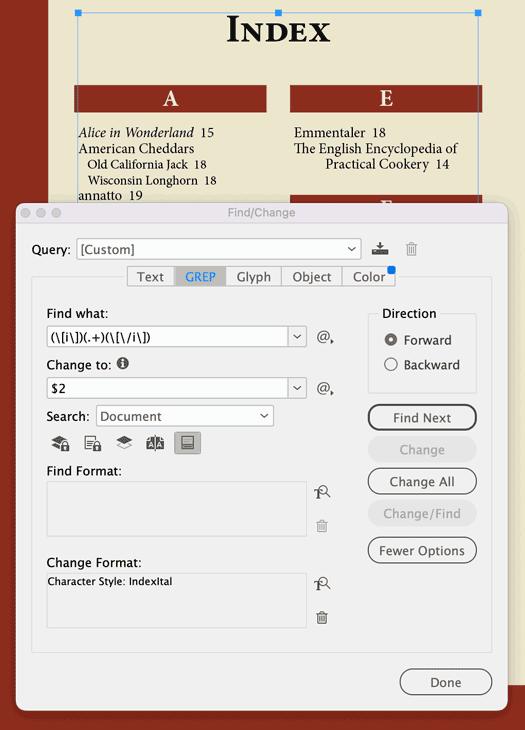 Note: If you generate your index again it’ll overwrite the formatted text with the tagged text. So you’ll have to run the query again to get your formatting back. Tip: Click the button in Find/Change to save the query so you don’t have to rewrite it (or remember it) each time you need to use it. You can simply choose it from the list of saved queries.
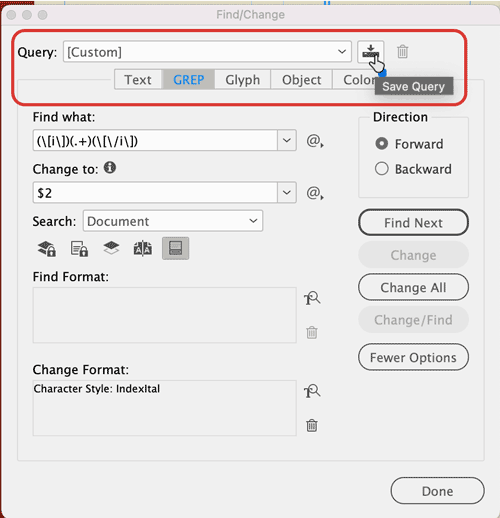
Commenting is easier and faster when you're logged in!

Recommended for you

MoreInfo Improves Notes, Conditional Text, Tracked Changes and More
MoreInfo is a plug-in by Kerntiff Systems that combines information from several...

New InDesign Script to Set Keep Options in Indexes
A new script allows you use InDesign keep options to keep index topics with thei...
IndexMatic<sup>3</sup> Review
The most powerful indexing solution for InDesign just got even better.