
Tips and Tricks: Fall 2023
A roundup of time-saving techniques for Adobe Photoshop, Acrobat, InDesign, Illustrator, and PowerPoint

This article appears in Issue 23 of CreativePro Magazine.
To paraphrase the insurance company tagline, “We know a thing or two, because we’ve been stumped a time or two.” (Or five.) But we’ve learned little tips that make the process easier or the end results better. Whether you’re interested in adding an organic look to your artwork, using features in unusual and clever ways, sharing assets between apps, or getting some help with confusing settings, this collection of tips and tricks will certainly keep your creative engines running smoothly.
Grunge Looks in Illustrator
Whenever you come across a nice worn texture, grab your phone and take a photo. You never know when you might need an image of old wood, rust, or flaking paint to make the perfect grunge look. Figure 1 shows you how.
- I started with my photo of a wooden plank and converted it to black and white in Photoshop.
- I pasted it onto my art in Illustrator.
- I positioned the photo, selected both it and my art, and in the Transparency panel applied Make Mask.
- I adjusted the settings as needed. In this case, I deselected the Clip option.
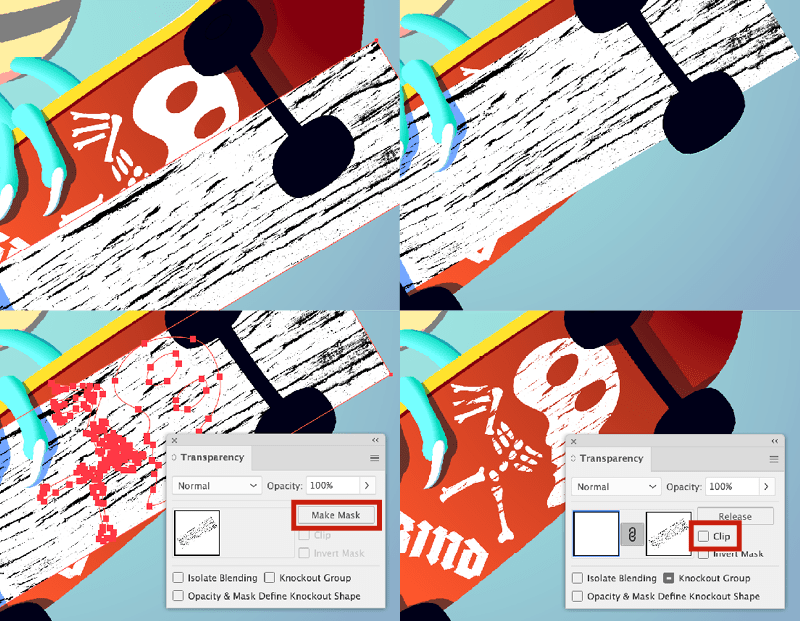
Figure 1. Use photos of everyday textures to add a grunge look to your Illustrator artwork.
Clear InDesign’s Text Transformations
Have you ever seen a type size written like this: 24pt (12.45pt)? That’s an indication that the text has been transformed from its original size (Figure 2).

Figure 2. Parentheses around type size indicate a transformation has taken place.
up when you have:
- Used the Page tool to resize a page and you’ve scaled objects
- Created an alternate layout
- Resized a group of text frames and images (sometimes)
To return this type size back to a single size with no parentheses:
- Select the text frame with the Selection tool.
- From the Control panel menu, choose Redefine Scaling as 100% (Figure 3).

Figure 3. Reset any text transformations back to 0 from the Control panel menu.
Extract Logos from a PDF
You might need to extract a clean version of a logo or other vector artwork from a specific page of a PDF. Here are a couple of ways to do this, depending on how the PDF is constructed.
Method 1
- Open the PDF in Acrobat, and select the Edit PDF tool (or choose Edit > Edit a PDF).
- Select the logo by clicking it or dragging a selection boundary around it.
- Right-click and select Edit Using > Open With, locate Adobe Illustrator in your Applications folder, and click Open. In Illustrator, the logo will appear on a page the size of the original PDF page. Tip: Once you’ve selected a program to open artwork directly in Acrobat, you can select that application directly from the Edit Using submenu.
- You will likely see one or more clipping masks on the page. Select them with the Direct Selection (white arrow) tool, and press the Delete/Backspace key until the entire mask is deleted.
- Select the Artboard tool (Shift+O), and choose Fit to Artwork Bounds from the Select Preset menu in the Control bar at the top of the screen.
- Choose File > Save As to save your artwork.
Method 2
If the logo is difficult to select in Acrobat, try this method.
- Open the PDF in Illustrator.
- Specify the page containing the logo, and click OK (Figure 4).
- Use the Direct Selection (white arrow) tool to select and delete everything on the page except the logo.
- Select the Artboard tool (Shift+O), and choose Fit to Artwork Bounds from the Select Preset menu in the Control bar at the top of the screen.
- Choose File > Save As to save your artwork.

Figure 4. When you use Illustrator to open a multi-page PDF, you must specify the page(s) you want.
Integrate Assets from Other Adobe Apps and Adobe Express
Despite its ease of use, Adobe Express lets you retain a professional workflow without sacrificing quality. You’ll find the process of building Creative Cloud Libraries familiar whether you’re adding assets from Illustrator, Photoshop, or InDesign.
- Open your Libraries panel, then click your designated library (Figure 5).
- Drag your asset from your artboard, layer, or page into your designated folder inside your library.

Figure 5. Choose which library you want to add assets to from the Libraries panel.
Export a PDF to Grayscale from InDesign
Want to see what your InDesign document will look like in grayscale? Preview it.
- Go to View > Proof Setup > Custom, and select Gray Gamma 1.8 from the Device to Simulate menu.
- Choose View > Proof Colors to preview what your document will look like when exported.
- If you’re happy, you can deselect View > Proof Colors.
To export the PDF in grayscale:
- Choose File > Export and choose PDF (print) for the file type.
- Go to the Output area of the Export Adobe PDF dialog box. In the Color Conversion field, select Convert to Destination, then select a grayscale color profile like Gray Gamma 1.8 in Destination (Figure 6).
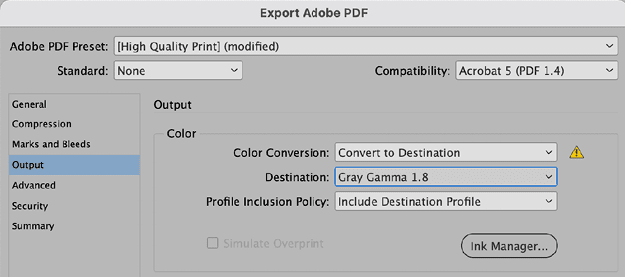
Figure 6. To export a PDF as grayscale, select one of the grayscale profiles in the Destination menu.
Create a Document Zoom Effect in PowerPoint
The Morph transition in PowerPoint works best when it’s subtle, and one of my favorite things to do with it is to momentarily zoom in on a document or schematic (Figure 7).
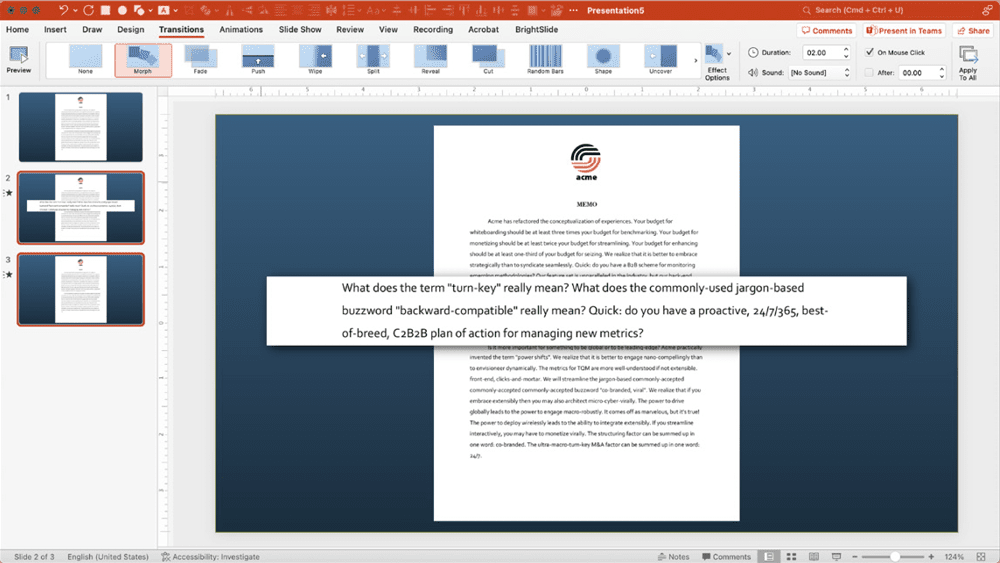
Figure 7. Use the Morph transition in PowerPoint to zoom in on a portion of a document.
- Import an image of your document to create slide 1.
- Duplicate the slide twice to create slides 2 and 3.
- On slide 2: Duplicate the image and align it with the original.
- Crop the duplicated image to the portion that you wish to zoom in on.
- Apply a drop shadow to the cropped image portion, and enlarge it on the slide.
- Under Picture Format, bring the brightness down on the bottom image to de-emphasize it.
- Apply morph transitions to slides 2 and 3.
—Nolan Haims
Set Transparency Flattening in PDFs
Many printers still require you to flatten transparency in PDFs, including blend effects and drop shadows, which are achieved with pixels. Flattening removes any actual transparency while retaining the appearance of transparent elements of your design. PDFs created with a compatibility below Acrobat 5 (PDF 1.4) will flatten transparency. You can control that process in different ways from different programs. Transparency resolution is determined by the Transparency Flattener Preset in the Advanced panel of the respective PDF export dialog boxes in InDesign (Figure 8) or Illustrator (Figure 9). Edit or create custom presets from Edit > Transparency Flattener Presets.
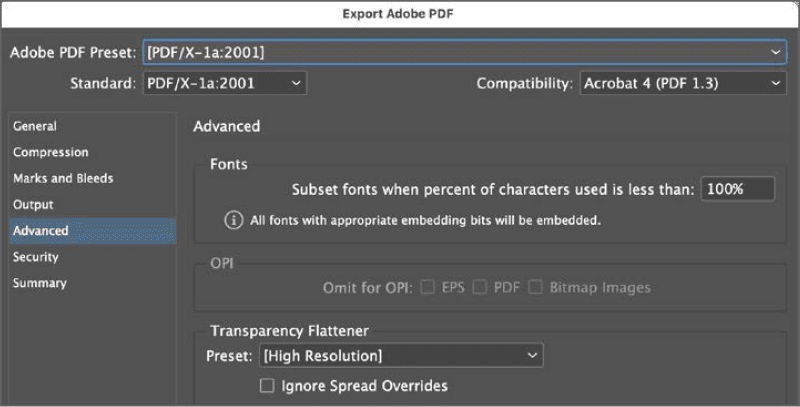
Figure 8. Flattener settings when exporting a PDF from InDesign

Figure 9. Flattener settings when exporting a PDF from Illustrator
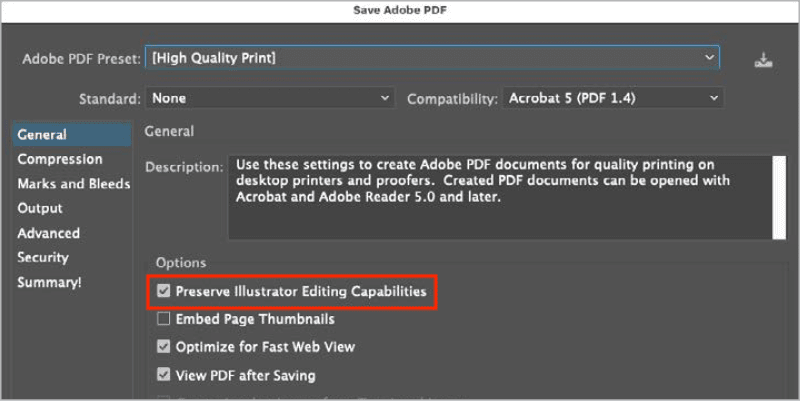
Figure 10. Reduce PDF file size by deselecting Preserve Illustrator Editing Capabilities.
View Photoshop Actions as Buttons
Using Button mode, you can display your Photoshop actions in the Actions panel as buttons. In this mode, you will see only a list of buttons labeled with the names of the actions (Figure 11), reducing all the panel clutter. To run an action, simply click its button.
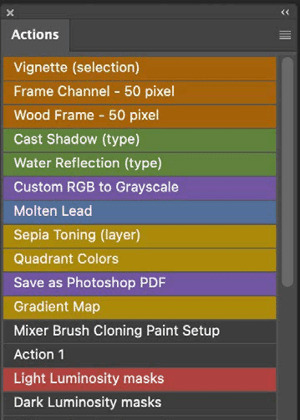
Figure 11. Button mode simplifies Photoshop’s Actions panel.
- Here’s how to switch to Button mode:
- Open the Actions panel.
- Choose Button Mode from the panel menu.
Repeat to deselect Button mode. —Colin Smith
Save Time when Replacing Symbols in Illustrator
Hold Option/Alt while dragging art over an existing symbol in the Symbols panel to replace it globally through your Illustrator document (Figure 12). You can also do so with symbols within the panel to replace one with another.

Figure 12. Option/Alt-drag to replace one symbol with another in Illustrator.
Photoshop Tool Presets and Troubleshooting
Do you constantly change the options for your tools in Photoshop? Set your preferred options, and save the settings with Window > Tool Presets. Right-click the tool icon in the Options bar (the Tool Preset Picker) and choose Reset Tool or Reset All Tools to reset the tool options (found in the Options bar) to their default state. This shortcut is a great way to troubleshoot a tool when it’s not working as you think it should. (Perhaps the tool’s blend mode, feather, or other option was changed the last time you used it, for example.) Note: This shortcut doesn’t reset the visibility or grouping of the tools, only their options. —Julianne Kost
Commenting is easier and faster when you're logged in!

Recommended for you
How to Make Two Items Swap Positions in InDesign
Learn how to transpose two objects in InDesign so they swap positions on a sprea...


How to Customize the Ribbon in PowerPoint
Make PowerPoint work for you, by customizing the Ribbon, hiding tabs you don’t u...