Creating a Contact Sheet or Yearbook Page in InDesign
You have hundreds of images to import into InDesign and limited time? It's easy to automate it!

I’m off to speak at Russell Viers’ Yearbook Extravaganza this week in Germany (that’s not the real name, but I can’t remember it off the top of my head), and so I have yearbooks on my brain. More specifically, the number one problem every yearbook or photographer has: How to take hundreds (or thousands) of images and lay them out your page — in a grid — automatically. Whether it’s a yearbook page or a contact sheet, this simple task seems devilishly difficult in InDesign. Fortunately, there are some great tricks you can use.
First, the most obvious one: Gridify. We’ve discussed this in some detail in a few posts:
- Quickly Create Yearbook-like Image Spreads
- Place Multiple Pages of a PDF In a Grid in InDesign
- CS5?s Gridified Tools Adds a Wrinkle to Drawing Starbursts and Polygons
One of the downsides to gridify, however, is that it really only works with one page at a time. If you have a lot of images, it’s going to get tiresome pretty quickly.
Another method is to use a commercial contact sheet script, such as Image Catalog.
But InDesign has an awesome built-in method to create grids of hundreds or thousands of items, and it’s not hard to set up: Data Merge.
Gathering the Pieces
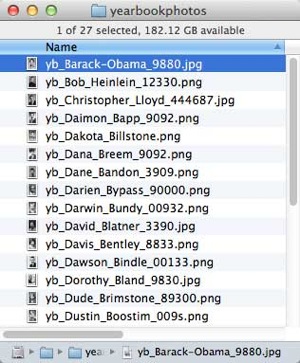
First, we want to place all the images in a single folder. In this case, I’ve ensured the person’s name is in the file name. (You can use Bridge or other tools to batch name files.)

Next, we need a list of all those files, and it would be super helpful if we could get it in a CSV file, ready to be used by Data Merge. Fortunately, we have one, which you can download here. (I think this may have been written by Marc Autret, but I’m not sure? not even sure where I found it.) After you install it, it’ll show up in your Scripts panel and you can double-click it to run it. It asks for the folder, and builds a CSV file for you:

Lastly, you need a template into which you’ll flow your images and names. Here’s a simple one I just built:

The green border in the background is on a master page, so it’ll appear on every page. Then, on the document page, I’ve put a graphic frame and a text frame under it.
Building the Pages
If you’re looking closely, you’ll notice that there’s some text inside the frames you see in the image above. Those are Data Merge tags? to get them you need to first open the Data Merge panel (Window > Utilities > Data Merge). Choose “Select Data Source” from the Data Merge panel menu and point it to the csv file you just made.

To place the tags into the empty frames on your page, just select the frame and then click the tag in the panel. (The image tag needs to go into the graphic frame, obviously.)
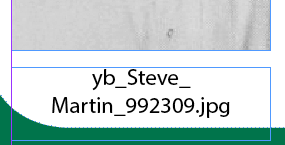
Try turning on the Preview checkbox to see if it’s importing the image and caption properly. Unless the file name is exactly the person’s name, you’ll probably see something like:

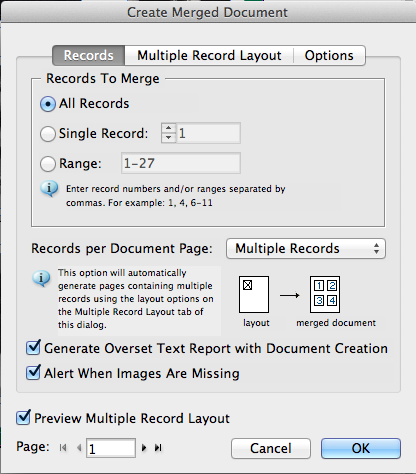
That’s okay, we’re going to process that text to look correct in a moment. But for now — assuming that the image and caption are importing properly — let’s turn off Preview and go ahead and actually merge the file. Choose Create Merged Document from the Data Merge panel menu, and set the Records Per Document Page to Multiple Records:

Next, switch to the Multiple Record Layout tab in this dialog box and set up margins and amount of space between columns and rows. It helps to have the Preview checkbox turned on here, so you can see how it’s going to look on the page:

When it looks right, click OK and InDesign builds a new document from the template you’ve created, importing every image in that folder:

Cleaning Up the File Name Gunk
Okay, I’ve gotten ahead of myself again? in the image above, the names (captions) don’t have all that code in them. How did I get rid of that gunk? You could do a fancy grep-based find/change, but instead, I made a set of grep styles that made that stuff disappear.
We’ve discussed grep styles in detail elsewhere on InDesignSecrets, so I’m just going to show you the codes I used for this particular example:

The “disappear” character style is set to .1 pt, None color, so it just makes that text vanish! The “change to space” character style is similar: it sets the color to None, but changes the horizontal scaling to about 70%. “Disappear” is applied to the text before and after the name; the “change to space” style is applied to the underscore in the name.
Note that these grep styles probably won’t work for you because your file names will be different! Everyone has a different “standard” that they use for file naming. As I said, in this particular case, the people’s names are in the file names.
Of course, you don’t want to change this paragraph style in the document you just built (the one with all the images and captions in it)! No! Close that document and don’t save the changes. Go back to the original template you were working on and apply the grep styles there, then save your template. Okay, let’s add one more thing to the template before you merge again.
Use Object Styles
In order to have maximum flexibility with your files, you should create at least a couple of object styles — one for the caption text frame and one for the graphic frame. After you make these object styles and apply them to the frames, save the template. Now you can choose Create Merged Document from the Data Merge panel menu again!
The cool thing about master pages and object styles is that it’s super easy to change them later if the design changes. For example, here’s the same file, but with a different master page (gray background) and an altered object style:

That’s it! Enjoy!
This article was last modified on August 31, 2023
This article was first published on September 24, 2012
Commenting is easier and faster when you're logged in!
Recommended for you

How to Paste Tables From Word or Excel into InDesign
Bring your Microsoft tables into InDesign with this preference setting trick.

Scanning Around With Gene: Twin-Bed Relationships
Thanks in part to the Motion Picture Production Code, which guided Hollywood mor...

How to Make a Terminator Robot Effect in Photoshop
Arnold Schwarzenegger’s iconic robotic endoskeleton was a defining feature...


