
Graphics Fundamentals: Importing Files into Photoshop

Photoshop has the ability to open dozens of different file formats. Files such as JPEGs and GIFs are easily opened and edited within Photoshop’s ample resources, but there are times when you need to do more than merely open them to make them useful. Sometimes, you’re bringing in a file from an external source, such as a digital camera or scanner. This process, known as importing, allows Photoshop to bring in images from other sources.
Import Guidelines In this article, we’ll look at some of the situations when you need to use importing to get your file into Photoshop. First, we’ll examine the flexible EPS format and tell you why it’s one of the most prevalent file formats used for graphic design. Then, we’ll talk about importing images from your scanner using TWAIN technology. Finally, we’ll look at how Photoshop brings in photos from your digital camera.
Importing EPS Files EPS, or Encapsulated PostScript, is a specially designed file format that allows vector and raster information to be saved together. This means that a single EPS file may contain both images made up of pixels and objects comprised of vector paths. The primary users of this format are graphic designers, who often need to bring their artwork into Photoshop for finishing touches after designing it in illustration programs such as Adobe Illustrator or Macromedia FreeHand. However, since most graphics applications can save in the EPS format, it has become the bridge into Photoshop for many applications that can’t save files as a standard file format such as TIFF or JPEG.
Rasterizing Your EPS File While you can open an EPS using the Open command on the File menu, it’s treated differently before being processed as an image. When you open an EPS file in Photoshop, the vector paths are converted to pixels. Because EPS files don’t save any specific resolution or size data, you must tell Photoshop how to open this file by inputting your desired settings. This process is known as rasterization, which is often used in the Photoshop world. To rasterize an EPS file, first launch Photoshop and select Open from the File menu. Locate your EPS file (with the .eps file extension) and click Open. The Rasterize Generic EPS Format dialog box displays, as shown in Figure A. This dialog box allows you to enter the data Photoshop needs to rasterize the file. You can set the width, height and resolution of your file using the text boxes and dropdown menus.
 Figure A
Resolution Considerations Before we continue, let’s have a quick word on resolution. EPS files aren’t saved at any specific resolution. This means that the vector elements in your file can be rasterized at any resolution without any loss in quality. However, if your file contains any raster elements (images), you can only rasterize the file in Photoshop at the maximum resolution of the images. Anything beyond that maximum resolution results in pixelation, which means your image data has been stretched too far. Note: If you’re unsure of what the maximum resolution of your placed images is, the easiest way to find out is to open them in Photoshop, independent of the EPS file. Once opened, select Image > Image Size and note the number in the Resolution text box. That’s your maximum resolution for that image. Make sure you check all of the images contained in your document, using the lowest resolution as your rasterizing target point. When choosing the resolution for your EPS file, first consider the existing resolution of the raster images in your file, then decide the target resolution of your file. For example, if you’re printing on an inkjet printer, 300 or 600 dpi does fine. If you’re prepping an image for the Web, 72 dpi is the standard. Don’t add unnecessary file size that can bog down your computer. Remember that you can always start over if you aren’t satisfied with your results.
More EPS Options There are more options in the Rasterize Generic EPS Format dialog box that deserve note. The first is the chance to designate the color space of your file. This is an important choice because color is rendered differently depending on its color space. The main color spaces are RGB (Red, Green, Blue) and CMYK (Cyan, Magenta, Yellow, Black), Grayscale and LAB (Luminosity, Alpha, Beta). For 99 percent of your EPS files, you’ll use RGB and CMYK. The rule of thumb is RGB for the Web and CMYK for printing. Photoshop can also control the amount of pixelation in your images when rasterizing. If you select the Anti-aliased check box in the Rasterize Generic EPS Format dialog box, Photoshop smoothes the rough edges between pixels to make them blend together. This almost always results in better looking images, so make sure this option is selected. When you’re done making your choices, click OK to rasterize your file. Photoshop uses the in-formation you entered to process the EPS information and brings the file to your screen. Once it’s opened in Photoshop, you can save it in any file format you desire.
Importing Files from Your Scanner While EPS files used the Open menu to initiate the import, bringing files in from external sources requires using other menu items. In the case of scanners, a special technology known as TWAIN is used. Almost every scanner comes with a TWAIN-compliant driver for Photoshop. A TWAIN driver allows the scanner and Photoshop to speak the same language, and also puts the control over how the scanner performs in your hands. TWAIN driver user interfaces vary between manufacturers, but you’ll always find them on the same menu. Open the File menu and choose Import. If you’re using Photoshop 6 and have scanner software installed, it will be listed here by manufacturer and model name. If you’re using Photoshop 5 or 5.5, you can access your scanner software by choosing File > Import > Twain Acquire. In figure B, the last two entries in the menu are TWAIN drivers loaded on our hard drive as they appear in Photoshop 6. You might have more than one scanner listed if you have multiple scanners installed on your system.
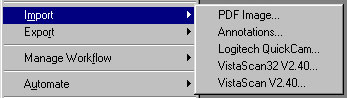 Figure B
Once launched, each scanner has different options and methods for scanning your image. Our scanner software, shown in figure C, loads within Photoshop. It gives us the ability to set the resolution and size of the scan, as well as make image adjustments before our image is imported. Most scanner software allows you to designate the area of the scanner glass you’d like scanned. It’s a good idea to only scan what you need or you’ll be waiting longer than you have to for your scan to complete. Once you’ve made your choices, you can click Scan to import the image. Once the image is loaded into Photoshop, as with EPS files before, you can save the image to any file format you choose.
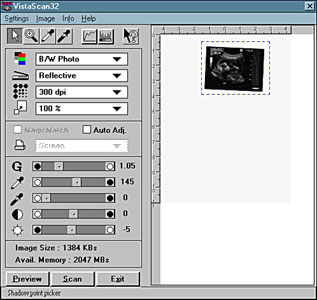 Figure C
Importing Files from a Digital Camera Importing pictures from a digital camera isn’t much different than importing from a scanner. Digital cameras store images in their internal memory or on removable storage devices such as compact flash cards. You can import these images in two ways: with the use of an external reader or by using plug-ins to bring the infor-mation directly into Photoshop.
Using Card Readers for Importing Digital Images Since many digital cameras use removable storage media, having a reader that can quickly transfer your images to a computer is a must-have for many digital camera enthusiasts. While fast USB and Firewire connections have made the transfer of images directly from the camera much quick
er, storage capacity on many memory cards has also increased. Card readers work just like a disk drive-you simply choose Open from the File menu in Photoshop, locate your card reader and select the image or images you’d like to open. Importing your images into Photoshop using a card reader is fast and relatively foolproof.
Using Plug-ins for Importing Digital Images Many camera manufacturers also include a plug-in that allows direct access to the digital camera using some sort of connection. This connection ranges from USB, serial, Firewire and even Infrared. A plug-in is a third-party application that’s compliant with Photoshop (or whatever program it was created to work with). These two applications run together to achieve a goal, usually to create special effects or increase productivity. In our example, the plug-in allows us to communicate with a digital camera and import files directly into Photoshop. Plug-ins for digital cameras, similar to scan-ner TWAIN drivers, are accessed using the Import menu. In our example, we’re using a Web cam to snap some quick images. The camera is connected to the computer with a USB cable, so we could use the standalone version of the software to snap the image, save it to our hard drive, and then open it in Photoshop. However, using the plug-in offers a much more streamlined approach. When using our Web cam plug-in, we first choose Import from the File menu and locate our camera from the dropdown list. Once launched, the camera software opens. This plug-in was made to work in Photoshop. As shown in figure D, we get a live preview from our camera, an image size picker and a snapshot button that initiates the import of the image. It couldn’t be simpler!
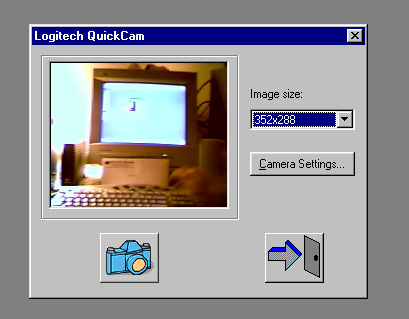 Figure D
While we don’t get all the image control options we normally get in the full-blown application, it’s no big deal; we can adjust our image in Photoshop. Plug-ins aren’t meant to replace functionality in Photoshop, but to enhance and add to the possibilities. You may have a still digital camera that works in a similar way. Many cameras have features that allow you to control your camera from your computer and transfer the images immediately to Photoshop. This is another good example of how using plug-ins to import images can extend the functionality of this image-editing application.
Import Wrap Up Photoshop can open almost any image file format. Those that it can’t open can usually be imported using several different methods. Whether you’re bringing in a file from your hard drive or importing images from a camera or scanner, understanding how to import images to Photoshop gives you many options for using the application to its fullest.
This article was last modified on February 27, 2025
This article was first published on May 2, 2013
Commenting is easier and faster when you're logged in!

Recommended for you

Stop Hyphenating Across Columns and Page Breaks
Luke wrote: I wondered if there was any way of stopping InDesign from hyphenatin...

Rorohiko Ltd. Releases 'Lightning Brain ImpositionCompanion for Adobe InDesign'
Rorohiko Ltd, a software development and consultancy company targeting the prepr...

Scanning Around With Gene: The Art of Sewing
When I grew up I was the youngest of three children with two older sisters. This...