
20 Tips From CreativePro Week 2020
Erica Gamet shares her favorite tips from an unprecedented online event.


This article appears in Issue 135 of InDesign Magazine.
When it was announced last year that the 2020 CreativePro Week conference would be held in Austin, I’ll admit that I was not looking forward to experiencing the summer heat in Texas. As a former resident of the Lone Star State, I know whereof I speak. But little did I know that I wouldn’t have to sweat it (literally) as CreativePro Week would be transformed from an in-person event into an online one due to the COVID-19 pandemic.
The conference—which was held via Zoom with hardly a change to the original agenda—may have looked different, as we were all glued to our computer screens (Figure 1). But it was still packed with all the same amazing speakers giving sessions overflowing with useful information. The bounty of knowledge was just as generous as the in-person event, and the format allowed me to peek in on more sessions than ever.
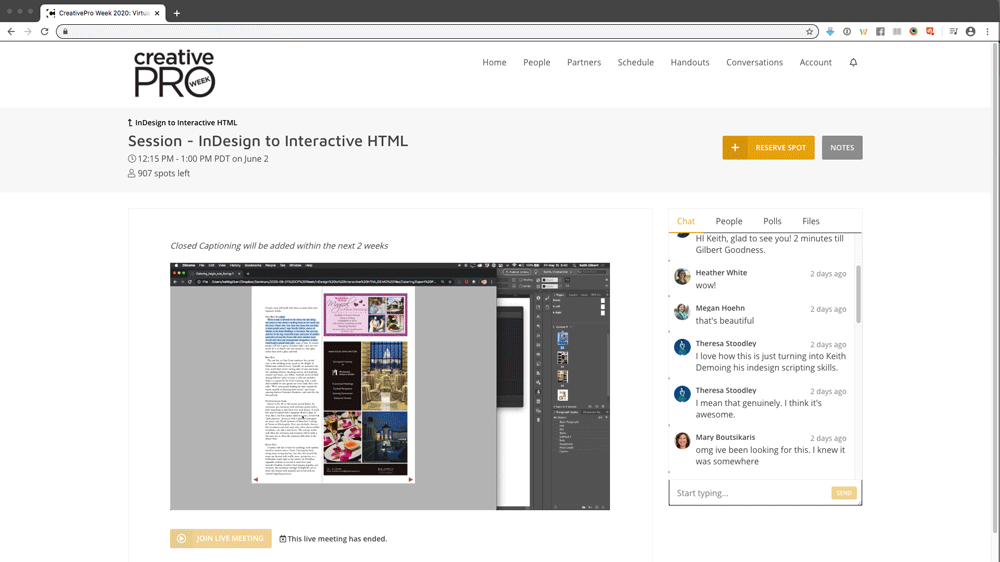
Figure 1. CreativePro Week was all online this year, but still packed with sessions by great speakers, a wealth of information, and even community participation.
I’ve gathered up a few of the yummiest tips and tricks to share here and I can’t wait to dig into the sessions that I didn’t catch in their entirety. I’m sure I’ll have more goodies to share down the road…and look forward to attending the 2021 event in person in Washington, D.C. (fingers crossed).
Adobe Bridge Magic
David Blatner used one of his favorite InDesign “plug-ins”—Adobe Bridge—to find all documents that use a particular image. In Bridge, make your way to the enclosing folder you want to search (TIP: Don’t search your whole hard drive, keep the search focused). Then choose Edit > Find and set
the criteria to search InDesign document types, click the “+” to also search all metadata that contains the name of your image, and set it to match if all criteria are met. Click Find, and then wonder why you haven’t been doing it this way all along. Or is that just me wondering that?
Pasting Content, Not Frames
Jason Hoppe explained the right way to paste an image from one frame to another. Make sure you have the image you want selected with the Direct Selection tool, then copy or cut it. Select the new frame and choose Paste Into from the Edit menu. If you select the original with the Selection tool, you’ll be pasting the image as well as its containing frame into the new frame.
Replacing Images
Bart Van de Wiele clued us in on how to paste an image inside a frame that is currently occupied with another image. If you choose to place an image (Command/Ctrl+D) and don’t have Replace Selected Item selected in your Import Options, clicking on a frame with an existing image will just place the incoming image in a new frame of its own. But not to fear! With the loaded place cursor, press Option/Alt as you click the existing frame and the content will be replaced.
Instant Templates
Here’s a tip I mentioned in one of my sessions. I’m including it here because I only recently learned about it and a few other seasoned pros were also unaware of it. It’s the simple, yet time-saving act of changing file types in the Finder or Explorer. To quickly convert a regular InDesign document to a template file, simply change the file extension from .indd to .indt. No need to open up the document and export. That’s it! Who knew you don’t even need InDesign to create an InDesign template?
Captions Only When You Need Them
Laurie Ruhlin explained how to create a photo caption that only appears as needed in an interactive document. Start by creating the buttons—text or icons—to hide and show the caption. Next, create the text frame with the caption, setting any necessary opacity options (Figure 2).

Figure 2. Creating a dynamic caption that appears on command
Use the Buttons panel to convert all three to buttons, name each, set the action (by clicking the “+”) to Show/Hide Buttons and Forms, and set the visibility to be triggered by each button (Figure 3). Be sure to set the close and caption button as “Hidden Until Triggered.”

Figure 3. The Buttons and Forms panel
Libraries of Your Favorite Fonts
Anne-Marie Concepción gave us a great way to create a list of favorite fonts—even inactive ones—using CC Libraries. Since libraries don’t allow a font to be a library item on its own, make it part of a character style instead. Style some text using the favorite font, then create a character style with only the font defined. Be sure to turn on Add to CC Library in the New Character Style dialog box. You can even create a library just for your favorite fonts. Add other existing character styles by clicking the “+” in the CC Libraries panel and rename as needed. Then you can activate your favorite Adobe fonts from within the library.
Moving Table Rows and Columns
Even as someone who uses tables a lot, I always learn something about them from Keith Gilbert. This time I learned that you can easily move columns or rows to a new location within the same table. Just select the entire row or column (or several) with the Type tool, and drag into the new location (Figure 4).

Figure 4. Duplicating a column and moving it
Add in the Option/Alt key to duplicate a row or column. If it’s empty rows and columns you need, press the Option/Alt key while dragging the bottom boundary of a row or right side of a column (Figure 5). The further you drag, the more rows and columns you’ll create!
Figure 5. Adding empty rows to a table
Recording Find/Change Queries
If you’re intimidated by the handy FindChangeByList script, which executes multiple find/change queries at once, then this other script is for you. The RecordFindChange script does what the name says: It records what’s in the Find/Change dialog box. Put in all the query parameters in the Find/Change dialog box (no need to execute the search), then run the RecordFindChange script. You can then paste the generated text in the FindChangeByList script text file and never worry about typos in the code.
Keeping Table Formatting When You Update the Data
Keith Gilbert offered up a little gem on updating table info. Let’s say you have data you’ve copied from an Excel spreadsheet and it needs to replace info in an InDesign table. The problem is, if that table is already formatted, bringing in the new data will lose that formatting. To solve this problem, Keith points us to the Preferences panel, in the Clipboard Handling section. Choose Text Only in the “when pasting tables” option. Then select the entire first cell of the formatted table. When you paste the text, it will retain all the existing formatting!
Masking With Type
David Blatner showed a quick and easy way to make a mask with type that remains editable. This lets you punch a hole through a portion of an image and see what’s beneath. Place your text on top of the image you want to knock out and set the Opacity slider to 0%. Group the text frame and the image below it, and go into the Transparency option in the Effects panel (Window > Effects). Select Knockout Group. Anything behind the image/text group will show through the text (Figure 6). You can actually use this method on all sorts of objects in InDesign, in addition to text.
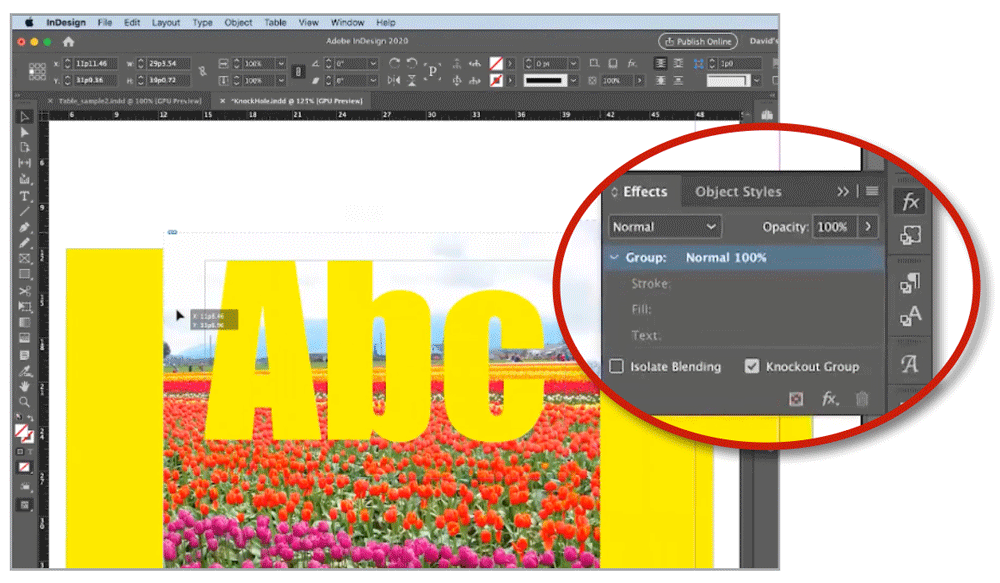
Figure 6. Knockout Group punches a hole through the image.
Tri-Folds Made Easy
Chad Chelius demonstrated his method for quickly creating a tri-fold brochure layout. Create a one-page letter document, landscape orientation. Select the page with the Page tool, and in the Control or Properties panel, change the width to 3.6875″. Now duplicate that page twice and change the third page’s width to 3.625″ using the Page tool (this will become the inner flap). In the Pages panel menu, deselect Allow Document Pages to Shuffle, select all three pages, and drag page 2 just to the right of page 1. Duplicate the spread and reverse the page order to create the other side of the tri-fold.
Making Duotone Effects Without Photoshop
Bart Van de Wiele has a quick way to create a duotone effect, without ever touching Photoshop! Start by placing a grayscale image in InDesign. Next, select the frame that contains the image and apply a color fill from the Swatches panel. You should see that color wherever there is white in the original image (Figure 7). Now select the image itself using the Direct Selection tool and assign a fill color, which will become the darker areas of the image. You can even duplicate the image and assign different colors to each instance.

Figure 7. Creating a duotone effect by filling the frame with a color and assigning a color to the image
Bookmark Best Practices
Laurie Ruhlin had a couple of quick tips regarding bookmarks in files destined for PDF. To start, when creating a table of contents in InDesign, enable Create PDF Bookmarks in the TOC dialog box. This will ensure those bookmarks will appear in the finished PDF. She also points out that creating and setting up bookmarks in InDesign is better than creating them in Acrobat. If you have to re-generate the PDF, those created in InDesign will be re-created; any created in Acrobat would need to be re-built.
Naming Form Fields
Speaking of Acrobat, Richard Turner-Jones discussed best practices for creating Acrobat forms in InDesign. Two things he stressed were consistency and uniqueness in naming the form fields. Each field needs its own distinct name, otherwise the field data would populate into multiple fields. In addition, those fields should not have spaces in their names and he suggests using underscores in place of spaces. Though InDesign and Acrobat can handle the spaces, many places where that data might end up cannot, so best to play it safe.
Grayscale FX
Another tip on manipulating images right inside InDesign comes from Jason Hoppe. This one lets you create a quick black-and-white version of a color image. Place your color image in InDesign, then create another frame the exact same size right on top. Fill that frame with solid black, and head up to the Effects menu (Window > Effects). In the Blending mode menu, choose Color. You can even adjust the Opacity slider to affect the image’s saturation. Since this doesn’t create an actual grayscale image, it works best in RGB documents for digital output.
Portable Paragraph Styles
Discovering cool new scripts brings a tear of joy to my eye, and this handy script that Chad Chelius mentioned did that for me. It’s called StyledListOfStyles (which sounds like a 1950s variety show title, but I digress). This little freebie add-on creates a listing of every paragraph style in your document… even if it’s not being used. But wait, there’s more! The styles are displayed in the matching paragraph style formatting (Figure 8). Copy the text frame it creates and paste it into a new document to bring over all of the paragraph styles at once.
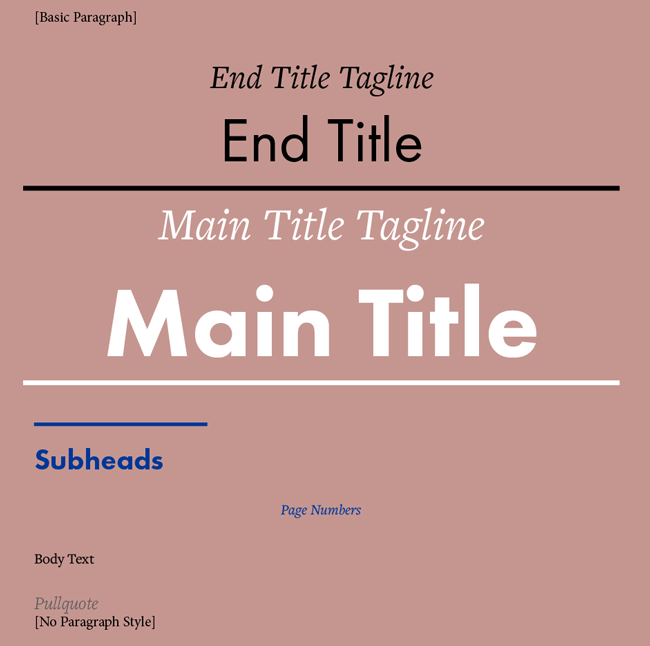
Figure 8. Styles used in the document displayed using each style, after running the StyledListOfStyles script
Protecting Master Page Content
Nervous about co-workers accidentally changing master page elements on document pages? Chad Chelius showed how to prevent that from happening. First, select the object on the master page. Then go to the Pages panel menu and choose Master Pages and deselect Allow Master Item Overrides on Selection (Figure 9).

Figure 9. Turn off Allow Master Item Overrides on Selection in the Pages panel menu to prevent accidental changes to master page content.
Changing Page Numbering
In her session on Design and Layout for Print, Kladi Vergine showed the quickest way to change page numbering at any point in your document. In the Pages panel, right-click the page when you want to change the number or its style and choose Numbering & Section Options (Figure 10).
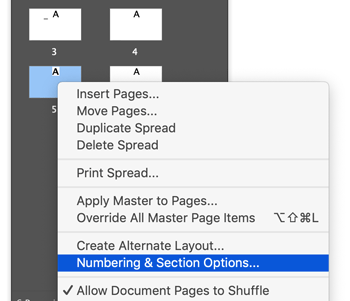
Figure 10. New page numbers are just a right-click away.
The Key to Using InDesign Styles in Photoshop
When it comes to CC Libraries, you may have trouble bringing text styles from InDesign into Photoshop unless you know the trick that Bart Van de Wiele showed. You need to create a character style with the formatting you want, and add it to a CC Library since Photoshop cannot make use of InDesign paragraph styles.
Sleuthing Stylistic Sets
In many fonts, the stylistic sets which offer additional glyphs are not named. So when you go to the Open Type menu, you get a generic list that’s pretty much useless. But as David Jonathon Ross pointed out, if you’re willing to spend some time exploring, you can use the Glyphs panel to decipher what each stylistic set does. Just choose a set from the panel’s Show menu, and you’ll see only the glyphs in the set (Figure 11).

Figure 11. Even cryptic stylistic sets can’t hide their contents in the Glyphs panel.
Until We Meet Again…
I hope you found some helpful little morsels amongst these tips. This is just a tiny sampler platter of the five-day, multi-course meal that was CreativePro Week 2020. And even though it was a virtual banquet this year, I look forward to breaking bread—both metaphoric and carb-laden—with many of the creatives at next year’s event.
Commenting is easier and faster when you're logged in!

Recommended for you

Nashville Notes: Hatch Show Print
For a designer, no trip to Music City would be complete with a visit to this ico...

Tip of the Week: Setting How to See and Edit Overset Text
This tip was sent to Tip of the Week email subscribers on May 21, 2015. Sign up...
InDesign Magazine Issue 66: Workarounds
We’re happy to announce that InDesign Magazine Issue 66 (October, 2014) is...