

That night began like any other: I sat alone in my office, the buzzing streetlights casting flickering bands of color across my desk. I had just swallowed my last shot of cheap instant coffee, feeling it burn its way down my gullet, when she walked in.
The Client.
Maybe “walked in” isn’t the right phrase. She had more curves than a Bezier tool, and she flowed in with the supple grace of a placed story moving through threaded text frames. Her eyes were rich black, a full-on CMYK mix of deep, mysterious ink. Her smooth skin was like aqueous varnish on ultra-smooth paper. Most striking of all were her lips. I knew instantly what must be written on the cap of her lipstick tube: PANTONE 1797 C.
“You’re a private design investigator,” she said, her voice the sultry hum of a high-speed offset press turning out a six-color job.
“I am. How can I help you, Miss…?”
She continued, as if I hadn’t spoken or wasn’t worth the gift of her name. “I’ve lost my cast shadow. I need you to find it.”
By way of demonstration she glided across my office. Wherever she stepped, a soft pool of darkness stayed directly below her. That drop shadow pooled about her spiked heels like a bad mood. It was Multiply blending mode, I knew. And it wasn’t a true shadow.
This woman didn’t trail a cast shadow, only a cheap imitation.
“Find it for me,” she purred. “This” — she dropped a thick envelope embossed with the initials CMYK on the closed lid of my MacBook — “should be enough.”
Without another word, she strode back to the door of my office, opened it, and was gone.
The Trail to a Cast Shadow
It took me a few hours of pounding the pavement, squeezing every gutter rat snitch I knew, to piece it together. Anyone could get a drop shadow in InDesign, but a real cast shadow took some doing. I had to go all over the application, looking in all-but-abandoned menus and seedy dialog boxes, but I had it. I had my client’s cast shadow.
The secret was in text variables. Once a snitch — a retired fence named Micky Matchprint — turned me on to where to find text variables, the rest was simply connecting the registration dots.
The trick, Micky explained, was to define the source as a text variable. So I went to the Type menu, then to the Text Variables submenu, and then into the Define dialog (Figure 1). Once there I hit the New button.
Figure 1. The Text Variables dialog box in InDesign CS3 and CS4.
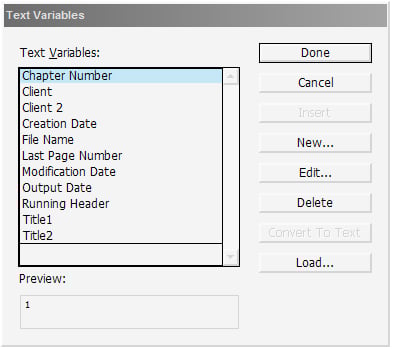
Then I described my client. Name: “Client”. Type: “Custom Text”. Text: “Mystery,” because I had begun to call her Ms. Mystery for lack of a real name.
I clicked OK and found “Client” now listed in the Text Variables dialog. I clicked Done and got out of there.
Heading out to the pasteboard where I could work free from prying eyes, I created a new text frame.
With my Type tool in hand, I clicked inside the text frame and went back to Type > Text Variables but bypassed the extension for Define. Instead I navigated through to Insert Variable and called up Client (Figure 2). Instantly the pseudonym I’d given my client, “Mystery,” appeared in the empty text frame. I could call her up again any time, from any page and place in the current document.
Figure 2. Selecting the desired text variable from the menu. Click on the figure to see a larger version.

Before proceeding, I styled the type, which, though actually the content of a text variable, is in all other respects just normal text (Figure 3). It’s not possible to adjust individual characters in a text variable, but I could style the entire word or phrase.
Figure 3. Text variables are simply text and can be formatted just like plain text.

Making a duplicate of the text frame through copy and paste, I positioned the copy directly beneath the original, and then flipped it vertically with Object > Transform > Flip Vertical (Figure 4). The result was a mirrored image of my client’s nom de guerre.
Figure 4. A mirror image, both text frames contain the same text variable.

Leaving the first copy a solid color, I filled the second with a black-to-white gradient, rotated 90 degrees. Then I used Object > Transform > Shear to shear, or skew, the lower text frame 60-degrees horizontally. The result was my client’s cast shadow (Figure 5).
Figure 5. After filling with a gradient and shearing, I have a workable cast shadow.

Of course, that would only work if my client were standing on a white background. If not, then even a half-blind production manager would notice that the shadow doesn’t fade into the background (Figure 6).
Figure 6. The gradient cast shadow doesn’t look so hot when the background colors differ.

For better compatibility in any setting, I changed the fill of the shadow text back to solid black, and then used a trick I picked up working another case. Object > Effect > Gradient Feather in InDesign CS3 and CS4 creates true transparency in the form of a gradient rather than a simple solid-to-solid faux transparency. Figure 7 shows the settings I used, and Figure 8 is the result.
Figure 7. Setting a gradient feather effect. Click on the figure to see a larger version.
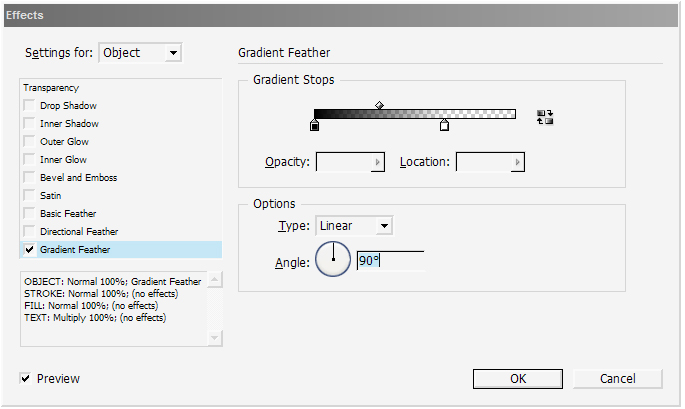
Figure 8. A real cast shadow, interacting with its background.

Just for good measure, I also set the blending mode of the text to Multiply via the Effects panel.
After a quick call to Ms. Mystery, I packed up my document and hailed a Library panel taxi back to my office. It was time to give the client what she paid for — after she gave me the last piece of the mystery, of course.
Solving Ms. Mystery’s Variable
She was waiting for me when I got back to the office. I laid out all the steps until there was a shadow on the floor in front of her, cast by the light filtering through the glass of my office door from the hallway ceiling lights. Except the shadow looked nothing like her.
“It isn’t mine,” she said quietly.
“Nope, “ I agreed. I didn’t say anything else; I didn’t need to. She knew what was required to complete the job, and only she could provide it. The tense silence stretched on like a workday in a pre-press shop when the imagesetter is down for repairs. How badly did she want her cast shadow?
“It’s Registration,” she murmured. “My name is Registration. Miss.”
I nodded. That’s what I’d been waiting for — her real name.
I went back to Type > Text Variables > Define, but this time I selected “Client” from the list of text variables and pressed the secret code button that would enable me to finally wrap up this case: Edit.
In the Edit Text Variables dialog box I replaced “Mystery” with the client’s real name, “Miss Registration.” I clicked OK, then Done. Instantly both text frames changed to read “Miss Registration” — the first the client herself, the second her cast shadow.
Micky had said the key was text variables. Storing the client’s name in the text variable definition and then using the text variable itself in the two text frames would make both of them instantly update to reflect changes in the variable definition. I could have created two or three or more other cast shadows — perhaps corresponding to other light sources — and they would have all changed simultaneously just by redefining the text variable (Figure 9).
Figure 9. Unlimited copies of the text variable can be used and all can be changed simply by redefining the variable content. Click on the figure to see a larger version.

Miss Registration barely smiled. She must have been glad to have her cast shadow back — and once she used CMD+G/CTRL+G to group it to herself, it followed her around the room — but you wouldn’t know it from looking at her unruffled exterior. She was a cool customer, this dame. By way of thanks she merely dipped her chin toward me and slipped out the door, shadow in tow.
Another case solved.
This article was last modified on July 11, 2023
This article was first published on January 14, 2009
Commenting is easier and faster when you're logged in!

Recommended for you

Clear Text Overrides from Word Files
WBB wrote:This is an age-old problem for me... How do I get my Word styles to im...

Get the Color You Expect When Printing
Do your press checks come with unpleasant color surprises? Then “Meeting Y...

CreativePro Video: Fix Distorted Perspective in Lightroom
In this week’s CreativePro video, Nigel French shows a quick way to adjust issue...