

As we plunge headlong into the holiday shopping season, you might be asking yourself “What do you buy the digital photographer who already has the basics: a nice camera, a good computer, and a copy of Adobe Photoshop?” That’s easy: cool digital photography gadgets! Whether you’re shopping for someone else, or looking for some ways to improve your own photographic work, the cool hardware shown here should provide you with some new shooting and workflow capabilities.
Portable Hard Disk Storage
At the time of this writing, flash storage cards of all formats are incredibly cheap. But when it comes to price per megabyte, flash memory still can’t compete with a hard drive. If you’re planning an extended vacation or backcountry trip without a computer, or if you simply have photo assignments that require you to shoot lots of images, then a portable, battery-powered hard drive might be a better solution.
Products such as the SmartDisk FlashTrax (approximately $375-$625, depending on capacity), the NixVue Vista ($310 – $550), and the Delkin PicturePad ($350-$400) provide you with a simple portable hard drive backup solution that’s cheaper and lighter than a laptop computer. Stick the memory card from your camera in these devices and you can easily back up the card, then erase it and keep shooting. Many of these devices also have LCD screens that allow you to review and delete images, and some also offer video-out so that you can connect them to a TV and review images at larger size. The FlashTrax can even play back PowerPoint presentations, making it a portable, stand-alone presentation device (see Figure 1). If you shoot in the Raw format, be sure to pick a device that supports your camera’s Raw format.
 Figure 1: The Smart Disk FlashTrax lets you offload images from camera card to hard disk.
Obviously, these boxes are no substitute for a full-blown computer, but they’re much cheaper than an equivalent amount of flash cards, making them ideal for the user who needs portable mass image storage.
Belkin iPod Adapters
If you’ve already got a third-generation iPod, you can use it like the portable hard disk devices mentioned above by simply adding one of two Belkin adapters.
The Belkin Media Reader for iPod ($100) is a flash card reader that works just like the type you might plug into your computer (see Figure 2). Compatible with any third-generation iPod (except for the Mini), the device can read CompactFlash type 1 and 2, SmartMedia, Secure Digital, Memory Stick and MultiMediaCard (MMC). Insert a card and the iPod will automatically copy the contents to its drive. The downside to this gizmo is that it’s slow. Real slow. In our tests, copying a 512 mb CompactFlash card took about 40 minutes and drained a significant amount of our camera’s battery. However, for offloading images at the end of the day, when you’re back at a location with some time and power on your hands, the Media Reader is an effective, affordable solution.
 Figure 2: The Belkin Media Reader turns your iPod into a camera-card-reader-and-hard-drive combo.
The Belkin CameraLink for iPod ($80) acts as a USB adapter that lets you connect your camera to your iPod via a cable, and download images just as you would with your computer. This is a faster solution than the Belkin card reader, but it does require using your camera’s battery power, and it doesn’t work with all cameras. Check Belkin’s compatibility list very carefully before you buy.
If you’ve got an iPod Photo and are planning on viewing the images after you’ve transferred them, you’re out of luck. The iPod Photo can only view images that have been downloaded via iTunes.
Hoodman
Even the best camera LCD screen can be hard to read in bright daylight. If your camera provides only an LCD screen viewfinder, or if you need to review lots of images outdoors, then a Hoodman might be the solution to your remote image-viewing quandries. Ranging in price from $10 to $25, these collapsible cloth or rubber hoods are available for just about every camera out there and you can find a complete selection at www.hoodmanusa.com.
Well-made and durable, these devices provide a more effective, more convenient alternative to cupping your hand over your camera’s screen (see Figure 3). Some even provide magnification that can ease the viewing of especially tiny LCD screens. Be aware, though, that some models require you to glue a special mounting frame onto the back of your camera. Though there’s really no way to do this wrong, you might have a hard time removing the mount, should you ever decide you don’t want it.
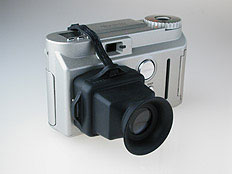 Figure 3: The Hoodman cuts down on glare.
Cubelite
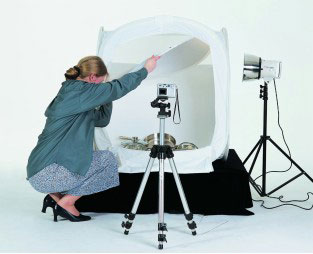
If your job finds you shooting lots of product photos, or if you’re just like to sell lots of stuff, then the Cubelite will make your life much easier. Available in six sizes ranging in price from $600 to $1,900, the Cubelite is a package of accessories designed specifically for shooting perfectly lit product shots in a white limbo environment.
Basically a giant collapsible softbox into which you can put your products, the Cubelite package includes a single light and a reflector for evening out shadows (see Figure 4). Place your object in the box, turn on the light, position the reflector inside the box on the opposite from the light, and you’ve got a perfectly lit product shot. The Cubelite is incredibly easy to use and yields beautiful results. (You’ll also want to check out the Cubelite if you shoot lots of QuickTime VR objects, or use photo modeling software such as RealViz ImageModeler.) Avid eBay sellers would appreciate getting one of these.
 Figure 4: The Cubelite lets you easily get perfect product shots every time.
Olympus Stylus 410
If you live somewhere with miserably rainy weather, or find yourself routinely shooting in somewhat harsh outdoor conditions then you might want to consider a more durable camera. The Olympus Stylus 410 is not as high-end or as weatherproof as a pro SLR, but it also doesn’t cost $8,000, either. A mere $300, this full-featured 4-megapixel point-and-shoot is one of the few consumer cameras that’s been outfitted with weatherproof seals and gaskets that allow it to stand up to splashes and rain (see Figure 5).
What’s more, it yields very nice images and offers a 3x f3.1-5.2 zoom lens, adjustable ISOs, 320 x 240 QuickTime movie mode, and a selection of pre-set exposure modes for getting better exposures in specific lighting situations. For the photographer who likes to play or shoot hard but doesn’t want to worry about rain, sand, or other camera-wrecking forces of nature, the Stylus 410 is a great choice.
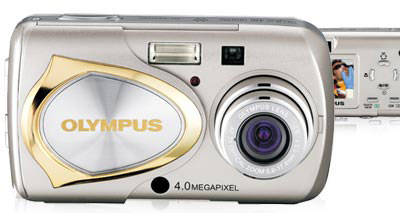 Figure 5: The Olympus Stylus 410 is a weatherproof digital camera for $300.
Lens Filters
Avid Photoshop users are always on the lookout for new Photoshop filter plug-ins, but it’s easy to forget about the other kind of filter, those flat pieces of glass that you can screw onto the end of your camera’s lens to create any number of different imaging effects. Obviously, to use a lens filter, you’ll need a camera that has a lens with threads on the end. These days, many digital point-and-shoot cameras provide threaded lenses, and almost all SLR lenses include lens threads. Some point-and-shoot cameras might lack threads, but provide a threaded adapter that can be attached to the camera using some other type of custom mount.
A filter itself is a piece of glass that alters the characteristics of the light passing through it, without adding any magnification. The most commonly used filters include: UV filters which, in addition to being used simply to protect your lens, can reduce haze in your images; circular polarizers, which are most commonly used to eliminate reflections in a scene or to improve contrast in cloudy skies; colored filters, which are used to improve contrast in a scene; neutral density filters, which cut the amount of light passing through your lens, allowing you to change your exposure options (longer shutter speeds, wider apertures); graduated filters, which can be used to brighten or darken part of your image so as to yield better exposures of, for example, landscapes; and special-effects filters which can apply starbursts, lens flares, and other tacky-graduation-photo-type effects.
If you’re new to lens filters, know that there are differences in quality between filters. Though that $25 circular polarizer might seem like a tremendous bargain, it might also yield artifacts and aberrations that won’t be found in a more expensive filter. Also, although those special effects filters might look like fun, bear in mind that many of the same effects can be created using those other kinds of filters, Photoshop plug-ins. Before you shoot your scene with a bunch of starbursts, you might want to think about shooting it normally, so as to have the option of adding such effects later.
SLR Accessories
If you’ve got a digital SLR with removable lenses, you have access to lots of additional accessories in the form of special lenses and attachments that mount directly to your camera’s body. Not all SLR vendors use the same type of mount for their lenses, so when considering an accessory, you’ll need to be certain that it’s available with the type of mount that fits your camera. Many of these add-ons will be familiar to experienced film photographers, and all of them are compatible with all of the popular SLR lens mounts.
Lensbaby. The Lensbaby is a $99 “lens” that attaches to your camera just like any other lens. Looking like a cross between an extension tube and an accordian, the Lensbaby lets you shoot really beautiful grungy, smeary images. The Lensbaby creates an effect that’s similar to shooting with a long exposure time while simultaneously zooming your lens. The difference is that you can move the point of focus to any part of your frame. The Lensbaby can create stylized images with terrific beauty and dynamism, but if you’re a stickler for clean, sharp images it won’t be for you (see Figure 6). You can see more samples and a full review here.
 Figure 6: Shooting with the Lensbaby results in interesting visual effects.
Reversing ring. Counter to what the name may imply, a macro lens lets you take extremely close-up images of very small things. Unfortunately, most macro lenses also have macro price tags. However, there are a couple of work-arounds that can get macro performance without having to spring for a macro lens.
If you’ve ever looked through the wrong end of a pair of binoculars you know that, when used backwards, a lens can have very different magnification properties. A reversing ring attaches to your camera and provides threads that mate with the filter threads on the end of your lens. The practical upshot is that you can mount your lens to your camera backwards, to achieve of rough simulacrum of a macro lens. The great thing about reversal rings is that they’re small. If you don’t want to carry the weight of an additional lens, you can easily pack a reversal ring instead.
The downside to this whole scheme is you’ll need to stop your lens down when using a reversal ring, which means you’ll probably need a tripod to shoot good shots, and with your lens mounted backwards, you’ll plainly look like a cheapskate who won’t spring for a real macro lens.
Extension tubes. Like a reversing ring, extension tubes are a way of getting close-up capability, with a few caveats, but at a much more affordable price. The main difference between a reversal ring and an extension tube is that an extension tube allows you to capture images that are larger than life size, while a reversal ring produces only actual-size results.
An extension tube sits between your camera and your lens. Rather than adding any actual magnification, an extension tube simply alters the focusing distance of your lens. As you’ve probably already discovered, your lens can’t focus if you get your camera too close to your subject. An extension tube simply lets you get closer than you can when using the lens by itself. The downside to extension tubes is that they tremendously reduce the depth of field in your image. Because the depth of field is so compromised, you’ll need to use a small aperture to ensure sharp focus, which means that you’ll need longer exposure times, which will very often require a tripod. Though no substitute for a true macro lens, they’re a great way to get started with macro-type photography, without having to make a macro economic sacrifice.
Tele-extenders. Just as extension tubes and reversing rings provide inexpensive, alternative “hacks” to more expensive macro lenses, tele-extenders provide reasonably priced alternatives to pricey telephoto glass. Like an extension tube, a tele-extender sits between your camera and your lens, but unlike an extension tube, a tele-extender actually includes optics. The optics increase the magnification in your lens, usually by a factor of 1.5 or 2 times.
The obvious advantage of a tele-extender is that you can get a very telephoto lens while only having to spend the money on a somewhat telephoto lens (and a tele-extender). The downside to tele-extenders is that they degrade the optical quality of the lens they’re attached to. With most tele-extenders, you’ll probably find a decrease in sharpness as well as a decrease in brightness. Very often, you’ll lose one or two stops of brightness with a tele-extender. In addition, some tele-extenders don’t work with the autofocus mechanism of the camera.
As with extension tubes and reversal rings, tele-extenders are no substitute for a dedicated lens, but for users on a budget, they provide a quick telephoto fix.
All the Other Usual Accessories
If you still can’t quite find the right gift, you can always consider the range of more “normal” photography accessories: bags, tripods, external flashes, additional storage cards. Shooting is only half the process, of course, so if you can’t find the perfect shooting accessory, perhaps you should consider some software goodies. We’ll look at some of those options in our next installment.
This article was last modified on December 14, 2022
This article was first published on November 23, 2004
Commenting is easier and faster when you're logged in!

Recommended for you

Image Editing in Lightroom 5: Correcting Overexposed and Underexposed Images
The following is an excerpt from The Adobe Photoshop Lightroom 5 Book: The Compl...

Photoshop How To: Retouch Eyes With Photoshop CS6
When it comes to portrait retouching, a person’s eyes can be the most impo...
Meet the Neo SmartPen: A New Way to Draw
As an artist who specializes in combining traditional and digital tools, I’m alw...