


Good film photographers often have a very thorough understanding of the nature and properties of particular film chemistries — often going so far as to make their own paper and emulsions. Though digital photographers can’t sit around forging their own image sensors, they can still benefit from understanding some of the rudiments of the image sensor technology found in most digital cameras.
Many imaging problems can be avoided by understanding their cause, and often times imaging troubles are caused by fundamental issues within your camera. In this installment of “Framed and Exposed,” we’re going to take a high-level look at what happens inside your digital camera.
Electric Photos
Fundamentally, there is little difference between a brand new digital camera and a traditional film camera. A lens focuses light through an aperture and shutter onto a focal plane. While a film camera has a piece of film sitting on the focal plane, a digital camera holds a digital image sensor on its focal plane. Subsystems can vary from camera to camera — auto focus mechanisms, light meters, storage technologies — but fundamentally, when it comes to image quality, it’s the image sensor that makes or breaks a camera.
Most cameras use either a charge-coupled device, or CCD, or complementary metal oxide semiconductor, or CMOS chip, as an image sensor. CCDs are still far more popular than CMOS chips, but for the most part, the chips work the same way: When you take a picture, the image sensor samples the light coming through the lens and converts it into electrical signals (see Figure 1). These signals are boosted by an amplifier and sent to an analog-to-digital (A-to-D) converter that changes those signals into digits. An onboard computer processes those digits to produce the final image data, which is stored on a memory card of some type.
 Figure 1: Light takes a fairly traditional path through a digital camera, passing through a lens, aperture and shutter. Once it hits the image sensor, a very complex process begins.
 An image sensor is able to sample light thanks to a natural phenomenon called the photoelectric effect in which some metals release electrons when exposed to light. (Albert Einstein won the 1921 Nobel Prize in Physics for his work on the photoelectric effect, thus getting the ball rolling for digital photography.)
To exploit the photoelectric effect in an image sensor, the surface of the chip is covered with a grid of electrodes called photosites. Each photosite corresponds to a pixel in your final image (see Figure 2). Before you shoot a picture, your camera charges the photosites with electrons. Because of the photoelectric effect, when light strikes a particular photosite, the metal in that site releases some of its electrons. Each photosite is bounded by a non-conducting metal, so these released electrons get trapped, effectively piling up inside a little well.
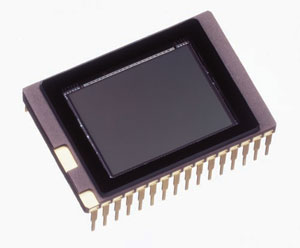 Figure 2: Image sensors vary in size from fractions of an inch up to the size of a 35mm piece of film.
 After the exposure, your camera simply has to measure the voltage at each site to determine how many electrons have heaped up there, and thus how much light hit that particular spot. These voltages are amplified and then fed to an A-to-D converter.
What Color is your Pixel?
Most digital cameras use 12- or 14-bit A-to-D converters. It’s important to understand that a higher bit depth does not give your image sensor a bigger dynamic range. The brightest and darkest colors that it can see remain the same, whether 12- or 14-bit. Rather, the extra bit depth gives you finer gradations WITHIN that dynamic range. How many bits get used in your final image depends on the format in which you save.
Photosites are only sensitive to luminance; they know nothing about color. As such, in its basic state, your camera’s image sensor is only capable of recording a grayscale image. To get color, the image sensor depends on complex filtering and interpolation.
Just as you can mix different primary colors of paint together to make other colors, you can mix the primary colors of light together to create any other color. The difference is that where ink pigments are subtractive — as you mix them they get darker — light mixes additively. As you combine colors of light you eventually reach white.
Your computer monitor works by combining red, green, and blue signals to create every other color (see Figure 3). This is why we refer to TVs and monitors as RGB devices. If you’ve played much with any image editing software, you might have encountered individual red, green, and blue image channels. Combine these channels, and you get a full-color image.
 Figure 3: Red, green, and blue, the primary colors of light mix together together in an additive process that ultimately creates white.
This is exactly how a typical digital camera works, but with an extra complication. Your digital camera doesn’t shoot three complete channels. Instead, it shoots three partial channels, and uses them to interpolate the final color of each pixel.
Every photosite on your camera’s image sensor is covered with a color filter. Most cameras use a combination of red, green, and blue filters, with one row alternating between green and blue, and the next row alternating between green and red. There are twice as many green filters because your eye is more sensitive to green than any other color. This filter pattern is called the Bayer pattern, and it is currently the most commonly used (see Figure 4).
 Figure 4: On most image sensors, each pixel is covered by a separate color filter, either red, green, or blue, arranged in a configuration called the Bayer pattern.
To get from a bunch of red, green, and blue pixels to a final full-color image, your camera employs an interpolation process called “demosaicing.” The final color of each pixel is calculated by analyzing the colors of all of the surrounding pixels. At the simplest level, the process goes something like this: “if the pixel to the left is bright red, and the pixels above and below are bright green, and the pixel to the right is bright blue, then I must be a bright white pixel, because full red, green, and blue makes white.” If you ever hear your camera muttering to itself like this, it’s probably demosaicing.
Make It Better
This might all sound very complicated, but in reality it’s actually far worse. There are a number of extra steps that occur in the basic workflow that we’ve just described, all of which serve to improve image quality. First, the light coming through the lens is filtered by an infrared filter (because image sensors are particularly sensitive to certain red frequencies) and a low-pass filter.
As discussed in the last installment, image sensors are very small, sometimes as small as 1/4 or 1/6 inch. As vendors pack more and more photosites onto the same size chip, the individual sites have to be made much smaller. As each site gets smaller, its ability to collect light gets compromised. This results in a worsening of the chip’s signal to noise ratio, resulting in noisier images.
To help improve the light collecting ability of especially tiny photosites, some chip makers place tiny microlenses over each site, to help focus the light more tightly. Though this can improve signal-to-noise ratio, these filters also cause problems of their own in the form of artifacts in your image.
Because demosaicing is such a gnarly process, camera makers routinely employ different techniques to try to improve color fidelity, and to reduce Bayer interpolation artifacts, which can sometimes appear in the final image. Many vendors choose to use a different color filter pattern for their image sensor such as cyan, yellow, green, and magenta. Since these are primary colors of ink, these filters can be physically thinner than red, green, and blue filters. With a thinner filter, signal-to-noise ratio is improved. Other vendors augment the traditional red, green, and blue pattern with an additional color such as emerald.
Foveon has taken the most drastic approach to the interpolation dilemma. Rather than use any color filtering at all, its image sensor can read separate red, green, and blue data at each photosite.
All image sensors are prone to a “blooming” artifact that occurs if a photosite collects so much light that it overflows into the adjacent photosites. If the camera’s software isn’t smart enough to recognize that this has happened, you will see anything from purple or reddish fringes around bright objects, to smearing colors and flared highlights in your final image.
After demosaicing, your camera performs a number of adjustments to the image data. First, the image is adjusted according to your camera’s white-balance and exposure-compensation settings.
An imaging sensor has a linear response to light — when twice as much light hits the sensor, twice as much voltage is produced. Unfortunately, brightness values are logarithmic so to get accurate brightness values, your camera must apply a mathematical curve to all of its brightness values.
Most cameras also provide user configurable settings for contrast, brightness, and color saturation. These adjustments are performed, and then the camera applies some type of sharpening, while many cameras also employ some sort of noise reduction mechanism, particularly for long-exposure images.
Squish and Save
Finally, with your image processed and munged, the camera’s ready to save the data. These days, all cameras default to saving in JPEG format, though many offer an uncompressed format such as TIFF. Increasingly, many cameras are offering a Raw mode which simply stores the original sensor data on the camera’s storage card. This is the very original data before the camera has even performed any demosaicing. After transferring a raw file to your computer, you can use special software to perform all of the computations that your camera would normally perform — demosaicing, white balance, sharpening, contrast and brightness adjustments.
Raw has several advantages over JPEG. Because it’s uncompressed, you don’t have to worry about your image being marred by ugly JPEG artifacts. Because all of the final processing is happening inside your computer, you can custom tailor everything from white balance to color adjustment, to achieve maximum control of your image.
Finally, most cameras upsample their original 12- or 14-bit data to 16-bits, perform their processing there, and then sample back down to 8 bits before performing their JPEG compression. With raw files, you can choose to work in 16-bit mode to achieve better color fidelity.
The downside to working with raw files is that the workflow is more complicated than working with JPEGs, because you must perform custom processing on each image. Fortunately, with more and more programs — including Adobe Photoshop — providing raw support, raw workflow has become much easier to manage.
It’s a bit easier to choose a film camera than a digital camera, because you don’t have to worry about any particular imaging technology. After all, you’ll make that decision later when you select a film to stick in your camera. With a digital camera, you have to make your image quality decision up-front, when you buy the camera.
Over the next several installments of this column, we’ll be exploring how to evaluate and select a digital camera. In the process of assessing image quality, we’ll be returning to several of the concepts presented here, in an effort to determine how well a camera handles certain common imaging problems.
This article was last modified on January 18, 2023
This article was first published on July 6, 2004
Commenting is easier and faster when you're logged in!

Recommended for you

How to Make Layer Comps in Photoshop
Learn how to create combinations of layers and items in Photoshop called Layer C...

10 Essential Tips for Working With Color Swatches in Illustrator
1. Creating Swatches. To create a process color swatch, select an object with th...

Heavy Metal Madness: I'm Looking Through You. Where Did You Go?
I’m a bit late in this eulogy to a couple of products from Eastman Kodak t...