

It’s been almost a year to the day that Adobe introduced InDesign 2.0. One of the key features of version 2 is InDesign’s ability to create and preserve transparency effects. In honor of that event, we present two stories about transparency. Part one, from Element K Journals, gives an over view of using transparencies, including flattneing. Part two, from Adobe Systems, describes how to use transparency flattener styles for best output results. — Ed.
Creating Transparency in inDesign
With InDesign 2.0, we no longer need to reserve our creativity for image editing and drawing applications. It’s now possible to create transparent effects directly in our page layout application. The Transparency palette in InDesign not only enables us to adjust the opacity level of objects and text to create transparency but also lets us select from a variety of blending modes to control the way layered objects interact with each other. Without ever leaving our InDesign document, we can now do more than just place and position text and objects on our pages, as shown in figure 1.
 Figure 1: The new transparency feature enables us to extend our creativity into our page documents.
Okay. Maybe it doesn’t take much to get us excited but when we first heard version 2.0 features the ability to create transparency, we simply couldn’t contain ourselves. In this article, we’ll first explore the new Transparency palette. Then we’ll create a simple example to see how objects are made transparent in our page documents. In doing so, we’ll become more familiar with each option in the Transparency palette. In addition, we’ll see what all this talk about flattening is when the time comes to print our documents.
Secret Weapon
Transparency in InDesign is created using the Transparency palette, shown in figure 2. If necessary, choose Window > Transparency or press [shift][F10] to display it. If the two options in the lower section of the palette aren’t shown, click the triangle in the upper-right corner of the palette and choose Show Options.
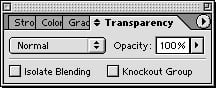 Figure 2: Being able to create transparency in InDesign opens a big bag of new tricks.
The first option in the Transparency palette lets us specify a blending mode, which determines how the selected object, or group of objects, interacts with the color in underlying object(s). Items can interact whether they’re on the same layer or different layers. These blending modes act identically to those found in Adobe Photoshop and Adobe Illustrator.
The next option on the Transparency palette controls the opacity level of the selected item, or group of items. We can either enter a value in the Opacity text box and press [enter], or click the arrow next to the Opacity setting and drag the slider until the desired value is displayed in the Opacity text box.
In the lower section of the palette are two more options that are turned off by default: Isolate Blending and Knockout Group. Isolate Blending mode enables us to apply a blending mode that affects just selected items, leaving unselected items unaffected. The Knockout Group option is just as straightforward. It lets us knock out an area to see what’s underneath the selected item. We’ll cover these two options in more detail a little later in this article.
Getting Started
We can apply transparency to objects and text created in InDesign and images imported from Photoshop or Illustrator but not individual text characters. Nor can we apply one transparency value to the fill and another to the stroke of an item. The selection tool we use determines what becomes transparent. Specifically, an object, grouped object or graphic selected with the Selection tool can be made transparent but, to make an object in a group transparent or to make the contents of a graphic frame transparent without affecting the frame, we must use the Direct Selection tool.
To get a better idea of how transparency works in InDesign, select the Ellipse tool and click on the page to open the Ellipse dialog box, enter 5 in in the Width and Height text boxes and then click OK. Repeat this process to create a 2.5-inch circle and a 3-inch circle, in that order. Color the three circles and position them as shown in figure 3.
 Figure 3: Create three overlapping, colored circles for use in this demonstration of transparency.
Selecting a Blending Mode
When creating transparency, we can choose whether we want the selected item’s color to interact with the color of any underlying items. Blending modes let you vary the way in which the blend color of the selected item interacts with the base color of the underlying item to render a resulting color. If we choose Normal as a blending mode, no interaction between items takes place, so colors aren’t blended.
To see how this works, select the smallest circle with the Selection tool. Next, choose Normal from the blending mode’s pop-up menu and then lower the Opacity value to 80% using one of the two methods described earlier. The result of doing this is shown in figure 4. The cyan circle below the yellow circle is now visible but neither circle’s color is actually affected by the other.
 Figure 4: We can create a transparent effect without the color of our objects interacting.
With the yellow circle still selected, choose Multiply from the blending mode’s pop-up menu to combine the color in the yellow circle with the color in the underlying cyan circle. Where the yellow circle overlaps the cyan circle, green is created, as shown in figure 5. Later on, be sure to play around with the other blending modes to see what effect they can have on color.
 Figure 5: The Multiply blending mode combines the underlying color with the blend color.
Isolating Blending Modes
For added control over color, we can isolate the chosen blending mode (other than Normal) to a specific group of objects to prevent its color from interacting with the color of underlying objects outside the group.
For example, select the magenta circle and change its blending mode to Multiply so it interacts with the cyan and yellow circles. Next, use the Selection tool to [shift]-click on the yellow circle to select both the magenta and yellow circles. Then choose Object > Group or press [command]G ([Ctrl]G in Windows) to group the two objects. (The blending mode will change to Normal.) Lastly, select the Isolate Blending check box in the Transparency palette. Now, the yellow and magenta circles only interact with each other, as shown in figure 6. The cyan circle isn’t part of the group, so its color no longer affects the color in the circles above it.
 Figure 6: The Isolate Blending option enables us to isolate blending to a selected group of objects.
That’s a Knockout!
The final option in the Transparency palette lets us knock out (block) underlying objects. Only objects within a selected group knock out and the effect varies, depending on the blending mode.
To see this option in action, create another circle, size it 1 inch in diameter and then select the Paper swatch in the Swatches palette for its stroke and fill color. Position the circle so it sits on top of the yellow circle and overlaps the left edge of the cyan circle. With the circle still selected, choose Multiply from the blending mode pop-up menu in the Transparency palette. The circle will become invisible. Now, [shift]-click on the grouped object (the yellow and magenta circles) and choose Object > Group to add the smallest circle to the group. Finally, select the Knockout Group check box to make the small circle knock out the underlying part of the yellow circle and reveal the underlying object that isn’t part of the group (the cyan circle), as shown in figure 7.
 Figure 7: Use the Knockout Group option to make objects below a grouped object visible.
Flattening your Document
For our InDesign document to print or export to PDF efficiently, its transparent art must be flattened. That is, the transparent art is cut into sections wherever overlapping occurs. InDesign flattens these objects according to the settings in the selected flattener style.
To view the default flattener styles, choose Edit > Transparency Flattener Styles. There are three default settings — Low Resolution, Medium Resolution and High Resolution. The Style Settings section displays the selected style’s settings. The Low Resolution style is adequate for printing to desktop printers and for Web or SVG documents. The Medium Resolution style is good for printing on a laser printer. The High Resolution style is for commercial printing. We can also create new styles in this dialog box.
When it comes time to print or export a document that contains transparent items, make sure the appropriate Transparency Flattener style for the intended output device is chosen in the Advanced section of either the Print or Export PDF dialog box (more about this on the next page).
Tip: Since this is a new feature, it’s wise to discuss with whoever will be outputting the job your intention of using transparency prior to submitting the document.
Apparently So…
That’s pretty much all there is to creating and controlling transparency in InDesign. This feature releases a tidal wave of artistic capabilities in page layout that we never had before. And the new flattening feature makes it possible to show our efforts to the world in any format.
Now let’s learn about applying transparency flattener styles. Scroll to the bottom to click to the next page.

Customizing Transparency Flattener Styles
When you print transparent artwork from Adobe InDesign 2.0 — or export it to a format other than Adobe PDF 1.4 (Acrobat 5.0) — the artwork is “flattened.” That is, InDesign cuts transparent artwork into multiple pieces, some that remain vector objects and some that become rasterized areas. Using transparency flattener styles, you can optimize the way InDesign prints transparent artwork to get the best results (see figure 1).

Figure 8
- Open a document with transparent artwork.
Create or open an InDesign document that contains transparent artwork.
- Apply a pre-set style.
Choose File > Print or File > Export. In the Advanced panel of the Print or Export dialog box, choose a default transparency flattener style from the Style pop-up menu. If you’re printing to a high-resolution device such as an imagesetter, choose High Resolution; if you’re printing to a desktop printer, choose Medium Resolution; and if you’re exporting a file for on-screen viewing (such as an SVG file), choose Low Resolution (see figure 2). The High Resolution style retains more of the transparent artwork as vector objects, requiring greater memory and longer print times. The Medium and Low Resolution styles rasterize more of the transparent artwork, potentially reducing print quality.
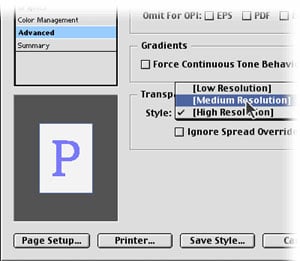
Figure 9
- Print or export the file.
Print or export the file after you’ve applied the default transparency flattener style.
- Adjust the flattener settings.
Evaluate the output. If it’s acceptable, note which default style you used for the device. If the output is not acceptable, choose Edit > Transparency Flattener Styles, select the style you used, and click New (see figure 3). In the Transparency Flattener Style dialog box, name the style for the device you are printing to, and then adjust the settings for the style. Print with the new style. Continue making adjustments until the transparent artwork outputs successfully. (For more information about the flattener settings, see the InDesign user guide.)

Figure 10
- Share the flattener style.
Choose Edit > Transparency Flattener Styles again. Click Save to save the styles to a file you can share with colleagues. Copy the saved file to other computers that use the same workflow; on those computers, choose Edit > Transparency Flattener Styles and click Load to load the styles you saved (see figure 4) — in Windows, the file extension is *.flst.

Figure 11
- Troubleshoot specific documents.
Use the transparency flattener style you saved when you print to the device you adjusted it for. If transparent artwork doesn’t print as expected, override the style on individual spreads to troubleshoot. To override a style, select the spread in the Pages palette and then choose Spread Flattening > Custom from the palette menu (see figure 5). When you print or export the document, ensure Ignore Spread Overrides is deselected in the Advanced panel of the dialog box.

Figure 12
©2002 Adobe Systems Incorporated. All rights reserved.
This article was last modified on July 26, 2025
This article was first published on January 24, 2003
Commenting is easier and faster when you're logged in!

Recommended for you

Adobe Introduces InDesign Server CS2 for System Integrators and Third Party Developers
Adobe Systems Incorporated (Nasdaq:ADBE) today announced Adobe® InDesign® Server...

Creating a Ghostly Effect with a Drop Shadow in InDesign
Here’s how to achieve a ghostly effect, using an obscure drop shadow trick...

HumanEyes 3D Expands Special Effects/Lenticular Software Product Line for Printers
HumanEyes 3D today announces that it has expanded its PrintPro special effects/l...