


Creativepro.com readers can subscribe to Element K Journals at a discount. Click here to learn more.
In the last few years, a technical look to graphics has developed that has really dominated Web sites and many technology startup companies. Then the style spilled out to other areas. Basically, tech-style graphics are characterized by a few specific elements, which are simple shapes, outlines, gradients and repeating elements. So, with a little help from Photoshop designing for the times has never been easier.
In this article, we’ll show you how to create a tech look. First, we’ll go over how to create pattern-based designs. Then we’ll show you how to make halftone graphics. From there we’ll explain how to add radiating lines and square grids to your imagery, as well as create pixelated effects. Once you have a grasp of the components, you’ll see how easy this look is to create. You can modify these techniques to put your own stamp on the tech graphics you create.
Pattern-based Design
A lot of the graphics that you see are based on the use of patterns. One of the most common is scan lines. They’re used on both graphics and images as a design element or to make some-thing look more like a television image. Another common element is grids. Both of these effects are based on patterns, which are easy to make. For all examples in this article, we’ll be working with images that are 3 inches by 3 inches at 200 ppi.
- Creating Scan Lines
To create scan lines like the ones shown in Figure A, create a new transparent document that’s 10 pixels wide by 6 pixels high. With the Rectangular Marquee tool, draw a selection to fill half the document and fill it with black. Deselect your selection. Then, choose Edit > Define Pattern. In the resulting dialog box, name your pattern “3pixelScanline” and then click OK. That’s all there is to it.
- Applying the Pattern
Now that you’ve created the pattern, you can apply it as a layer style or use the Fill command. In the example in Figure A, we used the Fill command so we’ll go through that method. First, open a new document that’s 3 inches by 3 inches at 200 ppi. Then, create a new layer and choose Edit > Fill. In the resulting dialog box, select Pattern from the Use pop-up menu and then locate the 3pixelScanline pattern from the Custom Pattern pop-up menu. New patterns appear at the bottom of the list. Click OK and the scan lines fill the layer perfectly. The transparency of the layer allows you to overlay the scan lines on any image. By locking the layer’s transparent pixels, you can easily paint the scan lines a specific color or multiple colors and then use blending modes to apply it to the base image.
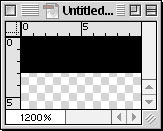
Figure A: Scan lines are one of the most common ways to make an image look “digital.”
- Finishing the Graphic
Our atom symbol in Figure A uses another common tech effect, which you can create with the Motion Blur filter. As you can see in Figure B, our atomic symbol started out as three stroked ellipses. To apply the Motion Blur filter, choose Filter > Blur > Motion Blur. So that we could set the direction of blur for each ellipse, we had to apply the Motion Blur to each ellipse separately and then layer multiple copies of slightly different colors until we finally got the look we wanted. The Motion Blur filter and the Radial filter are both very useful for this style of graphics.
Figure B: Motion Blur and the other Blur filters can help you add interest to otherwise simple graphics.
Televised Images
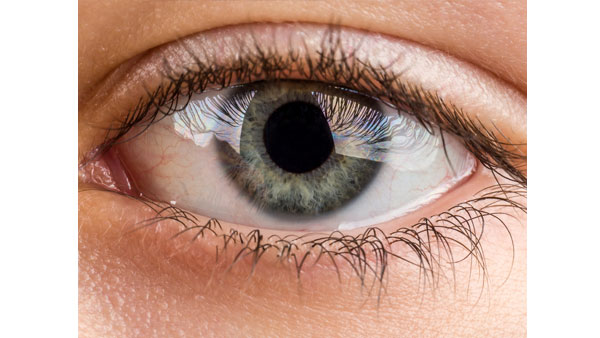
Ostensibly, scan lines are created to make something look more like a televised image such as the eye on the cover. In real life, you most frequently see clear scan lines when looking at single frames of video. These types of scan lines generally only affect a moving object in the frame and don’t usually cover the entire image.
Scan lines by themselves are usually too large and too stark to pull off the T.V. effect on their own. Televisions have a grain structure created by phosphors. So to mimic that, try using the Grain filter’s Horizontal grain setting in conjunction with the scan lines. In Figure C you can see the eye image before and after we added a layer of horizontal grain to the image. To apply the Grain filter, create a new layer named Grain and fill it with white. Then, choose Filter > Texture > Grain. In the resulting dialog box, choose Horizontal from the Grain Type pop-up menu and tweak the settings to adjust the contrast. Click OK to apply. To finish the effect, set the Grain layer’s blending mode to Overlay.

Figure C: If your scan lines appear too clean, try adding a little horizontal grain with the Grain filter.
This article was last modified on January 3, 2023
This article was first published on July 19, 2002
Commenting is easier and faster when you're logged in!

Recommended for you
Scanning Around With Gene: 108 Years of Dust
How an industry dies says a lot about how it lived. Some, like coal mining or st...
Improve Your Talent for “Eyeballing It”
I’m kind of a stickler for neat and tidy layout; blame it on my printing b...

The Digital Art Studio: Illustrator’s New Crop Image Button
The 2017 release of Adobe Illustrator added a new feature you can use to permane...