

When designing a publication in Adobe InDesign, the last thing you may have on your mind is building your pages for efficiency to save time in the long run. All too often, just when you think you’ve finally put the finishing touch on your masterpiece, the clients decide they would like to insert or reorder some pages and change the placement of their logo. Faced with the mind-numbing task of renumbering pages and repositioning a logo on every page, you start enlisting the help of higher powers: “There’s got to be a better way.” The good news, of course, is that there is, and that it’s not too late for you to regain control. Much like wisdom, “The Way” can only be found through insight. Read on, grasshopper.
Wax On, Wax Off
Master pages have been around for nearly as long as desktop publishing. But surprisingly enough, many users don’t realize they exist or understand how potentially valuable they can be. Master pages allow you to define how text and graphics will appear on any pages. For example, let’s say you have a series of pages that should have your logo in the right-hand corner and the date and page number at the bottom: You can build these elements into a master page and have them placed on the other pages accordingly. The beauty of this approach is that you can return to the master later to reposition or change any of those elements, and have those changes appear consistently and immediately across the entire publication.
Fortunately, InDesign makes the process of setting up master pages incredibly simple even if you already have your pages designed without them. Once you have a page comprising the elements you want to carry across your document, do one of the following to “masterize” that page.
- In the Pages palette, be sure the page you want turned into a master is selected, then choose “Save as Master” from the palettes twist-down menu (see below).
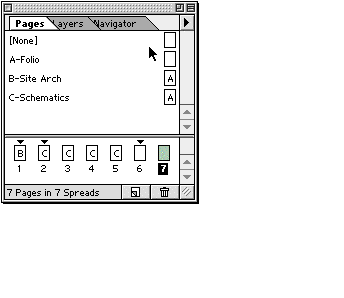
- The no-challenge route is simply to drag your page from the Pages area into the Masters area in the Pages palette (see below). Too easy.
Now that your well-designed page is a master, you can remove any elements specific to individual pages.
- In the Pages palette, double-click your newly created master. This brings up the page as if were any old page.
- Now just delete the elements you wish to remove and add any new ones you’d like.
Sure, it’s always nice to have this sort of control and consistency in your work, but what if you also need the flexibility to make subtle changes to a few of the master-page elements on just one page? InDesign allows you to make this type of local override with a simple key command. To release an element from a master page, place your cursor above the element and hold down Shift-Command on the Mac or Shift-Control on Windows while clicking on it. The element now becomes selectable and editable for that particular instance, remaining unchanged elsewhere in your file.
Spread the Word
Before InDesign broke onto the scene, there wasn’t much innovation happening with master pages in industry standard QuarkXPress or usability favorite Adobe PageMaker. It was possible to have several different but unrelated master pages in a document, but that was about the extent of it. InDesign takes master pages to a new level by introducing the concept of cascading master pages. Simply put, cascading master pages let you base a master page on another master page in a sort of parent-child relationship: Change the “parent” master page and all the changes are reflected, or cascaded, down to its “children.”
Establishing relationships among master pages within InDesign is fairly straightforward. For example, let’s say you’ve created a folio master page, which includes a header and footer that you want to apply to other master pages. To create a cascading master page follow these steps:
- Within the Pages palette, select the child master page to which you would like to apply the elements of the parent.
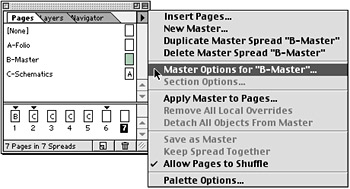
- Choose “Master Options for ‘B-Master'” in the Pages palette twist-down menu (see below). Note that “B-Master” will read whatever your master page is titled.
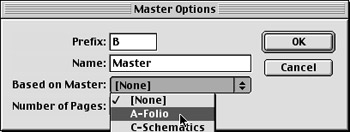
- Select your intended parent master from the “Based on Master:” pull-down menu (see below). In our case, this is the “A-Folio” master.
This article was last modified on January 18, 2023
This article was first published on February 28, 2001
Commenting is easier and faster when you're logged in!

Recommended for you

The Case of the Disappearing Text
A client of mine sent me a problem child InDesign file -- a legacy file in which...

InkyDeals Offers Mega Graphics Bundle
For only a few more days, you can get the Super Premium Typography Creation Kit...

Repurposing Projects in an InCopy Workflow
One of the questions that always seems to come up when I’m teaching or imp...