
These days more of us are using InDesign to create non-print projects-interactive PDF, SWF, EPUB, and applications for tablets. InDesign has had the ability to place video files since CS2, but its video capabilities were greatly enhanced in InDesign CS5 and 5.5.
In a previous posting, I wrote about the video format to use for digital publishing-H.264-encoded video files. But, in addition to converting a file to the correct format, you will also need to create a video of the proper size. Video file sizes are far larger than audio,
images, and text. For most digital publishing projects-especially those targeted at mobile devices-it’s crucial to keep video clips to a reasonably small file size.
Working with video introduces a lot of new terminology unfamiliar to those of us who have worked mostly in print and web publishing. For example, you have to be concerned with choosing the right aspect ratio (usually either 4:3 for standard television and 16:9 for widescreen and high-definition). You need to choose an appropriate data rate. This is the amount of information, or detail, that is stored per unit of time in a video.
So it comes as a pleasant surprise to find that most of us already have the utility we need to convert video, and which provides easy presets for common output like an iPad or an iPhone. That is the Adobe Media Encoder, which comes with the Adobe Creative Suite Design Premium, Web Premium, and Production Premium.
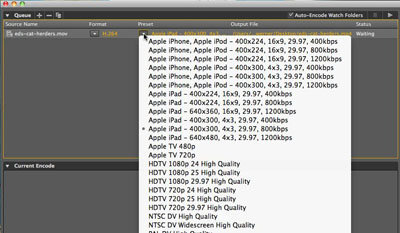
Choosing a Preset
To convert video, follow these steps:
- Open Adobe Media Encoder 5 or 5.5. You’ll see a single window, shown above. In the top Queue section, click the + button to add the file you want to encode (for example, a legacy QuickTime file). Or, even easier, just drag the file into the large central area.
- Choose the video format you’re aiming for from the Format menu-in this example, H.264. Click the Preset menu to select a preset that best represents your target output; for example, the Apple iPad. If you’re not showing a video fullscreen, you may choose a video aspect ratio that’s different from the device’s aspect ratio. You might keep the ratio of the video source file to avoid a “letterbox”effect (black bars on the sides of the frame). Some outputs have more than one aspect ratio or data rate setting for the same device, so try out different settings to see which produces the best result at the lowest file size.
- Click the Start Queue button to create a new, usually smaller, video file.
- For more control over the encoding, right-click the source file name and choose Export Settings. This opens the Export Settings dialog where you can tweak a variety of video settings (see below).

Export Settings
This posting is adapted from an article I wrote in the current issue (October/November 2011) of InDesign Magazine. In that article, I also include these topics:
- Tips for reducing video file size
- The settings to use in InDesign to control video play
- How to create “navigation points” to start a video at a particular frame
- Choosing embedded video vs. streaming video
- Special considerations for placing video in interactive PDF, SWF, EPUB and Adobe Digital Publishing Suite projects.
You can use the “FRIENDS” promo code, which is good for $20 off a 1-year subscription to InDesign Magazine.
This article was last modified on December 21, 2021
This article was first published on October 26, 2011
Commenting is easier and faster when you're logged in!

Recommended for you

Rein in Rogue Leading
Do the last lines of some of your paragraphs sometimes refuse to follow orders,...

Drag and Drop Graphics into CC Libraries
You can drag and drop AI, PNG, BMP, PSD, SVG, GIF, JPG, JPEG, TIF, TIFF, and PDF...

Search Faster in Large PDFs
Based on an article originally published in the DesignGeek e-zine. Does this sou...