
InStep: Using Table Styles and Cell Styles
Grace Fussell shows how table and cell styles can help you make quick work of complex table formatting in InDesign.

This article appears in Issue 118 of InDesign Magazine.
In the same way that paragraph and character styles save you serious time and effort in formatting text, cell and table styles can transform the look of your tables instantly. Sure, they take a little time to set up correctly, but you can save so much more time in the long run!
Unfortunately, table and cell styles are a little more confusing than text styles… at least when you first start using them. So in this article we’ll look at how to set up table and cell styles efficiently and easily. Our example will be to give a simple calendar table a creative makeover (Figure 1). I’ll create a table for a single page of a calendar; and then once I’ve saved the table formatting as a style, I can easily apply the same settings to the other pages of my calendar design.

Figure 1. The finished table, with cell and table styles applied
Create the Table
While you don’t have to make a table before you start defining cell and table styles, it’s often helpful.
To create the table for our calendar in InDesign, choose Table > Insert Table. Set the number of Body Rows to 10, Columns to 7 (for seven days), and 1 Header Row; then click OK. Use the Type tool (T) to insert day names into the top (header) row and the dates for January 2019 into every other body row below (Figure 2).

Figure 2. The starter table
Create Paragraph and Cell Styles
Now it’s time to create your paragraph and/or character styles. Later, you’ll apply them from within the cell
styles.
Start by using the Type tool to create a text frame, and then format the text using the options in the Control panel. Then use the Paragraph Styles panel to create a new style. I’ll name the style “Day of the week.” (Figure 3)

Figure 3. The new paragraph style
Choose Window > Styles > Table Styles to open the trio of table panels: Table, Cell Styles, and Table Styles. We’ll work in the Cell Styles panel first, to give the header rows (featuring the days of the week) a more stylish look. With your Type tool, highlight one or more cells of the first row, and choose New Cell Style from the Cell Styles panel menu (Figure 4).

Figure 4. Creating a new cell style
Give the style a name, such as “Day of the week – cell.” And—this is important—choose the paragraph style you just made from the Paragraph Style drop-down menu at the bottom of the window (Figure 5).

Figure 5. Choosing a saved paragraph style
From the Cell Style Options dialog box, you can also adjust other formatting options, such as the stroke and fill of your cells. For example, here we want to remove any visible borders from the cells, so we’ll set the Color of the Cell Stroke to [None] (Figure 6).

Figure 6. Formatting strokes and fills
When you’ve finished formatting your cell, click OK. You can then apply the “Day of the week – cell” style to the other cells on the header row by highlighting the row and clicking the cell style name in the Cell Styles panel (Figure 7).

Figure 7. Applying the cell style to the header row
Next, repeat the process to create a paragraph style and then a cell style for the body cells of your table. In this case, this is going to be for the date cells. Highlight a couple of cells from the body rows in your table, and choose New Cell Style, as before, from the Cell Styles panel menu. Give this style a name, such as “Date number – cell style.” Choose the saved style, here “Date number,” from the Paragraph Style menu at the bottom (Figure 8).

Figure 8.
The Date number cell style that applies the corresponding paragraph style
We’re also going to remove the border from these cells, so choose [None] for the Color of the Cell Stroke from the Strokes and Fills options. Once the formatting’s finished, click OK. You can then apply this cell style to all the relevant rows of your table (Figure 9).

Figure 9. Applying the cell style to the body rows of the table
Save Your Formatting as a Table Style
Once all the paragraph and cell styles are complete, it’s time to build your table style—which allows you to easily repeat the formatting in other tables.
Start by placing your text cursor anywhere inside the table, and choose New Table Style from the Table Styles panel, docked next to the Cell Styles panel. After you give the style a name, turn your attention to the bottom of the dialog box, where you can choose cell styles for the header and body rows of your table. Here, we’ll choose the “Day of the week – cell” style for the header rows, and the “Date number – cell style” style for the body rows (Figure 10).

Figure 10. Choosing pre-saved cell styles
When you create a table style, you can apply formatting to alternate rows or columns. So if, for example, you wanted to vary the color of rows, you can do that by adjusting the Fills options. Here we’ll go to the Fills options from the left-hand menu, and set the Alternating Pattern to Every Other Row (Figure 11).
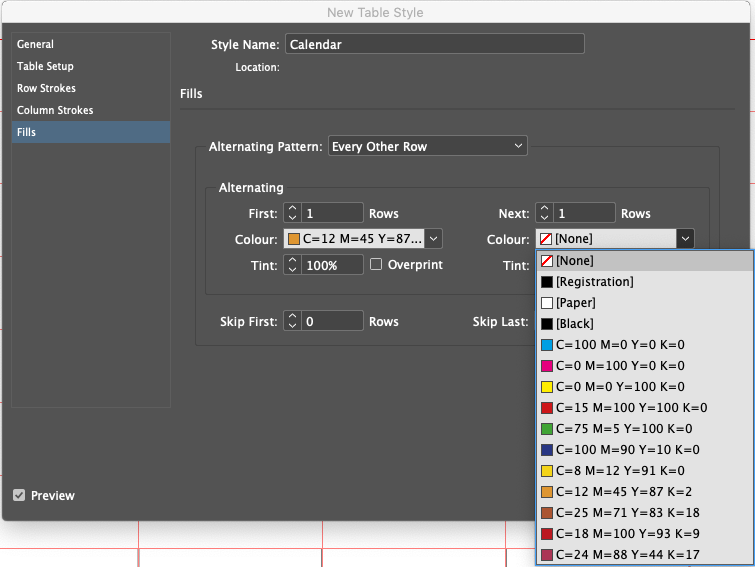
Figure 11. Giving your rows an alternating pattern of fill colors
Let’s also remove the border from the outside of the table. So, from the Table Setup options (on the left-hand menu), set the Color of the Table Border to [None].
When you’ve finished tweaking your table style, go ahead and click OK.
Now you can see the formatting of your table is saved as a style in the Table Styles panel (here, as “Calendar”). However, it may not be applied to the table on the page in front of you, so click once on your new table style to apply it. Then, to apply it to other tables, you simply need to place your cursor into an existing table and click on the style (Figure 12).

Figure 12. The finished table style
Apply Some Creative Customization
Even if you’ve saved the formatting of your table as a table style, that doesn’t mean you can’t further adjust the look of your table. Using the table style as a basis, you might want to add more creative touches to your table to make it look even more stylish and unique.
In our calendar, cells that don’t contain any dates don’t need a color fill, so you can highlight these cells individually, and from the Swatches panel (Window > Color > Swatches), adjust the Fill Color to [None]. Alternatively, you can create a cell style that changes the fill color, and then apply that.
If you want to adjust the dimensions of your table, you can do this by either manually pulling the edges left/right or up/down with the Selection tool (V, Escape) active, or by adjusting the Row Height and Column Width options in the Table panel. Here we want the cells of the table to be square in shape, so set the Row and Column Width to Exactly 2 cm (Figure 13).

Figure 13. Adjusting the width of rows and columns
When we changed the cell dimensions, the text in the header row was too large, pushing some of the days of the week outside their cells. That’s no problem—we can easily adjust the paragraph style applied to them, which in turn will adjust the applied cell style. From the Paragraph Styles panel, choose Edit “Day of the week.” In the Paragraph Style Options dialog box, reduce the size of the text to 13 pt, making sure the Preview checkbox is turned on so we can see that this revised size works well (Figure 14).
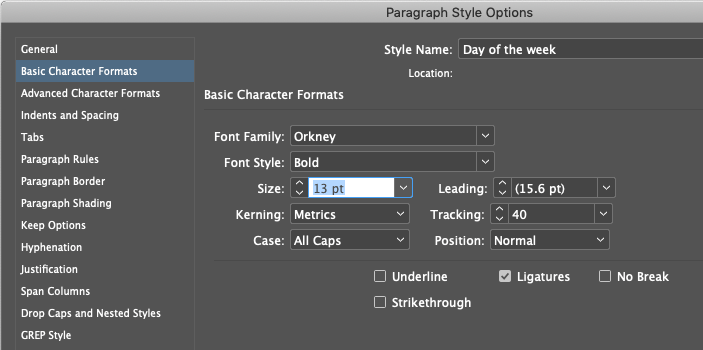
Figure 14. Resizing text from the Paragraph Style Options window
Tints are a really fun and interesting way of adding a gradient effect to your tables. I’ll highlight the first colored cell of the table, and from the Swatches panel pull the strength of the Tint down to 10%.
Moving along each cell, I increase the Tint percentage by 3% each time, eventually leaving a 100% tint only on the final colored cell (Figure 15) Unfortunately, this kind of effect can only be applied manually (it cannot be saved in the table style).

Figure 15. The finished gradient effect
For a calendar design, it’s not just the look of the table you want to repeat across other pages. You should create a paragraph style for other elements, too, such as the name of the month. The final touch is to add an image below the headline, placed in an image frame created using the Rectangle Frame tool (F).
Choose File > Place to drop an image into a frame (Figure 16).
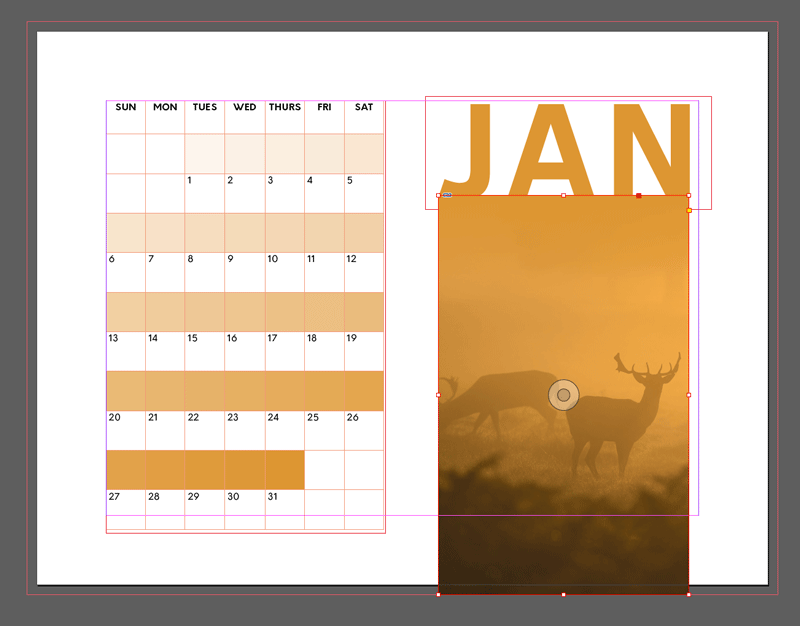
Figure 16. The finished look
Understanding Table Spacing
One of the most mysterious aspects of formatting tables in InDesign is the Table Spacing feature, which allows you to adjust the space above and below the table. What exactly is this? You can adjust Table Spacing from the Table Style Options dialog box (accessible by editing an existing table style or choosing Style Options from the Table Styles panel menu) (Figure 17).

Figure 17. The Table Spacing options in the Table Style Options dialog box
Table spacing determines how far away text above and below your table sits from the table’s border. The Space Before value is the space from the outside edge of the border to the baseline of text above. The default value is 4 pts (converted here to 0.1411 cm) (Figure 18).

Figure 18. Space Before determines the space between the outside edge of the table border and the baseline of the text above.
The Space After value is a little trickier to understand. This specifies how much space is added to the leading of the next line of text to define the space from the bottom of the table border to the next baseline of text. Because of this, the default amount is a negative value (-4 pts) (Figure 19).

Figure 19. Space After measures the amount of space added to the leading of the next line of text after a table.
Turning the Tables
Working with documents that contain lots of tables can be a grueling exercise. But if you take the time to build table styles, the investment can pay big rewards when you’re able to format and change lots of complex tables with just a few clicks.
Grace Fussell is a graphic designer and design writer from the UK. A self-confessed ‘print geek’ she loves all things related to print design, typography and branding. She writes educational content and shares her experiences of working in the design industry via blogs, articles and her e-learning business, InDesignSkills.indesignskills.com
Commenting is easier and faster when you're logged in!

Recommended for you

MacBook Pro Touch Bar: Where are my function keys?
Two solutions to solve the problem of the missing function keys on newer MacBook...

Free Scripts to Convert Color Images to Grayscale
While creating a series of presentation templates for a client, I hammered toget...