Scanning Line Art for Use in InDesign
Sandy wrote: I am attending a conference and one of the speakers mentioned he once attended a conference at which you spoke and you covered 3 or 4 steps to...

Sandy wrote:
David, I am attending a conference and one of the speakers mentioned he once attended a conference at which you spoke and you covered 3 or 4 steps to scanning and digitizing line art that would be suitable for reproduction for in a newspaper. I would very much appreciate a review about how to effectively and efficiently do that.
Scanning line art (artwork made of only one color, usually black on white paper) is nowhere near as straightforward as many people think, especially for high-resolution printing. Fortunately, it’s not difficult if you follow these steps. (Much of this is also covered in both Real World Photoshop and Real World Scanning & Halftones.)
1. Scan in Grayscale or Color
It’s essential that you scan in Grayscale mode. If you scan in Bitmap mode (line art or 1-bit), you can’t do much of anything to improve your image. So avoid the temptation to scan line art as line art, and scan it as grayscale instead. Sure, your files are eight times as large, but it’s only temporary.

Scanning as bitmap lineart:
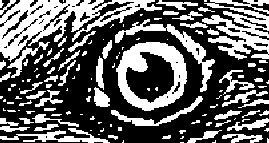
Scanning grayscale and converting with this method holds much more detail (looks “dirty” but it prints so much cleaner):
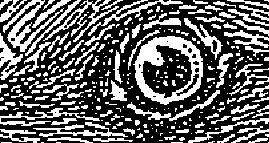
By the way, if you’re scanning newsprint or anything else that has something on the opposite side of the paper, try placing a black piece of paper behind the page you’re scanning. That makes a big difference.
Note that you can use a digital camera as a scanner, of course. In this case, just shoot the image in color.
2. Resolution
When you’re printing to a platesetter, you need very high image resolution to match the quality of photographically reproduced line art. That means 800 ppi minimum image resolution. You can see the difference between 800- and 1,200-ppi line art, so you may want to opt for the higher resolution if your printing method can hold it. That said, if you’re printing on newsprint, it’s unlikely that you need more than 800 ppi. If your final output is to laser or inkjet printer, then it’s unlikely that you’d need more than 600 ppi.
If you have a painfully old scanner that scan 800+ resolution, then go ahead and scan at 600 ppi or whatever, then upsample the grayscale image in Photoshop (using Image > Image Size). This is one of the few times that I feel comfortable upsampling (adding pixels) in Photoshop.
3. Clean Up
If your scan looks pretty clean, then skip this step. But sometimes it’s helpful to crop, straighten, and adjust the tone of the image. For instance, if you’re scanning a client’s ad which they only have printed on a scrap of old newsprint, you’ll likely need to use Levels or Curves to knock the background out to white.
4. Sharpening
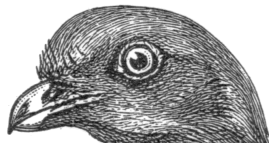
Nothing will do more for the quality of your line art images than sharpening the grayscale scan. I recommend running Photoshop’s Unsharp Mask filter (Filters > Sharpening > Unsharp Mask) once with the settings 500/1/5. Then run it a second time by pressing Command/Ctrl-F (which repeats the last filter). If the second time makes the image explode with noise, then Undo that and go with just one.
5. Threshold
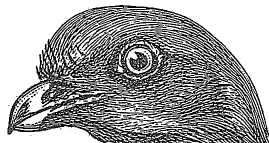
In grayscale mode, lines made of pixels with different gray values. But although you scanned in grayscale, you ultimately want a straight black-and-white image. The way you get there is via the Threshold command (from the Adjust submenu under the Image menu, or with a Threshold adjustment layer). Threshold turns gray pixels above a certain value to black, and pushes all other pixels to white. What Threshold level to use depends on the image; move the slider back and forth until you achieve the detail you desire.
6. Convert to Bitmap
After you threshold the image, there’s no reason for it to be in Grayscale mode anymore, so you’re better off choosing Image > Mode > Bitmap. Photoshop will ask you how to do the conversion (halftone, pattern, and so on), but because there are no gray levels in your file anymore, all the choices have exactly the same result. Just click OK.
7. Save and Import
Finally, you can save your bitmapped line art image as a TIFF or PSD and import it into InDesign. If you need to colorize your line art image, you can do that by first clicking on it with the Direct Selection tool.
This technique works whether the image is a logo, a cartoon, a low-resolution halftone printed in a newspaper (“copy dot”), or clip art, as I used here.
There are other articles that are similar to or based on this technique (which was, if I recall, originally invented by Steve Roth in the early 90’s). For example, I see some interesting links here and here.
Another Option: Vectorize It
I’m sure Mordy or Sandee will jump in here any minute now and say, “Hey, skip all that and just vectorize it with Illustrator’s Live Trace.” I’m okay with that, too, in some circumstances. Live Trace (which a long time ago was sort of the Streamline application) is amazing, but the results are vector, and they don’t always look as “natural” as I might hope for.
If you’re converting a logo that you have only in print form, then Live Trace would be a great way to go. But for comics and a lot of clip art, I still prefer the old scan-and-convert method.
This article was last modified on December 18, 2021
This article was first published on October 26, 2007
Commenting is easier and faster when you're logged in!
Recommended for you

Make It Look Like a Book in the Acrobat PDF
Laying out a document in facing pages isn't that hard. Displaying it as facing p...

Building an Index Using Character Styles or External Word List
Two scripts that solve age-old indexing problems
Making the First Page a Left Page in InDesign
Learn how to use InDesign's Pages panel to make a document start on a left page.


