
Showing results for vnc vyomesh vyomesh vmc vyomesh von von’s
If you use Adobe Illustrator, chances are you’ve heard of Von Glitschka—and perhaps even improved your vector skills with his assistance. He’s written several books, including Vector Basic Training, and co-authored Design: Logo with Paul Howalt. He’s been a regular instructor on lynda.com, where the latest in his video series, “Drawing Vector Graphics,” covers the use of color and detail to enrich your designs. Here Von demonstrates two basic workflows for getting illustrations from idea to print, demonstrating how he combines artistic play and discipline to achieve a goal. Throughout a project, Von uses Astute Graphics plugins to keep his work flowing as smoothly and quickly as his ideas. These plugins expand Illustrator’s arsenal of tools, and use dedicated panels to provide quick access to each plugin’s functions.


Two projects demonstrate Von Glitschka’s everyday techniques using Adobe Illustrator and Astute Graphics software
Making “Beautiful Soul”
For the illustration “Beautiful Soul,” Von created a new document in Adobe Illustrator, then brought in a flourish from his book Flourish, Banner, Frame, and kept the flourish selected. He used the MirrorMe plugin from Astute Graphics to help him explore possibilities for creating a new design based on the original flourish. While the plugin has more creative potential than this article can describe, Von said he was most drawn to how well it fits into the exploratory phase of a design. As Von hovered his cursor over the original artwork, moving slowly around the design, MirrorMe reflected a portion of the design into the number of segments Von had chosen. For “Beautiful Soul,” Von selected 7 segments, but could easily increase or decrease the segments while working. Once happy with the reflected design, he clicked to set the center point—as simple as that.

Selecting the MirrorMe Tool to discover new design possibilities based on existing art


When the cursor hovers over the design, MirrorMe previews the reflected artwork; moving the center across the piece or further away from it changes the reflection.
Von chose Apply to Selection from the popup annotation, which left him in MirrorMe mode for further exploration. He could still hover his cursor over the art to make yet another design or change the number of axes for the reflection. Once he selected a different tool, however, the art became a normal vector object that could be edited using any combination of Illustrator’s tools and other Astute Graphics plugins, such as VectorScribe or Dynamic Corners.

Apply to Selection or Apply to Layer (persistent) converts MirrorMe’s preview to a vector object, ready for editing with other tools.
Since the pattern he’d chosen was not oriented precisely as he wanted, Von used Astute Graphics’ simple but useful Orient Tool from the free SubScribe plugin to alter its angle. He then removed unwanted elements and added some new ones to tie it all together. After creating a pattern tile with his “Beautiful Souls” motif, Von switched to Illustrator’s Pattern Options panel to generate a repeating pattern for fabric. Although it certainly took Von’s design experience to create the pattern, letting MirrorMe spark his imagination with multiple possibilities for the design greatly cut the time from concept to finished product.

Von edited the mirrored pattern (shown in blue) to remove clutter and refine it with additional elements


After creating a pattern tile, Von used Illustrator’s Pattern Options panel to create a repeating pattern for the pillow fabric.
To see Von using MirrorMe, check out this video:
Making “Inspiration”
While MirrorMe helps Von Glitschka find new and unimagined directions, other tools from Astute Graphics make it easier for him to bring an idea to fruition, whatever the source of inspiration. He said: “Inspiration comes in many forms. And when it hits, you want to jump on it and create your idea with as much precision as possible, and that is why I love Astute Graphic tools. They don’t get in the way of me creating my art.”
Von began “Inspiration” the way he begins most of his artwork—with pencil on paper. He refined it until he could easily trace it in Illustrator. He didn’t, however, think he needed to rigidly adhere to the original drawing. The template simply made it easier for him to work through an idea before switching to tools that are less a natural extension of his hand than a pencil. Astute Graphics excels in eliminating the computer interface as much as possible, getting closer to a natural mode of drawing than most other vector tools, but it can’t completely replace the ease and comfort of drawing with pencil on paper.

Von most often begins with pencil and paper as the surest way to transform his idea into a reality
After scanning the drawing, Von used Inkscribe to quickly lay down the foundational paths. With InkScribe he could draw without switching to a different tool every time he wanted to reshape a curve or change an anchor point from corner to smooth. Astute Graphics’ “Smart Remove” technology would even attempt to retain a path’s shape when he deleted an extraneous anchor point. He also used PathScribe, part of the VectorScribe plugin. PathScribe permitted him to be as precise in fitting a path as he could possibly desire, combining multiple functions in one tool without the excessive use of modifier keys to access those functions. To further accommodate his own specialized workflow, Von adjusted the Preferences as needed to fine tune each tool’s behavior.

After initially tracing with InkScribe, Von switched to the PathScribe tools to refine his drawing.
Many complex designs can also be constructed more quickly by using basic geometric shapes, and Von used both SubScribe and Dynamic Corners (part of the VectorScribe plugin), to shape the bird’s feathers and feet. For the feathers, Von used SubScribe’s Circle by 2 or 3 tool to set one point along the bird’s body and a second point on an existing feather, then drew out a circle to align with that feather. With a copy of the bird’s body, he used Illustrator’s Pathfinder function to cut the “feather” to fit the bird. The feet were constructed by first drawing a simple rectangle, then using Dynamic Corners to reshape the corners interactively, depicting the bird’s talons. He duplicated the shapes for each part of the foot and again used the Pathfinder panel to join the parts into one. By using shapes he could edit easily, Von turned what would have been a painstaking effort into an easy task.

Von used a tool from the SubScribe plugin to quickly shape a feather using a circle oriented to fit the drawing, then removed the excess using Illustrator’s Pathfinder functions.

Dynamic Corners reshaped a basic rectangle into a bird’s talon, which then could be duplicated for the other talons. A Pathfinder operation completed the foot.
The drawing complete, Von chose a palette for his illustration and created subtle linear gradients to give the bird form and depth. Details are very important in Von’s work, and rather than add uniform shading with a Drop Shadow Effect, Von stayed with pure vector forms, drawing expressive shapes for shadows for the bird and the type. He used the Transparency panel to blend the layers with Multiply mode and a lowered Opacity setting. Since vector corners can appear a little too sharp and mechanical, he used Astute Graphics’ Dynamic Corners once again, this time to subtly round some of the corners in his illustration, such as on the bird’s crown and tips of the wings.
 <
<
Von used subtle gradients to start to give shape to the bird. Other objects were created for the shadows, their blend mode set to Multiply and their Opacity lowered in Illustrator’s Transparency panel.

To remove some sharp corners, Von used Dynamic Corners from Astute Graphics to subtly round some of the corners.
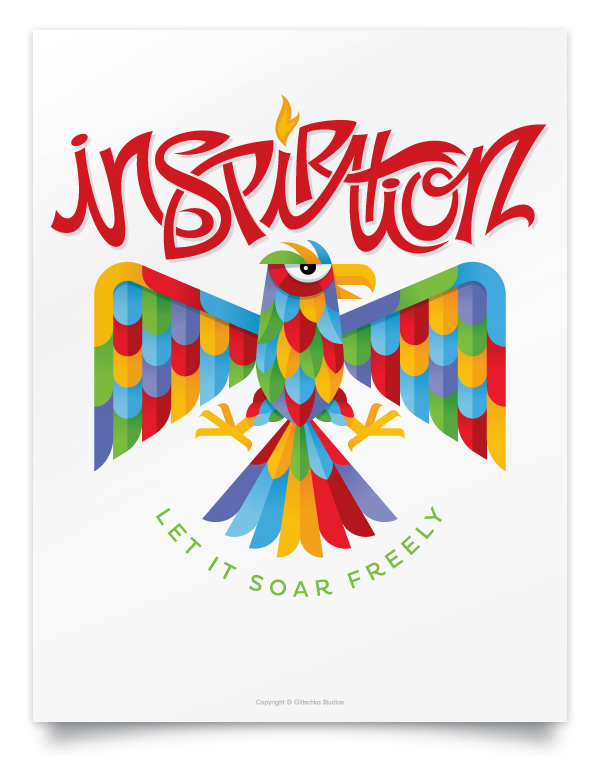
The final bird with the type was completed with less effort and time thanks to a strong start with a pencil, and Astute Graphics’ tools to streamline the process.
Von’s work demonstrates the advantages of combining exploration with discipline, and choosing the best tools available to ensure your creative workflow keeps up with your creative vision. For a more detailed journey through Von’s design process, check out his lynda.com videos. And to see more examples of Von Glitschka’s art and designs, visit his website at www.vonglitschka.com.
The Apple iPad is a primary creative tool for some; others have set it aside after finding that their production workflows need tools that aren’t here yet. But if you move beyond the notion that the iPad must replace or compete with your studio computer, you may find that it’s quite useful as a computer accessory as well as an independent device that can contribute to your studio workflow.
This article focuses on the iPad only because it’s the one I use. Many of the ideas in this article also apply to non-Apple devices.
Keep a Personal Trainer By Your Side
There always seems to be a new feature to learn in constantly upgraded applications such as Photoshop or InDesign. But playing a training video on your computer can take up valuable space on the screen, making you switch back and forth between the video and the application you’re learning. An iPad is perfect for playing training videos next to your computer so that you can devote your entire computer screen to the software you’re learning. Keep training websites like Lynda.com in your web browser favorites so that they’re only a tap away.
Add a Display to Your Mac
Wish you could move windows or panels to a second display, but you don’t own one? iPad apps such as Air Display and Duet Display let you connect your iPad to your computer wirelessly or with a USB cable, so that your computer sees the iPad as a legitimate secondary display. You can drag windows and panels between your computer display and the iPad screen. It can be slower than a true secondary display, and the bigger the tablet the better, but it’s definitely good enough for displaying tool panels and chat windows while you do your main work on your primary computer display.

On my laptop, I created more screen space for Adobe InDesign by moving its panels to an iPad mini 2, which I’ve set up as a secondary computer display. It all fits on a coffeehouse table.
Pack a Mac Graphics Tablet
Graphics tablets that let you draw directly on the screen, such as the Wacom Cintiq, can cost as much as an entire computer. But the Astropad app (which I reviewed for CreativePro) lets you use an iPad as a Wacom-like graphics tablet for a Mac, and it supports a pressure-sensitive Bluetooth stylus such as the Apple Pencil.

I’m painting in Photoshop using an iPad mini 2 as a graphics tablet for my Mac, with the Astropad app and a stylus.
Share the Shoot
If you’re a studio photographer, an iPad can be useful as an additional monitor for watching a tethered photo shoot. Instead of having clients look over your shoulder while you work, just hand them the iPad.
Dedicated iPad apps are available for some cameras. Phase One offers the Capture Pilot app that can monitor a photo shoot when used with some Phase One camera systems; an in-app purchase enables more features such as triggering the camera from the iPad.
Some photographers have figured out that you can combine a secondary display iPad app with the secondary display feature of Adobe Photoshop Lightroom so that your iPad can monitor a Lightroom tethered shoot. Use an iPad app such as Duet Display or Air Display to connect the iPad to your Mac as a secondary display, then in Lightroom set up the secondary display window as Loupe mode (Window > Secondary Display > Loupe – Normal). Then start a tethered shoot (File > Tethered Capture > Start Tethered Capture). Each time you take a photo during Lightroom tethered capture, it will show up on the iPad. (If not, in Lightroom enable File > Tethered Capture > Auto Advance Selection.)
Collect Creative Samples on the Street
With the Adobe Capture CC app, you can scout and collect visual references and resources for your projects. Suppose you see a pattern of leaves on the sidewalk that could be perfect for a fabric design you’re working on. Use Adobe Capture with your tablet camera to record the pattern and convert it into a brush that you can use in Photoshop, or into a vector shape that you can use with Illustrator. If you see a wonderful palette of colors in the late afternoon sky on the way home from work, you can capture those colors as a “look” that you can later load into Adobe Premiere Pro CC or After Effects CC to use in a video project, or as a color theme that you can use in programs such as Photoshop or Illustrator.
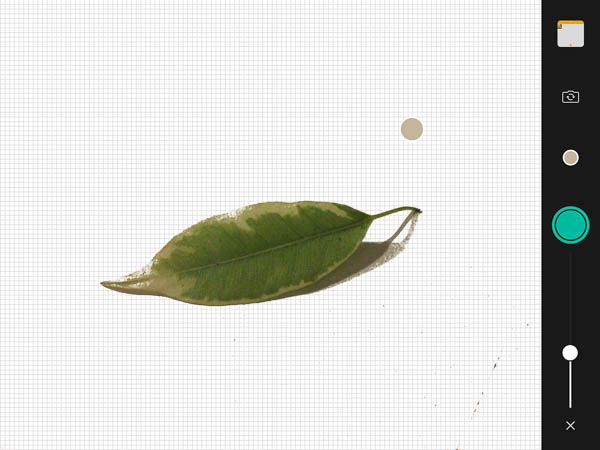
This leaf could make a great brush in Photoshop, so I’m taking a visual sample of it in Adobe Capture on an iPad.

Adobe Capture previews how the leaf might look as different Photoshop brush types, then I select one.
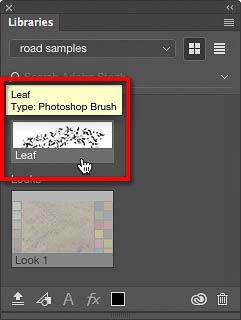
The leaf brush from Adobe Capture automatically appears in my Libraries panel in Photoshop CC on my computer.
Jumpstart Your Ideas
While there are many great sketching and painting apps for the iPad, many Adobe apps have a direct connection to their desktop counterparts. With Adobe Illustrator Draw you create vector-based drawings; Adobe Photoshop Sketch is similar but pixel-based. Both let you send projects directly to Adobe Illustrator CC and Adobe Photoshop CC or to other Adobe mobile apps. Adobe Comp CC lets you design layouts that you can send to Adobe InDesign CC, Illustrator CC, or Photoshop CC. When I say “send,” I mean you can tap an icon and when you get back to your studio computer, you’ll find the document from the iPad will already be open and waiting for you in an Adobe Creative Cloud application.

I worked out a layout idea in Adobe Comp on the iPad, and it’s ready to be sent to InDesign for full production.
Show Your Portfolio Anywhere
There are so many ways to use an iPad as a mobile portfolio of your work; how you do it can depend on which software and services you use the most. While you could just store images of your work in a photo album on the tablet, a cloud-synced portfolio can be updated from your desktop. A photographer who uses Lightroom heavily might sync specific collections to the Lightroom Mobile app for iPad. A designer or illustrator could use the Behance Display app to tie into the work they publish on the Behance service of Creative Cloud.
Outside Adobe Creative Cloud, so many services do such a great job of presenting images that you aren’t limited to the iPad apps of photo sharing sites such as Flickr and Smugmug. For example, you can present images of your creative work from a folder in the Dropbox or Google Photos mobile apps.
Keep an Eye on Things
Do you often wait for your studio computer to finish processing something lengthy, such as exporting hundreds of JPEG images, rendering video, or copying the entire system to a new backup drive? You don’t have to keep running in and out of the studio to check the progress bar. Instead, set up the Screen Sharing feature of your computer, and then on an iPad, use a remote access app such as Mocha VNC Lite to connect to your computer across your network and see what’s on your computer’s screen. I use this to check on my studio desktop computer while in the kitchen or living room, returning to the studio when the big job is done.

This Adobe Media Encoder render queue isn’t on the iPad. It’s running on a Mac in another room, which I can monitor from the iPad using the Mocha VNC Lite app.
It’s a Studio Sidekick, a Field Scout, and a Roadie
You might find that an iPad helps the most when you’re on the road. Just pack one thin and light iPad in the carry-on bag with your laptop and you’ve got a graphics tablet, secondary computer display, and extra video chat screen for the desk in your hotel room.
The iPad doesn’t have to do everything your laptop can do, and it isn’t just an electronic drawing pad or media viewer. It has enough power and flexibility to serve many useful roles both inside and outside your studio.
Welcome to our Speaker Spotlight series, designed to highlight some of our CreativePro Week 2017 Conference speakers, which will be in Atlanta, Georgia, May 22–26. We’ve assembled a dream team roster of Photoshop, InDesign, and Illustrator gurus, and thought you’d like to get to know what makes them tick, why they’re passionate about what they do, and what you can expect to learn from them at the conference.
(Our previous Speaker Spotlight was on Keith Gilbert.)
The subject of this Speaker Spotlight is Von Glitschka.
 Von is an Illustrative Designer, Thinker, Speaker, Author, Creator of Branding, Icons, Lettering, Illustration, and Wit. A foodie, who loves Jesus and reading books, doing the full-tilt creative boogie out of his home studio in the land of Bigfoot (Salem, Oregon).
He’s a sucker for anything BBQ and if he had a Star Trek replicator, his wife and two girls would definitely be in trouble — the house would be filled to the rim with all things BBQ!
Von’s creative outlook and diverse range of illustrative design has been used by some of the most respected global brands, including Adobe, HGTV, Rock and Roll Hall of Fame, Major League Baseball, Microsoft, Pepsi, Disney, and Ogilvy & Mather.
His name is Von Glitschka but his friends call him Vonster!
The Von Glitschka File
Von’s favorite class in high-school was history…until senior year when the principal didn’t approve of how he manipulated his schedule to allow for all electives and tossed him unwillingly into an English Creative Writing class.
Once Von stopped complaining, he found that he actually loved the class. During the next few months, Von would weave together an interesting tale about a smart-mouthed alien creature, that crash-landed in the 1920’s. His spaceship beyond repair, he’s odd, he doesn’t fit in and has no where to go. Until a family of farmers stumble upon him and what do they do? Why, they take him in, of course, hide his spaceship in the attic and make him a part of the family. Sound familiar? Maybe a little bit like that furry rude dude better known as ALF? Von swears it pre-dates the NBC hit but who knows, maybe this alien was from the planet Melmac too!
Do you prefer pen and paper or keyboard? Pen and Paper, without a doubt.
Favorite subject in school: History and surprisingly English. That senior year creative writing class, sparked an interest that ran deep, that summer my friend, Tom, and I grabbed a 8mm camera, spent weeks creating props and paid Tom’s brother $5 to be the stunt man and ride his bike into a tree. It was the beginning of my infatuation with design and film (and design in film).
Favorite website: Futility Closet, especially the podcast. The website is a collection of entertaining curiosities in history, literature, language, art, philosophy, and mathematics, designed to help you waste time as enjoyably as possible.
Favorite movies: That’s easy … Alfred Hitchcock
Favorite TV shows: Currently addicted to Grimm and Fringe.
How many cell phones have you broken? Just 1! And, it wasn’t totally broken, it fell from my pocket as I was getting out of the cab, scraped the glass bad – highly irritating!
Ever worn sandals with socks? Yes. Daughters totally made fun of me. One daughter is a true fashionista and feels like it is her responsibility to tell me when I am dressing “stupid”.
Math is…the reason I wanted to go to art school.
Coffee is…lifeblood.
At 6:00 a.m. I am usually: Sound asleep.
Something the readers wouldn’t know about you: I got to meet John Wayne in-person in a drug store when I was 10 years old. My mother stood flabbergasted as the legend asked us “How ’ya doin’?” dressed casually in shorts and t-shirt. We watched wistfully as he boarded the Wild Goose, his US Navy destroyer turned luxury yacht.
And, another fun fact that most people wouldn’t know about me is: I did a talk about stepping out of your comfort zone and my daughter decided that I should dress up in costume to take me out of my comfort zone – a few days later I was in front of the audience sporting a bunny get up.
Where you can find him: Depends on the day but you know you can always find him at this year’s CreativePro Week, he has a two sessions: Spectacular and Easy Type Effects and Making Iconic Logos: Creativity is a Process. Come on out and explore some fun tips and tricks for making your text pop, stretch, and engage your audience.
Good Design Advice from the Vonster
Process makes perfect. If you do something over and over again and your methodology is flawed it just means you are reinforcing marginal results. Improving your process means you’ll perfect your results over time. So be your own worst critic, don’t settle for good enough because no one will ever care as much about your work as you do.
Where you can find Von on the Web
Website: https://www.glitschkastudios.com/
Social Profiles: Twitter at @vonster
FB: https://www.facebook.com/DrawingVectorGraphics/
Linkedin: https://www.linkedin.com/in/glitschkastudios
Instagram: vglitschka
Behance: https://www.behance.net/vonster
Dribble: https://dribbble.com/vonster
 Register today for the CreativePro Week 2017 Conference! Four conferences back-to-back: The PS/AI: The Conference for Photoshop and Illustrator Users, The InDesign Conference, PePcon: The Print and ePublishing Conference, and the Creative Developers Summit.
Don’t miss out on these great conferences and a great early bird deal: Get $100 off any multi-day registration now through March 31st.
We’ll see you in beautiful Atlanta, May 22–26, 2017.
Welcome to our new series of posts called Speaker Spotlight, designed to highlight each of our upcoming CreativePro Conference speakers. We’ve assembled a dream team roster of Photoshop and Illustrator gurus, and thought you’d like get to know what makes them tick, why they’re passionate about what they do, and what you can expect to learn from them at the conference. (Our previous Speaker Spotlight was on Sharon Steuer.)
The subject of this Speaker Spotlight is Von Glitschka.
Von is an Illustrative Designer, Thinker, Speaker, Author, Creator of Branding, Icons, Lettering, Illustration, and Wit. A foodie, who loves Jesus and reading books, doing the full-tilt creative boogie out of his home studio in the land of Bigfoot (Salem, Oregon).
He’s a sucker for anything BBQ and if he had a Star Trek replicator, his wife and two girls would definitely be in trouble — the house would be filled to the rim with all things BBQ!
Von’s creative outlook and diverse range of illustrative design has been used by some of the most respected global brands, including Adobe, HGTV, Rock and Roll Hall of Fame, Major League Baseball, Microsoft, Pepsi, Disney, and Ogilvy & Mather.
His name is Von Glitschka but his friends call him Vonster!
The Von Glitschka File
Von’s favorite class in high-school was history…until senior year when the principal didn’t approve of how he manipulated his schedule to allow for all electives and tossed him unwillingly into an English Creative Writing class.
Once Von stopped complaining, he found that he actually loved the class. During the next few months, Von would weave together an interesting tale about a smart-mouthed alien creature, that crash-landed in the 1920’s. His spaceship beyond repair, he’s odd, he doesn’t fit in and has no where to go. Until a family of farmers stumble upon him and what do they do? Why, they take him in, of course, hide his spaceship in the attic and make him a part of the family. Sound familiar? Maybe a little bit like that furry rude dude better known as ALF? Von swears it pre-dates the NBC hit but who knows, maybe this alien was from the planet Melmac too!
Do you prefer pen and paper or keyboard? Pen and Paper, without a doubt.
Favorite subject in school: History and surprisingly English. That senior year creative writing class, sparked an interest that ran deep, that summer my friend, Tom, and I grabbed a 8mm camera, spent weeks creating props and paid Tom’s brother $5 to be the stunt man and ride his bike into a tree. It was the beginning of my infatuation with design and film (and design in film).
Favorite website: Futility Closet, especially the podcast. The website is a collection of entertaining curiosities in history, literature, language, art, philosophy, and mathematics, designed to help you waste time as enjoyably as possible.
Favorite movies: That’s easy … Alfred Hitchcock
Favorite TV shows: Currently addicted to Grimm and Fringe.
How many cell phones have you broken? Just 1! And, it wasn’t totally broken, it fell from my pocket as I was getting out of the cab, scraped the glass bad – highly irritating!
Ever worn sandals with socks? Yes. Daughters totally made fun of me. One daughter is a true fashionista and feels like it is her responsibility to tell me when I am dressing “stupid”.
Math is…the reason I wanted to go to art school.
Coffee is…lifeblood.
At 6:00 a.m. I am usually: Sound asleep.
Something the readers wouldn’t know about you: I got to meet John Wayne in-person in a drug store when I was 10 years old. My mother stood flabbergasted as the legend asked us “How ’ya doin’?” dressed casually in shorts and t-shirt. We watched wistfully as he boarded the Wild Goose, his US Navy destroyer turned luxury yacht.
And, another fun fact that most people wouldn’t know about me is: I did a talk about stepping out of your comfort zone and my daughter decided that I should dress up in costume to take me out of my comfort zone – a few days later I was in front of the audience sporting a bunny get up.
Where you can find him: Depends on the day but you know you can always find him at this year’s CreativePro Conference, he has a two sessions: Making Iconic Logos: Design & Production and Inception: How Deep Embedding Helps Weave Together Illustrator and Photoshop. The logo session is for anyone and everyone involved in or interested in logos. The deep embedding session is for people already familiar with Photoshop and Illustrator. Von will demonstrate how this technique helps to control a range of ever-changing visual assets by containing them within one core master file to make collaboration and continuity of creative content easier. Von was forced to master this technique when he was hired to design an Skeetball game ios app when the iPhone was first released and looks forward to sharing this time-saving technique with the world.
Good Design Advice from the Vonster
Process makes perfect. If you do something over and over again and your methodology is flawed it just means you are reinforcing marginal results. Improving your process means you’ll perfect your results over time. So be your own worst critic, don’t settle for good enough because no one will ever care as much about your work as you do.
Where you can find Von on the Web
Website: https://www.glitschkastudios.com/
Social Profiles: Twitter at @vonster
FB: https://www.facebook.com/DrawingVectorGraphics/
Linkedin: https://www.linkedin.com/in/glitschkastudios
Instagram: vglitschka
Behance: https://www.behance.net/vonster
Dribble: https://dribbble.com/vonster
 Register today for the CreativePro Conference!
Don’t miss out on a great show and a great early bird deal: Get $100 off registration now through May 16th
We’ll see you in Minneapolis, Jul 10-13th
In this Illustrator video, Von Glitschka gives several great pointers on creating and using thumbnail sketches when creating icons (or any vector artwork). From rough sketches to refined ideas to using photo references, he shows that you don’t have to be a great sketch artist to bring your ideas to life.
This video is taken from Von’s “Logos and Icons” session at our Adobe Illustrator Summit.
Responding to the growing demand for super zoom digital cameras, Sony is introducing its new 8-megapixel DSC-H9 and DSC-H7 models. Designed to appeal to families with budding athletes in their broods, the cameras debut Sony’s new advanced sports shooting mode.
This mode combines high shutter speed shooting and intelligent continuous auto-focusing. The cameras can quickly focus on fast-moving subjects by predicting where those subjects will be in the frame. This predictive technology also helps to reduce shutter lag, the time it takes for the camera to focus and shoot.
Both cameras feature powerful Carl Zeiss® 15x optical zoom lenses for up-close shots of big plays on the field. You won’t miss the look of victory in your champion’s face with Sony’s new face detection technology. It can identify up to eight faces in the camera’s LCD frame, and automatically adjust white balance and flash as well as focus and exposure for correctly exposed, sharp photos.
The Big Game Is Even Bigger In High Definition
Half the fun is playing the game and the other half is re-living the experience by viewing and sharing your photos. Why huddle around the PC to look at pictures when you can impress family and friends with the visual impact of the game in the utmost clarity, color and detail on an HDTV set.
These new cameras feature high-definition outputs. Simply connect them to your HDTV with the Sony VMC-MHC1 high-definition component cable, sold separately, and turn photo viewing into an entertainment experience.
Shoot At The Speed of Life
Even if you’re not at full speed during the soccer match on Saturday morning, the H9 and H7 models will be. These new cameras can shoot up to 1/4000 of a second, a critical speed for capturing fast-moving sports and freezing the action.
Both cameras are powered by the Bionz™ processing engine, first used in Sony’s Alpha digital SLR camera system. This new circuitry speeds up response times and delivers the fast image processing speeds needed to produce color-rich, detailed pictures for true high-definition photo viewing.
Capturing fast action does not have to result in blurry photos. The H9 and H7 cameras incorporate Super Steady Shot® optical image stabilization to minimize blur caused by camera shake, an important feature when shooting at slow shutter speeds at full zoom. Their high sensitivity, up to ISO3200, also helps to fight blur resulting from fast-moving subjects.
The H9 camera takes fast-action shooting a step further. It sports a 3-inch, flip-up LCD screen so that you can shoot comfortably from nearly any position. You can hold the camera low to the ground for eye-level shots of kids, without having to contort yourself or crawl on the ground, or hold it high for shots of the crowd. The H7 camera has a non-articulating but large 2.5-inch LCD screen for easy sharing and viewing.
Capture The Mood
The H9 camera is the only Cyber-shot model in this year’s line to feature NightShot® technology. This feature allows you to take photographs in environments with virtually no light so you won’t miss the action, even at a late night game.
Both cameras’ high sensitivity (up to ISO 3200) will also help preserve the mood of your pictures by capturing well-exposed, natural-looking photos, even in challenging low-light conditions. You can shoot at higher shutter speeds to take in the maximum amount of light without using the flash. Picture noise, common to pictures shot at high ISO levels, is minimized by Sony’s Clear RAW ™ noise reduction technology.
The Winning Finish
The H-series cameras incorporate selectable in-camera editing functions so you can spend more time on the field and less time behind a computer. Equipped with Sony’s Dynamic Range Optimizer, originally developed for the Alpha digital SLR system, the new cameras can analyze captured image data and instantly determine the best exposure and tonality of each picture before JPEG compression.
Other helpful in-camera functions include red-eye correction and photo retouching effects with filters. You can create fun and artistic photos with up to four filter selections, such as the partial color filter that can highlight your star athlete in color while the background of the photo is in black-and-white.
The DSC-H9 and DSC-H7 cameras will ship in April for about $480 and $400, respectively. The VMC-HD1 high-definition component cable will also be available in April for about $40. Additional accessories will include wide and telephoto conversion lenses, filters, batteries, travel chargers, sports packs and cases. All can be purchased online at sonystyle.com, at Sony Style® retail stores (www.sonystyle.com/retail), and at authorized dealers nationwide. Pre-orders begin on Feb. 28 at www.sonystyle.com/newcameras.
HP unveiled a broad effort to help make it easy for customers to reduce the environmental impact of their imaging and printing.
Targeting customers spanning individual consumers to large businesses, the wide-ranging initiative includes elements such as:
* an enterprise printing assessment service and a carbon calculator that together comprehensively address energy and paper use, related carbon emissions and projected cost savings for optimized printing environments;
* a global paper policy governing the sustainable manufacture and use of paper HP sells to customers and uses for packaging, collateral and its own office printing;
* a new HP inkjet printer made almost entirely from recycled materials; and,
* an HP Eco Highlights label that will help customers identify environmental attributes of a given HP product or service.
Many of the announcements are part of the new HP Eco Solutions program, which helps customers identify HP initiatives, products and services designed with the environment in mind.
“HP is focused on helping all of our customers – from consumers to enterprises – reduce their environmental impact,” said Vyomesh Joshi, executive vice president, Imaging and Printing Group, HP. “Over the past nine months we’ve helped several Fortune 500 customers realize up to a 30 percent reduction in their carbon footprint related to imaging and printing by using a variety of HP tools and services.”
Furthering its commitment to environmental responsibility in the area of imaging and printing, HP also pledged to:
* improve the overall energy efficiency of its ink and laser printing products by 40 percent(1) by 2011;
* increase the amount of recycled materials used in its inkjet printers by three times by 2010 (relative to 2007);
* quadruple the number of HP Halo Collaboration Studios at company sites worldwide by 2009, resulting in an expected reduction of more than 20,000 trips and millions of dollars saved in travel annually; and,
* surpass 250 million cumulative HP inkjet and LaserJet cartridges recycled in 2008, helping the company reach its goal of recovering 2 billion pounds of computing and printing equipment by 2010.
HP Eco Solutions program
HP Eco Solutions is a company-wide program created to help customers easily identify environmental initiatives, products and services designed with the environment in mind. Elements of the program include:
* The clear and simple-to-read HP Eco Highlights label helps customers understand the environmental attributes of a specific product, tool or service. The label will be used across all HP product categories, with the newly introduced HP Deskjet D2545, HP LaserJet P4015x, LaserJet P4515x and LaserJet P4515xm(2) printers being the first products to feature it. Customers can locate the Eco Highlights label on packaging, the web and in data sheets.
* HP Auto-On/Auto-Off Technology can improve energy efficiency up to three times in HP LaserJet personal devices beginning in 2009, and over 20 times as the technology continues to be incorporated throughout the rest of the LaserJet line. This savings is achieved by enabling the printers to go into a deep sleep mode – using less than one watt of power – after a period of inactivity, and then quickly powering back on after sensing activity again.
* The HP Carbon Footprint Calculator for printing allows customers to compare the carbon footprint of their existing printer fleet to that of a new, optimized fleet to understand how they can reduce their impact on the environment. The calculator assesses printer energy and paper use, the carbon impact of usage and associated monetary costs based on geographical energy assessments. Customers may access the calculator online at the end of June or work directly with HP to build a baseline annualized estimate of their printer fleet’s carbon footprint.
* The HP LaserJet Power Calculator enables micro, small and medium business customers to compare product-specific energy data from popular HP LaserJet printers with data from competitors’ products. Customers also can compare new HP LaserJet products with older HP models to illustrate energy savings in kilowatt hours and estimated dollars achieved simply by upgrading their older devices. It is available at www.hp.com/large/ipg/environment.
* A new addition to HP’s existing suite of services, the HP Eco Printing Assessment helps customers assess their energy consumption, paper usage and carbon emissions, and recommends ways to use less energy and paper, recycle more and reduce the impact of imaging and printing.
* Finding new uses for recycled materials, HP introduced the HP Deskjet D2545 Printer, the company’s first printer made almost entirely from recycled plastic material. Eighty-three percent of the printer’s total plastic weight is made from recycled plastics and it uses HP 60 ink cartridges, which are molded from recycled plastic resins. Additionally, the overall packaging for this printer is 100 percent recyclable. The printer is ENERGY STAR® qualified and features HP Smart Web Printing, which lets users easily combine portions of numerous web pages onto one page to save paper. The HP Deskjet D2545 Printer is currently available in Wal-Mart stores and the HP Home & Home Office Store for an estimated retail price of $44.99.(3)
* Lastly, HP plans to introduce this summer a printer that will feature recycled plastic derived from the company’s “closed loop”plastic recycling system, which incorporates a variety of post-consumer recycled plastics, from HP inkjet cartridges to water bottles.
HP paper policy
HP’s global paper policy is an important part of the company’s effort to help itself and its customers lower their environmental impact through energy and resource savings, digital alternatives, and reuse and recycling programs. HP is pledging to reduce the environmental impact of the papers the company buys, uses and sells by establishing one of the most comprehensive paper policies in the industry. HP’s paper policy incorporates six guiding principles that apply worldwide to HP branded paper, as well as paper used for HP’s internal operations, external marketing collateral and product packaging.
HP’s policy sets guidelines for the entire lifecycle of paper. The company will ensure that raw material inputs are used efficiently, give preference to suppliers who source fiber from credibly certified, sustainable forests and minimize carbon production and waste in the manufacturing process, and enable the responsible use and recycling of paper. HP plans to report on the company’s progress in implementing the policy and reducing the environmental impact of its paper usage.
Related to this policy, HP is pledging that 100 percent of its consumer photo paper will be derived from suppliers certified under a forestry certification program(4) by the end of 2009. HP is the world’s No. 1 selling brand of inkjet photo papers(5) and, with this pledge, becomes the first company to ensure that it makes sustainable sourcing and production choices throughout its entire paper supply chain.
Environmentally responsible clear packaging design
HP has engineered a way to package its high-end printers that, on average, cuts the volume of packaging materials needed to ship these products in half. The new clear packaging design eliminates the need for an outer corrugated box and extensive foam packaging, instead using minimal foam and supports along with a durable transparent film to encase the product for shipping. The outer transparent plastic film is made from the same recyclable materials as plastic milk jugs, and customers will have less packaging to manage when they receive their products.
HP is the first in the technology industry to apply this method to printing products. Beginning this summer, the company plans to use the new packaging design for shipping large printers with copier-like functionality that are on a stand or wheels. HP first applied the concept on existing multi-function printers and will use it to ship recently introduced products such as the HP LaserJet M5035x MFP.
Digital printing alternatives
HP has a long history of bringing to market digital printing alternatives that reduce a customer’s environmental footprint.
Earlier this year, the company showcased digital solutions for the retail photo printing market that consume three times less energy than comparable silver halide products and reduce the chemical and water waste associated with traditional photo processing.
Additionally, HP advanced the trend of print-on-demand publishing with the introduction of several new digital presses and workflow solutions over the past year. According to Pira International, up to 30 percent of traditional book stock remains unsold and is eventually re-pulped(6); with digital print-on-demand book publishing, excess inventory is significantly reduced.
The company also recently introduced HP Latex Printing technology, which offers print service providers a compelling alternative to traditional large-format printing methods by using water-based inks instead of solvent-ink technology which can be harmful to the environment.
More information about these announcements and HP’s social and environmental history is available at www.hp.com/go/ecosolutions.
How many times have you e-mailed a PDF proof to your client and then received a call from them that went something like this:
Client: Thanks for sending this. We only have a couple changes.
You: No problem. Go ahead.
Client: Okay, on page six, can you make the picture of the winners bigger?
You: Sure. How much bigger?
Client: About 20 percent. We need to see their faces a little better.
You: (scribbling notes to yourself) … Okay, but do you really want the picture bigger, or do you want me to just scale it up 20 percent?
Client: Um, both, right? Aren’t they the same thing?
You: I mean, I can make the picture itself bigger, but then I’d need to move text over and re-do the caption. Or I can keep the picture the same size, but make the image larger.
Client: Huh?
You: I could just increase the scale of the picture, but keep the frame the same size.
Client: Frame? There’s no frame. We don’t see a frame on the proof over here. Maybe it didn’t PDF right?
You: No, not a frame like a border. I mean the overall box, the actual dimensions. I’m asking if we could keep the dimensions, but make the faces bigger. So we don’t have to change the layout — where the text is and all that.
Client: (long pause, muffled conversation) Well, we really just need the picture bigger. Can you send it to us both ways? Whatever ways you just said?
This is not fun for either of you, is it? Little Mr. Guilt on your shoulder is telling you that what you really need to do is get your butt out of the studio, drive over to the client’s office, and go over the proof in person. But except for the biggest clients and the most important jobs, who’s willing to foot the bill for that anymore?
Here’s a solution we’ve been using for over a year in my own studio, with great success: screen sharing. Your client sees the project on your screen, just as though you brought your laptop to their office and opened it up in Acrobat, QuarkXPress, InDesign, or whatever. Except you’re in your own office, they’re in theirs, you’re both on the phone and your client is seeing your screen in a window in their Web browser (Figure 1).
Figure 1. Here’s what my client, Michael, sees when I share my computer screen with him. On my computer, it looks like I have the layout open in InDesign. On his end, everything in my screen appears in the main panel of the screen-sharing application running in his browser. If he wanted, he could enable his own video camera so we could see each other as we talked (his face would appear next to mine, upper right). Alternatively, a guest can click the Full Screen button at the lower left to hide the interface, enlarging the host’s screen to fill their monitor. Click on the image for a larger version.

So, as you scale up the image (but not THE FRAME) in your page-layout program, they see exactly what you mean. And they can say “That’s perfect” when it is, in real time. Clients love it. And aren’t you thrilled when clients love what you do? I know I am.
A Lot Easier than You Think
I know what you’re thinking: Oh man, screen-sharing with my clients? Technical nightmare! Ports and routers, firewalls, dynamic IPs, Windows vs. Macs … it would never work.
But none of these are an issue if you use the right screen sharing software. We’ve settled on Adobe’s Acrobat Connect (which has nothing to do with Acrobat, by the way; don’t ask me why they call it that); but I’m sure there are others that are just as easy and seamless. While I personally haven’t had good luck with GoToMeeting, WebEx, or any open-source VNC gizmo, I hear Glance is pretty good. And screen sharing in Mac’s new Leopard OS sounds great, but most of my clients are on Windows… and besides, I haven’t upgraded my production Macs to Leopard yet. (I’m waiting for Apple to release10.5.9999.)
I like how easy Connect is to set up and use. As soon as you register via a simple form, and Adobe installs its tiny Connect Add-In plug-in in your browser, you’re good to go. From then on, all that Connect requires from you or your clients is Internet access and any Web browser running a reasonably recent version of the Flash plug-in. In other words, virtually everyone. (Adobe says Flash plug-in market penetration is about 97%.)
It makes no difference which OS either of use or which browser: Firefox, Safari, Internet Explorer, they all work. I don’t even ask my clients if they’re on Mac or Windows anymore. When we’re on the phone and I think it’d help if they could see my screen, I just ask, “Are you in front of the computer?” and tell them the URL of my online Connect room. (You choose it when you sign up.) I log in to the same URL, turn on screen sharing, and ten seconds later we’re collaborating online (Figures 2 and 3). No biggie.
Just a minor miracle.
Figure 2. After you log in to your Connect room (or Brio room, the upcoming version of Connect, shown here) with your username and password, have your client go to the same Web page. They log in as a Guest … no software to install, no registration required. Click on the image for a larger version.

Figure 3. This is called the “lobby.” It’s what everyone sees when they’re logged in but no one is sharing their screen yet. Avatars for logged-in participants appear in the bottom row; in this screenshot, only I’m in the room. I’ve opened the Pods menu, only available to the host, to choose which pods (panels) my guests will see. Click on the image for a larger version.

Connect Standard, Professional, and Brio
A Connect Standard account is $39 per month, but there’s a free 15-day trial. You can have up to 15 people “in the room” (connected computers) including yourself — more than enough for client collaboration.
Adobe also sells a high-end version called Connect Professional, meant for enterprise accounts, which starts at $5,000 to $10,000 per yr. Connect Pro has many more features and can accommodate hundreds of meeting participants (it’s what Adobe uses for their own eSeminars), but it’s overkill for what I’m discussing here.
Adobe is already previewing the next version of Connect, code-named Brio, as a public beta. Learn more about Brio, download it and test it for yourself — yes, you can even hold screen sharing meetings with it, even though it’s free — from the Adobe Labs site. It’s brio-utiful. It has the same basic functionality as Connect, but with some long-requested features (such as Voice Over IP, so you don’t even need the phone call) and a redesigned, elegant interface. All the screen shots in this article are from Brio.
Be aware, though, that your Brio room has an upper limit of only two guests plus yourself (compared to Connect Standard’s fifteen total), and the very latest version of the Flash plug-in is required, so your clients may be prompted to download FlashPlayer 9 and install it the first time they connect to your room. And, did I mention it’s beta? At least it’s in late beta, so most of the bugs have been squashed, as far as I can tell. But if it doesn’t work for you, go with Connect Standard for now, or another service.
Screen-Sharing Tips and Tricks
When you’re sharing your screen with a consumer-level service like Connect Standard or Brio, your image data is sent through your ISP to the host’s servers (in this case, Adobe’s dedicated Connect servers), and from there to your client’s computer screen. It’s important that your own Internet connection be as fast as possible. If you’re running your e-mail program, downloading files, and listening to live radio in iTunes while trying to share your screen, your connection will degrade and your client will see a stuttering screen, or worse, it’ll take a minute or two for your actions to appear on their screen. This is known as the dreaded screen lag.
So don’t do that! ;-) Quit out of programs that use up bandwidth before starting a screen-sharing session. To see what it’s like for your client, set up a laptop near your computer and log on to the room as a guest from that laptop. That way you can tell if something goes glitchy during the meeting, and compensate for it.
Connect/Brio doesn’t require you to reserve a room in advance, another reason I prefer it over other services. So you can jump into it on the fly, as I described above.
Nevertheless, when possible it’s useful to set a meeting time in advance with your client. That way you can e-mail them the URL of the room, and maybe include a link to a “Test Your Browser” page if they’re at all nervous about it. Connect’s testing page is at https://na1.connect.acrobat.com/common/help/en/support/meeting_test.htm (Figure 4); other screen-sharing services have their own.
Figure 4. If you send your clients to the Connect test page, they can assure themselves that screen sharing will work on their computer. If anything goes awry, the test automatically runs a wizard to bring them up to speed, such as installing the Flash plug-in for them.

Scheduling a screen-sharing session in advance also gives you a chance to quit out of your other programs before you start (do you really want them reading the e-mail you left open?) and maybe comb your hair, for God’s sake, before you enable your camera. Open the documents you’re going to share so they don’t have to sit through any “Missing Font” alerts, too. Most importantly, close any browser windows you don’t intend to share; these tend to be the first things your clients see as soon as you start screen sharing!
As Natural as Web Surfing
Once I became comfortable with screen sharing, I started seeing opportunities for live screen cast enhancements everywhere. You will, too.
Besides online proofing with my clients, I also use it for sales presentations, reviewing a client’s Web site with them, holding group meetings with my staff on the road, and of course, a lot of remote training for clients with far-flung employees, or who don’t have a travel budget.
Screen sharing can go both ways. With Connect or Brio (or other services, I imagine), your invited guests can share their screens with you and anyone else logged in. So when my client says she can’t print the PDF I sent her, I can see her screen from Connect and make sure she’s choosing the right Print options. With Connect, you can also allow participants to control your screen (it’s weird watching the cursor move around “on its own,” but fun-weird), and if they’re sharing their screen, you can control theirs! This opens up a whole world of possibilities.
A couple weeks ago I had an appointment with my accountant, but the traffic was snarled due to yet another rush hour snowstorm in Chicago. So instead, I had him go to my Connect room, where I opened my Excel and Word files with all my financials and shared my screen, then gave him control of it. We went over everything on the phone, and as he disallowed deduction after deduction, a ghostly mouse selected line items and deleted them. It was like a nightmare, come to think of it. But at least I didn’t have to drive through a blizzard to experience it!
Anne-Marie, a design studio owner and busy software trainer, is the geek behind DesignGeek, a free monthly tips and tricks e-zine for digital designers that she’s been publishing since 2003. She’s also the co-host of the InDesignSecrets.com blog and podcast, with David Blatner.
HP today announced it has signed a definitive agreement to acquire Arteis, a privately held company that operates Logoworks, a leading distributed web-based graphic design service provider.
HP plans to leverage Logoworks’ technologies and services to provide small businesses with access to professional design solutions at a fraction of market cost. Supported by hundreds of graphic designers worldwide, Logoworks’ affordable packages range from simple logo design to the development of a full suite of marketing collateral.
“Today’s small businesses are increasingly turning to the web for marketing tools and services that strike a balance between affordability and quality,” said Vyomesh Joshi, executive vice president, Imaging and Printing Group, HP. “By adding Logoworks’ web-based graphic design service to our portfolio, HP can now provide the right mix of cost savings, flexibility and professional quality to help make a small business look big.”
Arteis, based in Lindon, Utah, also owns LogoMaker, a do-it-yourself design application for customers with a more limited budget. HP plans to greatly expand and enhance both Logoworks (www.logoworks.com) and LogoMaker’s (www.logomaker.com) simple-to-use web-based design services and use independent print service providers to help deliver a great value to customers.
The acquisition is subject to customary closing conditions and is expected to be completed in HP’s third fiscal quarter. Financial terms of the transaction were not disclosed.
About HP
HP focuses on simplifying technology experiences for all of its customers – from individual consumers to the largest businesses. With a portfolio that spans printing, personal computing, software, services and IT infrastructure, HP is among the world’s largest IT companies, with revenue totaling $94.1 billion for the four fiscal quarters ended Jan. 31, 2007. More information about HP (NYSE: HPQ) is available at www.hp.com.