
20 Adobe Acrobat Tricks Every Designer Needs to Know
Essential tips and tricks for designers working with PDFs in Acrobat

This article appears in Issue 22 of CreativePro Magazine.
Many graphic designers use Acrobat just for viewing editorial comments, optimizing print PDFs for the web, simple file conversions, and the like. But Acrobat can help you out with so much more than that, including:
- Modifying PDFs for print production
- Editing content when source files are unavailable
- Checking your work
- Spotting differences between multiple versions of a document
- Getting live text from images
- Repurposing content
- Converting printer’s spreads to reader’s spreads for online distribution
- Asserting and protecting ownership rights to content within a PDF
In this article, we’ll look at some of the powerful tools that Acrobat has to offer and what you can accomplish with them. But first, we need to head off some potential confusion about the user interface.
Are You (Acrobat) Experienced?
Before you explore the tips in this article, you should know about a software release that can serve as an enormous source of confusion. Adobe has been rolling out a significant redesign of Acrobat, a project it calls “the new Acrobat experience” and “an experiment.” Not all users have access to this new interface, and it’s not certain when (or if) it will be rolled out to everyone. This can lead to a bizarre situation where two people are running the exact same version of Acrobat and see very different interfaces. As described in a help document linked above, the update offers “a simpler and more intuitive experience for Acrobat desktop, making it easier for you to view content and perform your everyday actions on the PDF.” And the experience is nothing if not new. Essential functions—notably, Tools—have moved around; it’s like that feeling when you walk into a supermarket and find they’ve moved all your favorite groceries to “improve” your shopping experience. Does your home window greet
you with a chipper “Welcome to Acrobat” in the upper-left corner and address you by name? If so, you have the new Acrobat. You can switch back to the old interface by choosing View > Disable New Acrobat. And when you want to return to the new experience, choose View > Enable New Acrobat.
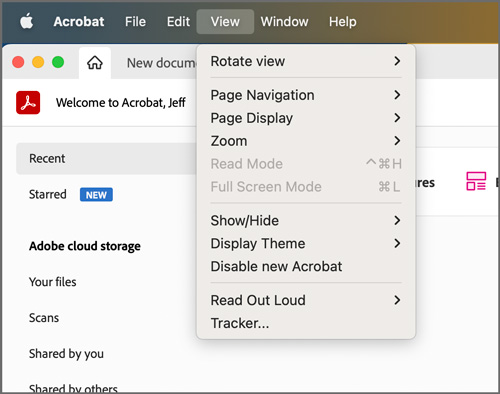
Some users might have encountered the “new Acrobat experience”—a significant change in the program’s user interface that Adobe considers experimental. You can easily switch between the two UIs from the View menu.
Convert Text to Outlines
Converting text to outlines comes in handy in the rare case you encounter a commercial printer who doesn’t want any live font data embedded in the PDF. (That’s so ’90s—I know.) Convert text to outlines in your PDF using Acrobat. It’s faster than doing it in InDesign, and you won’t risk accidentally overwriting your working layout file and losing your live text!
- Open the PDF in Acrobat.
- Open the Preflight panel via Edit > Preflight or Command+Shift+X/Ctrl+Shift+X.
- From the menu at the top of the dialog box, select Acrobat DC 2015 Profiles. Then, in the Profiles tab, click the toolbox icon to activate Select Profiles.
- Select the Convert Fonts to Outlines fixup (Figure 1).
- Click the Analyze and Fix button at the bottom of the dialog box. When prompted, save your fixed file under a new name.
- Verify that the previously used fonts are no longer embedded by choosing File > Properties > Fonts. You should no longer see any fonts listed (Figure 2).

Figure 1. You can easily type a few characters in the Search field in Acrobat’s Preflight dialog box to find the fixup you’re looking for.
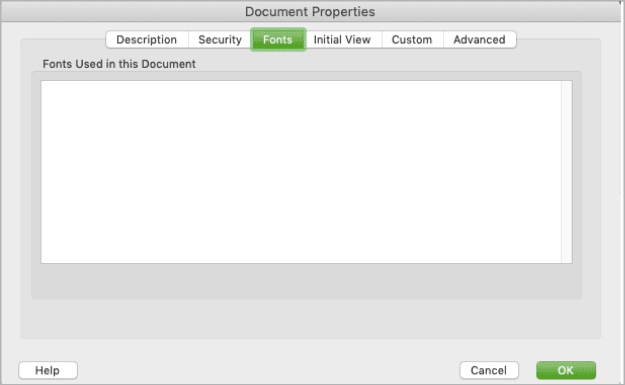
Figure 2. The Fonts tab in Acrobat’s Document Properties dialog box will show any fonts that are embedded in the document. If the tab is blank, you’ve successfully converted your fonts to outlines.
Should You Run Away and Find Another Printer?
If your printer requires you to submit files without embedded fonts, that’s usually a sign that the printer is alarmingly out of date and out of step with current prepress standards. For years, when people have asked about this issue on social media, our advice at CreativePro generally starts with flat-out urging you to find another printer—now. But taking your files and walking out the door might not be so simple. Consider the following:
- Maybe you’re working for a governmental agency where the printer is selected by a public contracting process. Or maybe you work for a corporation that is hidebound by requisition forms and complications and protocols that must be followed.
- Some specialty product workflows are very niche, using antiquated input such as EPS files with outlined fonts as a way of achieving predictable output and a cross-platform standard.
- Some large printers and manufacturers of product packaging require outlined fonts.
- You may want to do business with a specific shop for personal or financial reasons, despite the technology they use.
This article presumes that you have weighed the pros and cons of outlining and that you have good reasons to want to convert your PDF accordingly.
Flatten Annotations
Often, we work on documents that are meant for print and for the web. We remove the interactivity (i.e., hyperlinks, buttons, and forms) from an exported PDF so that we have a printable file. Flattening annotations is also helpful for documents that contain a form and may be shared. Doing so will prevent that data from being changed after it has been filled out.
- Open the PDF in Acrobat.
- Open the Preflight panel via Edit > Preflight or Command+Shift+X/Ctrl+Shift+X.
- From the menu at the top of the dialog box, select Acrobat DC 2015 Profiles. Then, in the Profiles tab, click the toolbox icon to activate Select Profiles.
- In the Search field, type annotations. Then you should see the Flatten Annotations and Form Fields fixup.
- Click Analyze and Fix. When prompted, save your fixed file under a new name.
Convert Spot Colors to CMYK
You may convert spot colors when you export to PDF from the source file. But what if you don’t have the source file and you still need all your colors as CMYK in your PDF? You can use the Convert Spot Colors to CMYK fixup in Acrobat.
- Open the PDF in Acrobat.
- From the menu at the top of the dialog box, select Acrobat DC 2015 Profiles. Then, in the Profiles tab, click the wrench icon to activate Select Single Fixups.
- Find and select the Convert All Spot Colors to CMYK fixup (Figure 3).
- Click the Fix button at the bottom of the dialog box. When prompted, save your fixed file under a new name.
- Check that the spot colors were removed. Navigate to the Print Production tools section, then click Output Preview. In the Preview menu in the Output Preview dialog box, select Separations. You should see only plates for Process Cyan, Process Magenta, Process Yellow, and Process Black (Figure 4).

Figure 3. Find and select the Convert All Spot Colors to CMYK single fixup.
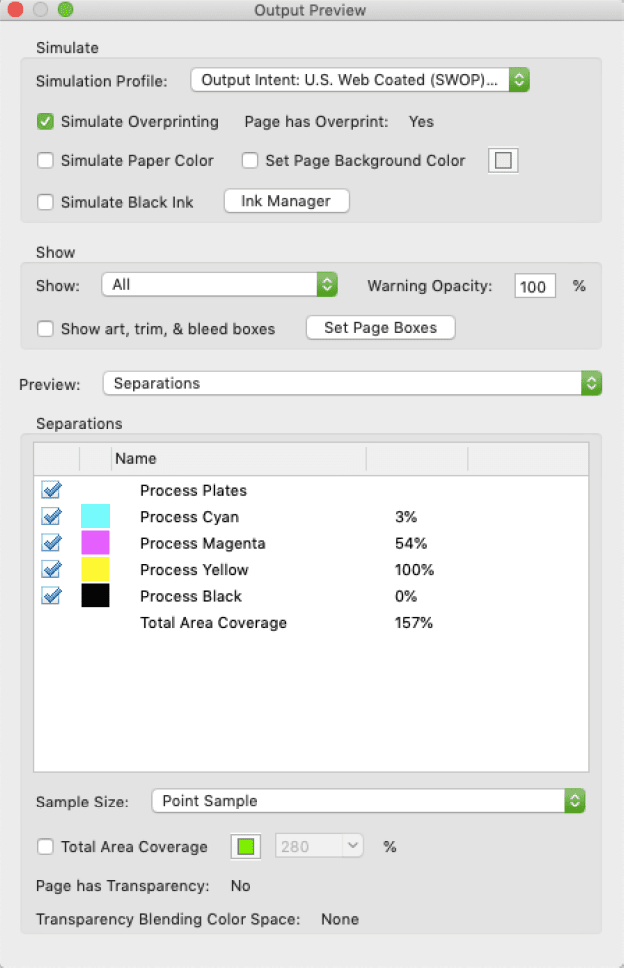
Figure 4. Check your separations with the Output Preview dialog box.
PDF Turns 30
January 2023 marked the 30th anniversary of the Portable Document Format, better known as PDF. To mark the occasion, we asked several industry veterans to share their thoughts on the history and impact of PDF. David Blatner, CEO, CreativePro Network The amazing thing about PDF was (and is!) that you can put almost anything into it, because it’s really just a container! This open-minded approach is why PDF could be extended to do so much over the decades. Steve Werner For those of us who came from the printing industry, PDF was revolutionary: You no longer had to have a copy of every application in order to print it for a customer! Duff Johnson, CEO, PDF Association The first time I saw a PDF file in 1995, I realized that I was looking at a technology that could bridge the paper and digital worlds. What I did not guess at the time was that 30 years later PDF would continue to grow and continue to serve a critical role as a trusted means of document exchange. John Warnock, Co-founder of Adobe When Acrobat was announced, Postscript had already been adopted by the US government as a standard for printing. But the process was slow. The 1040 IRS tax form took three and a half minutes to print from a Postscript file. The Camelot project described how to speed up the printing of documents on the first Apple LaserWriter by utilizing an optimized form of Postscript that evolved into PDF. As a result, that 1040 form could be printed in just 35 seconds. With this huge reduction in printing time, PDF was adopted by the US government as the preferred way to send documents electronically. Adobe then pursued font development for Japanese, Chinese, Indian, and all the variants of European languages, which led to PDF becoming a worldwide standard.
Create Bookmarks
Adding bookmarks makes it easier for people to navigate throughout a digital document. You could add bookmarks in InDesign, but what if you don’t have the file? Or what if you already did some work in the PDF and don’t want to go back to the InDesign file and re-export? No problem! Add the bookmarks in Acrobat with one of the following methods.
Method 1: Preflight Fixup
You can use this method if your PDF is tagged for accessibility (Figure 5).
- Open the PDF in Acrobat.
- Open the Preflight panel via Edit > Preflight or Command+Shift+X/Ctrl+Shift+X.
- From the menu at the top of the dialog box, select Acrobat DC 2015 Profiles. Then, in the Profiles tab, click the wrench icon to activate Select Single Fixups.
- Select the Create Bookmarks from Headings fixup. (Search for book.)
- Click the Fix button at the bottom of the dialog box. When prompted, save your fixed file under a new name.
- Set the bookmarks to always show when the PDF is opened. Otherwise, most people won’t know they’re there. Choose File > Properties, and in the Properties dialog box, select the Initial View tab. In the Layout and Navigation section, select Bookmarks Panel and Page under the Navigation menu. Click OK.
- Save, close, and reopen the PDF to see the bookmarks.

Figure 5. To make bookmarks immediately visible in the initial view of documents opened in Acrobat, enable the Navigation tab.
Method 2: Bookmarks from Structure
Like Method 1, you can use this method if your PDF is tagged for accessibility (Figure 6).
- Open the PDF in Acrobat.
- Click the disclosure triangle on the left border of the Acrobat window to expose the toolbar.
- Click the Bookmarks icon, or right-click the toolbar area, then select Bookmarks from the context menu.
- In the Bookmarks menu, select New Bookmarks from Structure.
- Select the paragraph style(s) of the headings to be used for the bookmarks to create a top-level bookmark, named Untitled.
- Rename Untitled to something more meaningful. Alternatively, move its nested bookmarks to the top level, then delete the Untitled bookmark.
- Save the document.
- To make bookmarks appear when opening the document, follow step 6 of the Method 1 instructions.
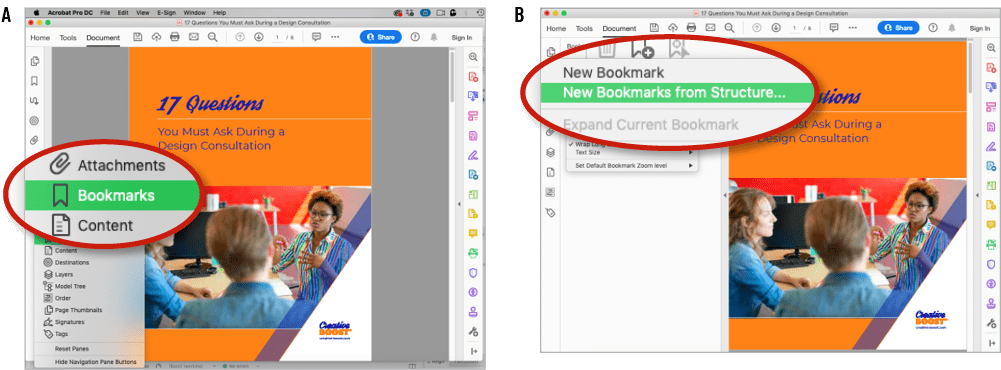
Figure 6. Steps to use the document’s structure to create bookmarks, which you can show by right-clicking the toolbar (A). By selecting New Bookmarks from Structure (B), you can access the Structure Elements dialog box (C) to create a group of bookmarks for your document (D).
Method 3: Manually create bookmarks
If the PDF is not tagged, there is just a little more work to do to create your bookmarks (Figure 7).
- Open the PDF in Acrobat.
- Click the disclosure triangle on the left border of the Acrobat window to expose the toolbar.
- Click the Bookmarks icon, or right-click the toolbar area, then select Bookmarks from the context menu.
- Select the text in the document where you want to create a new bookmark.
- Click the New Bookmark icon to create a new bookmark, and name it. Tip: If you select text first, then create the bookmark, it will be named with the selected text.
- Repeat this to create other bookmarks.
- To make bookmarks appear when opening the document, follow step 6 of the Method 1 instructions.

Figure 7. Create a bookmark manually by selecting text and clicking the New Bookmark icon (highlighted). You can rename the bookmark by selecting the name Untitled and selecting Rename from the context menu (right-click).
Hey! Where’s That Tool?
For a number of years, Acrobat has offered an idiosyncratic interface through its toolbar and its workspace. Many of these commands are replicated in the program’s menus through your computer’s operating system. To keep your head from exploding, we have largely guided you on these tricks using the right-hand toolbar, but—as is often the case with today’s software—you can find other ways to achieve the same outcome. If you do not see a link for a tool that we reference (like Edit PDF or Print Production) in the right-hand toolbar, you will need to add it by clicking the More Tools link (with the wrench icon), the last option in the list. Find the missing tool there, and click the Add button beneath its icon. You can also select options in the menu to remove tools that you’re not using or launch help pages for a tool’s use. 
Edit Text
We still tend to think of PDF as a format that locks down your file’s content and design. You may be surprised to know that you don’t have to go back to a source file to edit the live text in a document or its styling—the typeface, color, size, or alignment. In some cases, you may not even have a source file to go back to. You can edit the PDF in Acrobat instead (Figure 8), but take note: This method won’t work if the text is part of a raster image or if the text has been converted to outlines. If that’s your challenge, see the “Scan and OCR” section below.
- Open the PDF in Acrobat.
- Select the Edit PDF tool in the right-hand toolbar.
- Select the text you want to edit.
- Edit the text or adjust its formatting. If you intend to change the font, make sure it’s active on your machine.
- Save the document.

Figure 8. You can edit and reformat live text directly in Acrobat.
Edit Images
If you’ve ever needed to edit an image embedded in a PDF without having access to the source file, you may not realize that it’s actually pretty easy to do directly within Acrobat—and it’s a really cool trick (Figure 9).
- Open the PDF in Acrobat.
- Select the Edit PDF tool in the right-hand toolbar.
- Select the image you want to edit.
- Right-click the image, select Edit Using > Open With, then choose an image editing program such as Photoshop or Illustrator. Once you select a program, it will appear as an option in the Edit Using menu.
- The image will open in the other program. Edit it.
- Save the image. (Make sure you overwrite the temporary file that automatically opened in step 5. Do not rename it or save it in a different location.)
- Go back to the PDF where the newly edited image will be embedded.

Figure 9. All it takes is a visit to the context menu to edit a selected image in Photoshop, Illustrator, or any other image-editing program. You could even delete the image and paste in a whole different cupcake.
Insert or Move Pages Between Documents
If you’re designing a book, you will submit two PDFs: one for your cover and another for the text pages. But if you need to create a single PDF with both cover and text for distribution online, you can easily use Acrobat’s capability to manage pages (Figure 10).
- Open your two source PDFs in Acrobat, positioning their windows side by side on your screen.
- Select Organize Pages from the right-hand toolbar.
- Drag the pages from one document into the other, placing them where you want them to go.
- Save the document you added the pages to.
Tip: It’s much less work to drag a one-page cover into the text document than to drag hundreds of pages into the cover document.
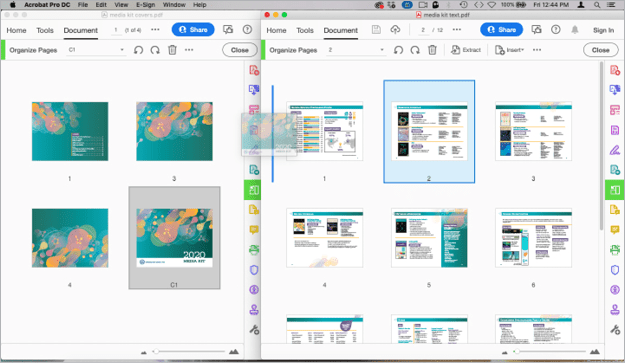
Figure 10. Simply drag a page from your source file and insert it into your destination file.
Make a Reader-Friendly PDF From Printer’s Spreads
Now what if you have a brochure set up as a trifold or gatefold in printer’s spreads? You don’t want to just export a low-resolution PDF for online distribution. Its panels will appear out of order, with your reader seeing the back panel of the brochure as the first page of the document. You can use a combination of tools in Acrobat to create a reader-friendly file efficiently.
Method 1: Crop Pages
The first method to accomplish this (Figure 11) uses the Crop Pages tool.
- Duplicate the PDF.
- Open the original and duplicate PDFs in Acrobat, positioning their windows side by side.
- In both documents, select Organize Pages from the right-hand toolbar. You will see thumbnail images of each page.
- Drag spread 1 from the duplicated document into the original, placing it after the last page. Repeat. The first will be for the fold-in panel of that spread; the second, for the back cover panel.
- Close the duplicated document.
- Return to your active document and double-click page 1.
- Select Edit PDF from the right-hand toolbar.
- Select Crop Pages from the Edit PDF toolbar.
- Double-click anywhere on the page to open the Set Page Boxes dialog box.
- Adjust the value in the Margin Controls Left field to move the crop line in the preview to the left margin of the brochure cover. This value will be the difference between the length of the PDF page and the width of the brochure panel. Tip: Make sure the Page Range’s From field is set to page 1 so you crop the correct page.
- Staying in Edit PDF mode, go to page 3 and repeat steps 7–9 to activate the Set Page Boxes dialog box.
- Adjust the value in the Margin Controls Right field to move the crop line in the preview to the fold-in panel of the brochure. That value will be the same measurement you used in step 10.
- Staying in Edit PDF mode, go to page 4 and repeat steps 7–9 to activate the Set Page Boxes dialog box.
- Adjust the values in the Margin Controls Left and Right fields to move both crop lines in the preview to the edges of the center panel (the back cover of the brochure). That value will be approximately half of the same measurement you used in steps 10 and 12. Tip: If your brochure design accommodated creep, each panel will differ in width slightly, and you will need to adjust your measurements accordingly.
- Save the PDF. You should now have—as pages in their own right and in the correct order—the front cover, inside spread, fold-in panel, and back cover.


Figure 11. Drag duplicates of the outside page of your brochure design into your PDF, and then use Acrobat’s Crop tool to eliminate all but the individual panels, in the order that gives the reader of the digital file the same reading experience as the printed product.
Method 2: Rotate Pages
What if your print document contains rotated content (to accommodate wide tables in a book, for example)? Instead of making readers strain their necks to read those pages, just use the Rotate Pages tool to position any rotated pages so the content is readable on screen (Figure 12).
- Open the PDF in Acrobat.
- Select Organize Pages from the right-hand toolbar.
- Select the page to be rotated.
- Click the counterclockwise or clockwise icon to rotate the page.
- Save the file.

Figure 12. Use Acrobat to return a natural orientation to content on pages that had to be rotated for printing.
Compare Files
You can use the Compare Files feature, which analyzes text and formatting differences between two PDFs, for two important purposes. First, you can use it to check your work, comparing content provided to you with the content in your design proof, to make sure it’s all included and styled properly. Second, consider the situation where you’ve already laid out a document and then you get a Word file with edits but without changes tracked? How are you supposed know where the changes are? It’s maddening, right? Not anymore! Instead of laying out the file all over again because you’re not sure what changed, just convert the two Word files to PDF and use the Compare Files feature (Figure 13).
- Open both converted PDFs in Acrobat.
- Choose View > Compare Files.
- Select the old file and the new file. If you accidentally swap them, you can click the arrow to reverse them.
- Select Compare Text Only if you want to compare the text, but not any styling or design elements.
- Click Settings to choose which pages of a multipage document to compare and which element types you want it to compare, i.e., images, headers/footers, etc.
- Click OK.
- Click Compare to view the report, which includes a synopsis of the number and nature of the differences and page-by-page highlights between the two versions of your document.
- Save the report if desired.

Figure 13. Acrobat’s Compare Files feature analyzes and highlights differences between two versions of the same PDF.
Scan and OCR
When you need to get editable, live text from an image of text and you don’t have access to a source file, you can use the Scan and OCR feature (Figure 14). The higher the image quality, the more accurate the result will be.
- Open an image (JPEG, PNG, etc.) in Acrobat.
- Select Scan & OCR from the right-hand toolbar.
- From the Recognize Text menu in the Scan & OCR menu bar, you can select In This File or In Multiple Files.
- In the Recognize Text dialog box, you can specify All pages, Current page, or define a range of pages. Select the document’s language, options for delivery of the recognized text, and the resolution at which you want Acrobat to process the image. Click OK.
- Click the Recognize Text button.
- Edit the text in Acrobat, or export the text to a text file.
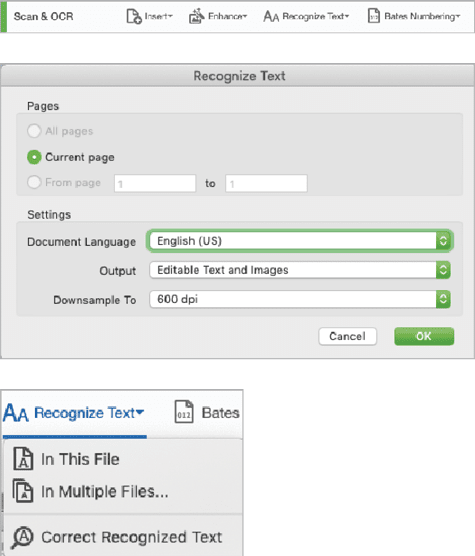
Figure 14. Use the Scan & OCR tool’s Recognize Text menu to turn text pictured within images into editable, live text.
Get Edits
When it comes to getting edits, you may already use the Comments tool to comment on a PDF and send it to another to do the same. But what if multiple people need to comment on a single PDF? Sometimes you end up getting conflicting changes. Let the Send for Comments tool come to your rescue (Figure 15)! This tool will distribute your file to any number of editors and marketers (and anyone else who needs to weigh in about your file), and they will duke out their changes with one another before it comes back to you.
- Open the PDF in Acrobat.
- Select Send for Comments from the right-hand toolbar.
- Under Invite People, enter the email addresses for those who need to review the file. (Invite anyone; they don’t need the full version of Acrobat to review.)
- Select what participants can do with your PDF. You can permit them to view the document, to make comments, or to complete forms and digitally sign the file.
- Modify the Name and Message fields, which will become the subject line and body, respectively, of the email that Acrobat will send to your reviewers.
- Set a deadline for receiving comments, if desired.
- Specify whether recipients should get a link to your file or your PDF as an attachment.
- Click Send, which will send an email with the link to review the file.

Figure 15. With Send for Comments, you can invite people to review the file (A) and set deadlines and other parameters for their interaction with the project (B). They will receive an email with links and instructions (C).
Check Colors
When you’re designing a document for print, you might want to check the build of colors (Figure 16).
- Open the PDF in Acrobat.
- Select Print Production from the right-hand toolbar.
- Select Output Preview. By default, Separations will display in the Preview section, showing you the process build of the area under your cursor. You can select the precision of that area under Sample Size.
- Alternatively, select the Object Inspector for precision measurement of color under your cursor. Click an area of the page to check the ink coverage, which is shown in the box under Preview. There, 100% black will be shown in the color values as 0.00000, 0.00000, 0.00000, 1.00000, which correspond to C, M, Y, and K plates.
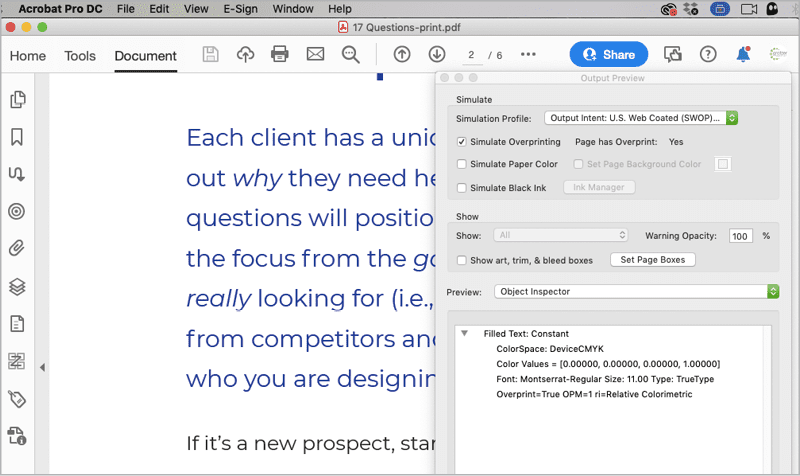
Figure 16. Object Inspector will show your process color build with accuracy to the 1/1000th of a percent.
Extract Content
Acrobat provides a robust collection of methods to get your content out of a PDF and into other file formats for you to work with.
Extract all images
What if you’re asked to provide all the images in a PDF as separate files? Or, maybe you need to use the images in another project but you don’t have the original working files? In either case, you can simply export all the images at once (Figure 17).
- Open the PDF in Acrobat.
- Select Export PDF from the right-hand toolbar.
- Select Image, and turn on the Export All Images option to export them individually.
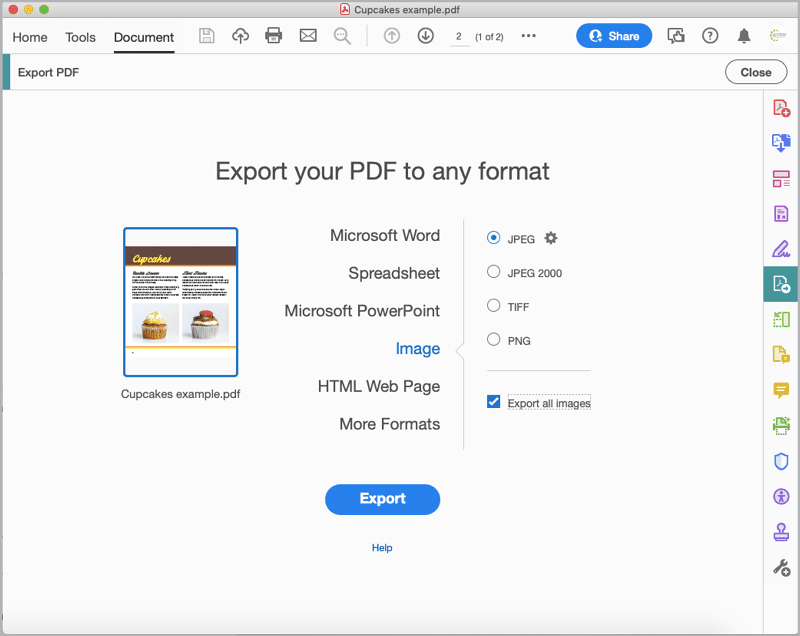
Figure 17. Export PDF gives you a variety of options for extracting digital assets from your PDF. Clicking Export All Images will save the images used in the document, not the individual pages of the document as images.
Extract specific images
You can alternatively export only the images of your choosing.
- Open the PDF in Acrobat.
- Click the image you wish to extract. It will highlight in blue.
- Right-click and choose Save Image As (Figure 18).
- Give the image a name and select the desired file format.

Figure 18. You can highlight individual images and export them from the context menu.
Extract a table
If you’ve ever needed to copy the content of a table from a PDF while retaining its structure, you know how tedious that can be. But if you use the Export Selection As option (Figure 19), it’s easy.
- Open the PDF in Acrobat.
- Use the Selection tool to click and drag around the table, which will then be highlighted in blue. You can select any part of the table or the whole thing.
- Right-click the selected area and choose Export Selection As.
- From the Format menu, select Excel Workbook.
- Click Settings to access the Save as XLSX dialog box. There, you can adjust settings for the workbook, how numbers will be formatted, and whether to recognize text if needed.
- Name the file, then click Save to create an editable Excel (XLSX) file.
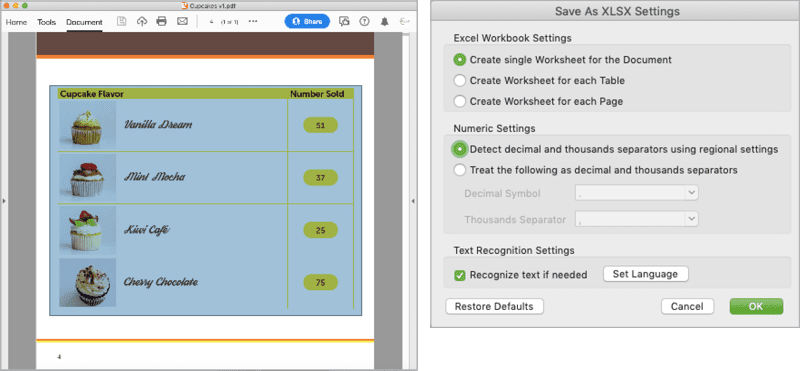
Figure 19. Select a table, in whole or in part (A) to export to an XLSX. As with any of Acrobat’s export options, you can adjust settings before you export (B).
Extract text
You can easily get text from your PDF.
- Select a passage and right-click.
- Select Export Selection As and choose a file format.
Convert the PDF to Other Formats
Someday, probably when you least expect it, you will need to provide a project in another file format with design elements and formatting intact. Whatever software you’re using to create the original, Acrobat will have you covered.
Export to Word or other text format
If you’ve ever struggled with designing letterhead or anything else in Word, you’ll be delighted to know that there is another way! You can instead design in InDesign, export to PDF, then use Acrobat to export to Word with Export PDF. Voilà! Any elements you added to the parent page in InDesign appear in the header or footer in Word. I can hear you cheering.
- Open the PDF in Acrobat.
- Select Export PDF from the right-hand toolbar.
- Select Microsoft Word (DOCX or DOC), or, after you select More Formats, you can select various flavors of RTF, TXT, or XML.
- Click the gear icon to adjust settings for page layout (Figure 20). Choosing Retain Flowing Text generates headers and footers in the Word file. Choosing Retain Page Layout results in header and footer elements being part of the page content instead.
- Click Export and choose a location for your new Word doc.
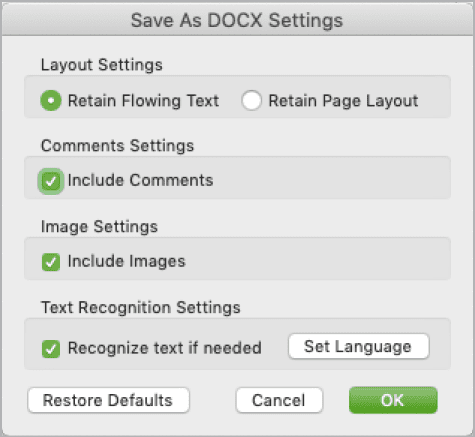
Figure 20. Peruse your options before exporting a document to Word.
Export to PowerPoint
You can also export to PowerPoint format and turn a document into a slide deck. This is particularly helpful if you originally created your presentation in InDesign or if you want to convert your deck from PDF to PowerPoint or Google Slides.
- Open the PDF in Acrobat.
- Select Export PDF from the right-hand toolbar.
- Select Microsoft PowerPoint.
- Click the gear icon to adjust settings for including comments and recognizing text, if needed (Figure 21).
- Click OK, and then Export.
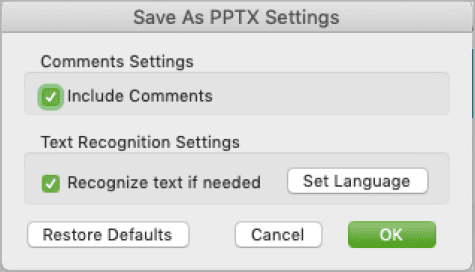
Figure 21. PDFs can become slide decks, with options for their export from Acrobat.
Export to HTML
When you need to repurpose a design for the web, you can use the Export to HTML feature in Acrobat.
- Open the PDF in Acrobat.
- Select Export PDF from the right-hand toolbar.
- Select HTML Web Page.
- Check the options for single or multiple pages.
- Click the gear icon to adjust settings for including images, detecting and removing headers and footers, and recognizing text (Figure 22). Tip: Adding a headings-based navigation frame will create a bookmarks-style panel on the left side of the web page.
- Click OK, and then Export.
- Open the HTML files in an HTML or plain-text editor or in a web browser. You will likely need to clean up the code.
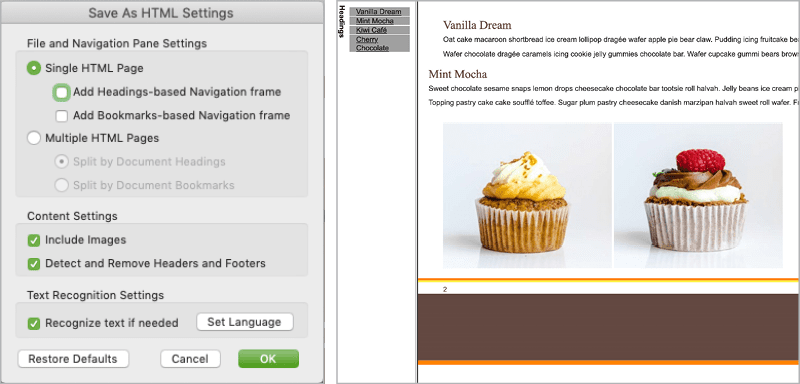
Figure 22. Acrobat can add navigation to your document when you export to HTML.
Export Pages as Images
When you need to include pages of a document as images in another document, on a website, or in a mockup, you don’t need to go find the source file and deal with loading images and fonts. Instead, simply export those pages from the PDF as images.
- Open the PDF in Acrobat.
- Select Export PDF from the right-hand toolbar.
- Select Image, but do not turn on the Export All Images option (which will export all individual images).
- Click the gear icon to adjust quality, color, and resolution-related settings for the available image formats—JPEG, JPEG 2000, TIFF, and PNG (Figure 23).
- Click OK, and then Export.
- Select the folder to save the images to.
- Change the name if desired. This new name will be used for all images, which will be numbered in sequence.
- Click Save.
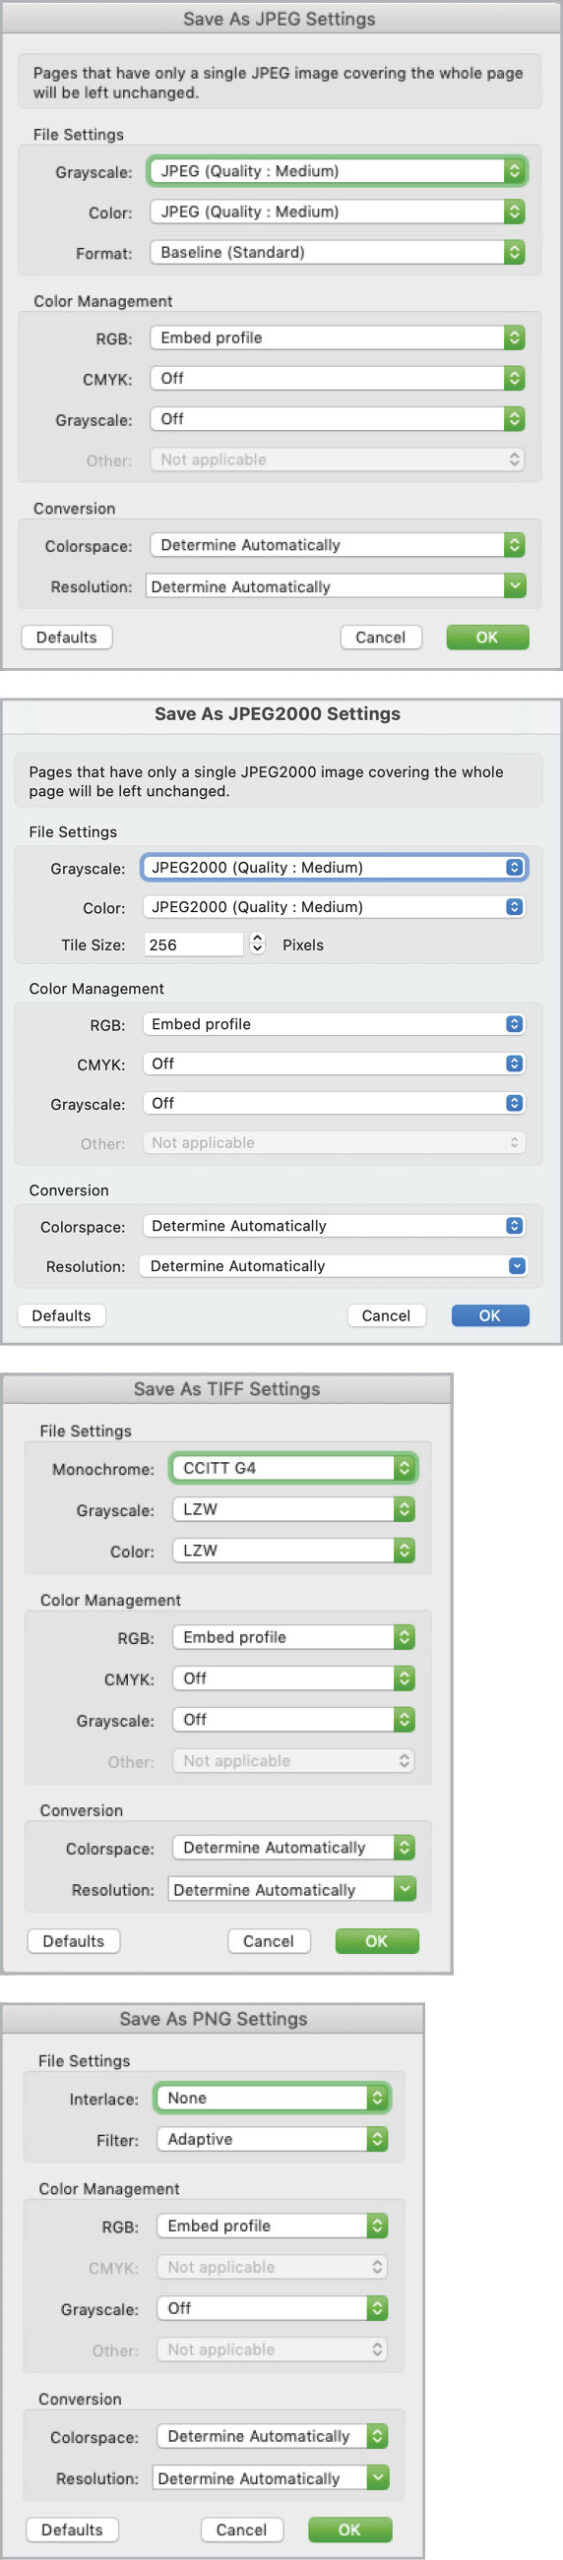
Figure 23. You can adjust output of images depending on file format: JPEG (A), JPEG2000 (B), TIFF (C), and PNG (D).
Password Protect a PDF
If you need to protect a document that has sensitive information, use the password feature to add a level of security to a PDF (Figure 24). Of course, it’s not foolproof, but it will add a bit of a barrier.
- Open the PDF in Acrobat.
- Choose File > Properties (Command/Ctrl+D).
- Select Security.
- From the Security Method menu, choose Password Security.
- Select Require a Password to Open the Document.
- Enter a password, and confirm it when prompted.
- Save the document to apply the password.

Figure 24. Give your document a password, but make sure you don’t lose it.
Restrict Printing and/or Changes
If you need to prevent someone from being able to edit or print a PDF, you can do so in Acrobat (Figure 25). It isn’t 100% foolproof, but it will prevent most people from being able to edit or print the PDF.
- Open the PDF in Acrobat.
- Choose File > Properties (Command/Ctrl+D).
- Select Security.
- From the Security Method menu, choose Password Security.
- In the Permissions section, select Restrict Editing and Printing.
- From the Printing Allowed menu, choose your viewer’s options for printing: None, Low Resolution, or High Resolution.
- From the Changes Allowed menu, select the options you wish to allow viewers to make:
-
- None
- Inserting, deleting, and rotating pages
- Filling in form fields and signing existing signature fields
- Commenting, filling in form fields, and signing existing signature fields
- Any changes except extracting pages
- Select whether you’ll permit the viewer to copy text, images, and other content.
- Select whether you’ll permit the viewer to enable text access for screen readers.
- Select options for compatibility or encryption.
- Enter the password that everyone—including you—will need to use to open the file. Warning: Before doing anything else, note that password somewhere!
- Save the document to apply, and save the settings.
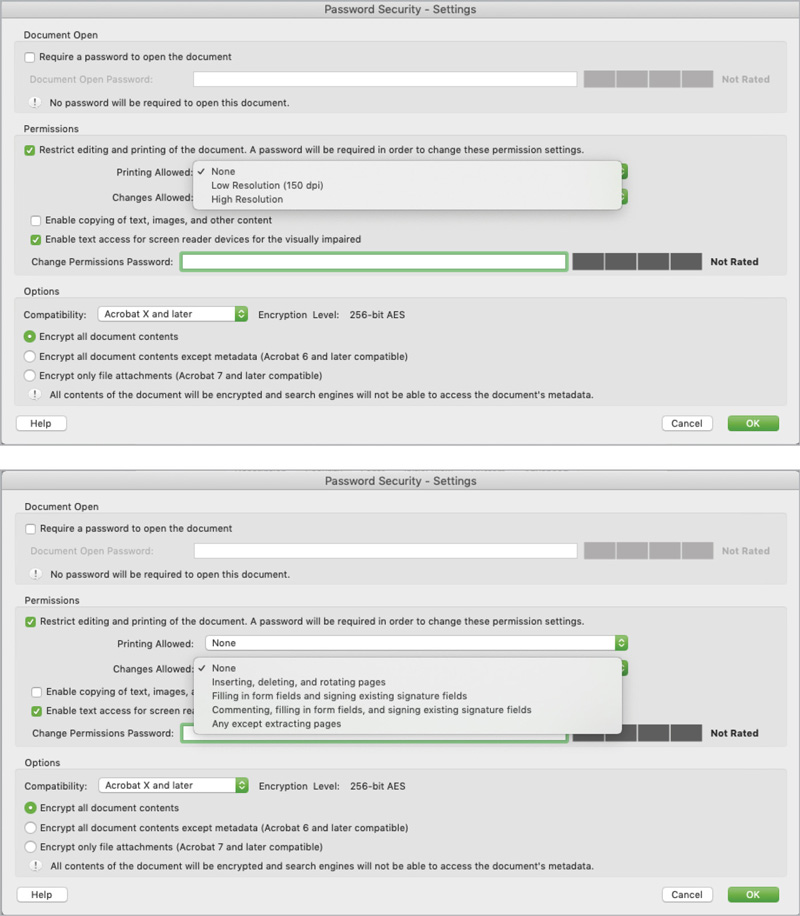
Figure 25. You can lock down whether and how a document may be printed (A) or changed (B).
Add Copyright Information
Another way to help prevent misuse of the content is to add copyright information and state the rights to the work (Figure 26).
- Open the PDF in Acrobat.
- Choose File > Properties (Command/Ctrl+D).
- Fill out the Title and Author fields.
- Click Additional Metadata.
- Set Copyright Status to Copyrighted.
- Add the copyright information in the Copyright Notice field.
- Add a URL in the Copyright Info field, if desired.
- Click OK.
- Save the document.

Figure 26. You can add all sorts of metadata to your PDF, including attribution of authorship and copyright information.
Watermark a PDF
Have you ever accidentally sent a low-resolution proof to the printer instead of the full-resolution PDF? The difference between a proof and a print-quality file is not immediately obvious. You can make it always clear which version you’re looking at by applying a watermark to the proof (Figure 27). This technique also comes in handy if you need to provide an immediately visible statement of copyright on each page. (Metadata alone won’t do that.)
- Create a watermark design and save it as an image, if desired.
- Open the PDF in Acrobat.
- Select Edit PDF from the right-hand toolbar.
- From the Edit PDF menu, choose Watermark > Add.
- You can add and style text for the watermark or upload an image.
- Adjust the opacity, angle, size, and placement.
- Select Appearance Options to specify if the watermark should appear on screen and/or on pages printed from the file, as well as whether to keep the position and size constant when printing on different page sizes.
- Click OK, click OK again, and save.

Figure 27. Add Watermark lets you overlay text or an image to each page of your PDF. You can control its rotation, opacity, size, and placement (A), as well as whether it will appear on screen or in print (B).
Apply a Custom Stamp
You can apply a custom stamp in Acrobat to add a logo, copyright notice, signature, or other message to your document (Figure 28). Unlike watermarks, which apply to all pages, you can apply stamps throughout your document, wherever you want them. You can use the supplied stamps (Approved, Not Approved, Draft, etc.) or upload your own design for a custom stamp.
- Design your watermark or stamp, making sure the page size is the same size as your design, and save it as a PDF.
- In Acrobat, select Stamp from the right-hand toolbar.
- From the Stamps menu bar, choose Custom Stamps > Create.
- Select your image, and click OK.
- Enter a category and name for the stamp, and click OK.
- Add it to your favorites, if desired, by choosing Stamp > Add Current Stamp to Favorites. After you do so, it will show at the top of the menu.
- Select the stamp to apply it.
- Place the stamp where you want it.
- Save the document.
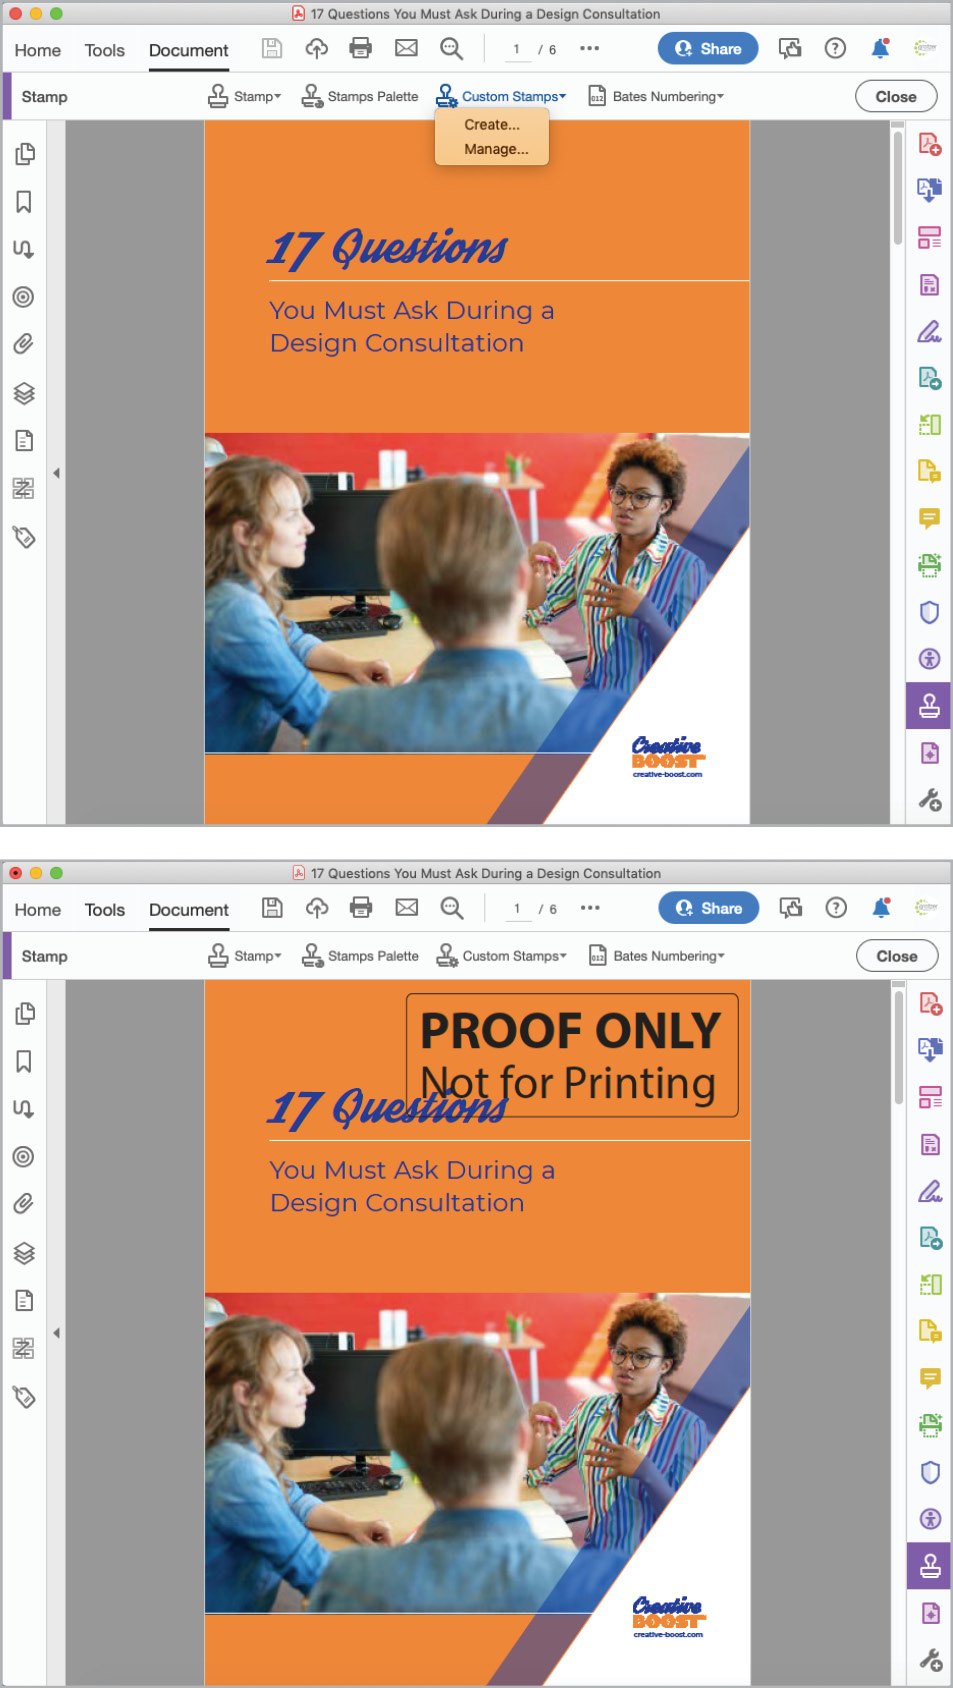
Figure 28. Use the Stamp tool (A) to create custom stamps to mark your PDFs so it’s always clear what their purpose or version is (B).
Is Your Acrobat Really Up to Date?
You can’t count on the Creative Cloud desktop app to tell you that you really have the most recent version of Acrobat! In our experience at CreativePro, the app will tell you your copy is “up to date,” even when it’s not. Check for Updates? That won’t help, either. Believe it or not, the only way to be 100% sure you have the most recent version is to uninstall and reinstall Acrobat.

Top: Acrobat before deleting and reinstalling. Bottom: After. Note that the Creative Cloud Desktop application did not indicate there was a newer version.
Put These Tips into Practice
The more you know what a program is capable of, the more efficient your workflow will be—even when you’re faced with the inevitable challenges. So, the next time you need to modify a PDF in some way—especially if you don’t have a source file—come back to this article to save yourself time and to work smarter, not harder.
Commenting is easier and faster when you're logged in!

Recommended for you

How to Extract All Images From a PDF
Learn how to quickly extract images from a PDF, either individually or all at on...
CreativePro Video: Delete Blank Pages in Adobe Acrobat
In this week’s CreativePro video, David Blatner shows us how to delete multiple...

How to Create PDF Bookmarks with a Table of Contents in InDesign and Acrobat
See pro tips for creating a table of contents and PDF bookmarks from that TOC.