
Facebook has had some ups and downs over the last few months. There was that little kerfuffle about its Terms of Use, which you might recall reading about, oh, everywhere. And a wildly unpopular redesign earlier this year left many users confused.
But despite those missteps, there are still plenty of reasons to like Facebook. It’s not just that Facebook is still the single best online tool for reconnecting with old friends and keeping in touch with current ones.
For creative folks of all stripes — designers, photographers, writers, filmmakers, musicians, theater people, crafters, cupcake artistes, you name it — Facebook represents a huge step forward in our ability to get the word out about our projects and events, and to find a larger audience for what we do.
That’s because Facebook offers an array of useful tools for sharing creative content, and then pushes that content out to your friends’ and fans’ Facebook Home pages. Which means your audience doesn’t have to come looking for your work to discover it. Rather, Facebook helps your work find its way to your audience — as long as you know how to put its features to work effectively.
So here are 12 tips on how creative pros can use Facebook’s various tools together, as part of a grand unified Facebook promotion strategy.
For the purposes of this article, I’m going to assume that you already have a Facebook account and some familiarity with how the site works. If you’re starting from scratch, you’ll find all the basics covered in my book Facebook Me!
1. Start by setting up a Page (a.k.a public profile) for your project or business.
Whatever you’re publicizing, you’ll need a home base for it on Facebook — a central location for all the basic info, announcements, events, and other content that you’ll be posting. That’s where Pages — with a capital P — come in.
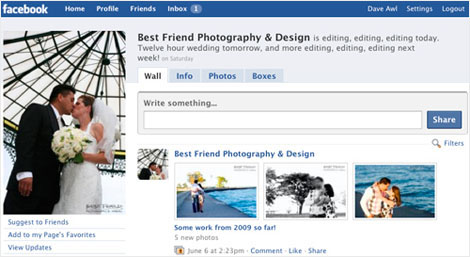
Figure 1: An example of a Facebook Page — this one was set up by an independent photographer and designer to represent her company on Facebook.

Facebook Pages (which Facebook also sometimes refers to as public profiles) are a special kind of profile page that’s specifically designed to represent public figures, companies, organizations, or anyone else who needs to communicate with large groups of fans, customers, and supporters on Facebook.
People who visit your Page can click the “Become a fan” link to declare their support for your Page to their Facebook friends, and also to subscribe to the content you post.
Figure 2: The “Become a fan” link appears in the list of links under the main profile image on the left side of the page, and also to the right of the Page’s name. You can click either.

From your Facebook Page, you can make use of all the same communication tools that are available to personal profiles: status updates, Notes, Events, photos, videos, etc., all of which I’ll discuss below.
You may already have a personal profile on Facebook, but you should still set up a Page for your artistic or business endeavors, because Pages give you some important advantages that personal profiles don’t offer:
• You don’t have to approve friend requests. When someone clicks the “Become a fan” link on your Facebook Page, they’re automatically and immediately added to the ranks of your Page’s fans. If you have a large audience to reach, that can save you a lot of time and tedious clicking.
• You can reach a larger audience more easily. Facebook places limits on how many people you can send messages to from your personal profile, or even to members of a Group you moderate. But a Page gives you the ability to quickly and easily communicate with thousands of fans — as many as your Page attracts.
• You get access to Insights. Insights are statistics that show you how many people are visiting and interacting with your Page on a day-by-day basis, giving you a set of metrics for judging how effective your communications are at generating a response.
Using Pages allows you to preserve a divide between content you post for the general public, and postings that are just for your personal friends, if that’s important to you.
Pages are also distinctly different from Groups. A Group on Facebook is essentially a club made of Facebook members with a common interest. (You may be familiar with the principle from Yahoo Groups or Google Groups.) Groups are great for networking with peers, but there are restrictions on how many members a Group owner can send messages to. And Groups can’t communicate directly to members via their Facebook Home pages the way Pages can. For that reason, Pages are a vastly superior tool for communicating directly with fans and customers. However, Groups are still a great tool for peer-to-peer communications or grassroots organizing.
So how exactly do you create a Page on Facebook? The answer is more complicated than it should be. Although the process of setting up a Facebook Page is easy, finding the starting point can be confusing because it’s hidden away in a place most people don’t think to look for it. (In fact, many people who have trouble finding it give up looking for it altogether and set up a Facebook Group instead, even though a Page would better suit their needs, for the reasons noted above.)
The key piece of information here is that Facebook considers Pages a form of advertising — so the Create a Page button is hiding behind the Advertising link, down in the footer on any Facebook page.
Figure 3: The Advertising link

Once you click the Advertising link, you’ll arrive at Facebook’s Advertising Home page.
Figure 4: The Advertising Home page

Click the Pages tab (circled in the figure above), and you’ll arrive at the Pages page, where you can click the green Create a Page button to get started. From there it’s just a matter of filling out the easy step-by-step form.
Figure 5: Click the Create a Page button.

Once you’ve set up your Facebook Page, you’ll want to let your Facebook friends know that it exists so that they can stop by and click the “Become a fan” link. Facebook provides an easy way to do just that: Page Suggestions, which you can send using the handy link on your Page.
Figure 6: Click the Suggest to Friends link in the left-hand column of a Page opens up a form that lets you send Page suggestions to people you know. You might need to click the More link to expand the list of links before it’s visible.

You can also post a link to your new Facebook Page on your own Web site or blog, and you can encourage your most loyal supporters to post the link to your Page on their own Facebook Walls, so their friends find out about it.
2. Make use of Facebook’s News Feeds to reach people outside the boundaries of your fan base.
One of the best things about Facebook is that it allows you to go beyond preaching to the converted. The secret ingredient to effective word-of-Facebook promotion is taking advantage of a phenomenon called passive endorsement, whereby Facebook’s News Feeds make the content you post visible not only to your own friends and fans, but to all the people they’re friends with, as well.
Here’s an example. Suppose you’re looking at a friend’s Wall and you see that your friend Pat has just become a fan of a band called, oh, I don’t know — the Passive Endorsers, let’s say.
Assuming the friend is someone whose taste you respect — and especially if Pat is the sort of highly respected friend who repeatedly turns you on to great things — you may feel motivated to go check out the Page for the Passive Endorsers. (With a snappy name like that, how could they not rock?) If you like what you see and hear, you may even click the “Become a fan” link yourself.
In this case, Pat hasn’t directly told you to go check out the band — which would be active endorsement. Instead, Pat’s merely set an example that you’ve chosen to follow.
Figure 7: An example of the story that appears on your Wall when you become a fan of a Page.

Facebook is packed with opportunities for this dynamic. It’s part of what makes Facebook so compelling — the fact that you learn things from your Facebook friends that they might not think to tell you about directly.
As a creative pro, the potential benefits to this are numerous. Perhaps you’re organizing an event of some kind. You can send out invitations to everyone on your mailing list, and you can ask them to pretty please tell their own friends and contacts about the event. While some of your most loyal fans might even remember to do that, the vast majority won’t get around to it.
But if you post an Event on Facebook, every time your fans or friends click the Yes button to RSVP that they’re coming, a message appears on their Walls telling their friends that they’ve just endorsed your Event.
Figure 8: An example of the story that appears on your Wall when you RSVP to an Event.

Your friends can also post the Event to their own profiles with a few simple clicks, meaning it can be seen on the Home pages of all of the people they know on Facebook.
Figure 9: When you post an Event to your profile, an Event story like the one above appears on your Wall as well as the Home pages of your friends.

The result, if you’re lucky, is a ripple effect that carries the news of your Facebook Event further than you could spread it by telling only the people you already know.
This works for all kinds of Facebook content — not just Events, but photos, videos, links, Groups, Notes, and even Pages themselves. Every time your Facebook friends and fans interact with what you post, you gain a little more potential exposure.
Also note that every post on Facebook has a “Like” link, which users click to indicate a positive response to what they see. It’s Facebook’s form of applause, kind of like finger-snapping in a beatnik café. (Or, to use a more contemporary example, like Digging an article on a news site or blog.)
Figure 10: The Like link

Postings that generate a lot of “likes,” a lot of comments, or both, have a higher chance of appearing in the Highlights column on the right-hand side of the Home page, drawing greater attention to them.
Figure 11: Items are more likely to show up in the Highlights column if they have many “likes.” Other factors that help are the number of people attending (for an Event), the number of comments, and the number of fans (for a Page).

All of this means that the more your posted content strikes a chord and generates interest, the more likely it is to be seen by Facebookers outside the set of your current friends and fans.
What’s the best strategy for putting this ripple effect to work for you? That’s what the next tip is all about.
3. Remember that on Facebook, the best way to promote your creativity is to share your creativity.
Or to put it another way: The most effective way to advertise on Facebook is not to advertise. I know that may sound like a Zen riddle, but bear with me — this particular pebble isn’t so hard to snatch.
To be really effective at promoting on Facebook, you need to step outside the standard promotional mindset. Facebook is first and foremost a social space, which means that blatant, hard-sell advertising is greeted with about as much enthusiasm as a life insurance commercial in the middle of an action movie.
On the other hand, thanks to the News Feed ripple effect discussed above, if you post content that amuses, entertains, informs, or otherwise engages people, you’ll attract friends and fans.
So instead of advertising your creativity, let people see it for themselves by sharing it. From your Facebook Page, you can post photos, videos, long and short messages, invitations to events, and more, all in a way that enters into the spirit of the party. You’ll become part of the friendly Facebook conversation instead of interrupting it.
That means you should think of each of the Facebook tools discussed in the next few tips as opportunities to show off your inventiveness, your wit, your innovation, your sense of style — whatever qualities make up the essence of your creative spirit.
Ultimately, this is really just a variation of that old creative writing rule, “show, don’t tell.” Instead of using Facebook to tell people how inventive you are, post samples of your inventiveness and show them.
Now let’s look at how to do that on a tool-by-tool basis.
(see page 2)
This article was last modified on December 14, 2022
This article was first published on July 1, 2009
Commenting is easier and faster when you're logged in!

Recommended for you

TypeTalk: How Good Typography Can Help Your Job Search
Karl Heine, principal and solutionist of creativeplacement with offices in CT an...
Is it Real or is it a Wrap?
While they’ve been around for many years, vinyl wraps – digitally printed graphi...

Building Email Templates
Rise to the top of your customers’ overflowing inboxes with effective and effici...