
10 Steps to Accessible PDF
Making sure that the PDF files you create are accessible to all users should be an important part of your workflow— regardless of what industry you work in.


This article appears in Issue 130 of InDesign Magazine.
When I mention the term “accessibility” to most InDesign users, I typically get a blank stare. As designers, we’re visual people and we focus on the appearance of what we create because that’s what we’ve all been taught to do. But appearance isn’t everything. We also need to consider how people with low-vision, blindness, or mobility impairments can consume our content. Those folks often use assistive software commonly referred to as “screen readers” that read content (usually a PDF or website) aloud. In an era where even household appliances can understand and respond to human speech, this may sound simple enough. But unfortunately, not all PDF files are created equal. Having actual live text in the document is a very important factor in making a file readable, but there are several other factors that also come into play.
To understand what it’s like for a non-sighted user to access the content of a PDF, let’s use the analogy of a printed newspaper. Imagine you open a newspaper in the morning looking for the news, only to discover that it contains nothing but blank pages. How would that make you feel? Or imagine opening the newspaper and there’s text on the page, but no headlines to tell you where one article ends and the next one begins. Your only option would be to read the newspaper from beginning to end. These examples are exactly what an impaired user may experience when a PDF file is not made to be accessible.
When we talk about making documents accessible, we use the term “remediation” to describe the process of generating a PDF file that can be read by non-sighted users. That makes you the “remediator.” There are two primary methods of remediation. The first is to take an existing
PDF file and modify it in Acrobat or another PDF editor so that it can be read aloud by assistive software. This method, however, is the time-consuming, arduous, and expensive way of making an accessible document.
The second—and much better—way is to start with the source application and add properties that facilitate the creation of an accessible PDF file. Not all source applications give you this control, but applications like InDesign, Microsoft Word, and Microsoft PowerPoint allow us to do it efficiently.
In this article, I’ll be focusing on the steps for creating accessible PDFs from InDesign. Although we’ve been able to accomplish this task to some degree in InDesign for years (CS5.5 was the first version to offer accessibility features), the InDesign team has continued to improve things with each release. So before trying to make your documents accessible, be sure you’re using the most recent version of InDesign that fits your workflow.
Step 1: Review Your Document
I know it sounds obvious, but just as you wouldn’t dive in and start designing a project until you understand the goals and objectives, you need to get familiar with the content before you can start adding accessibility properties to your InDesign file. Evaluate things such as how objects are ordered on the page. How many heading levels are in the project? Are there tables? Are they complex or built in an inefficient way? Which elements require special attention? Once you have an understanding of what content is in the document, you can get to work adding the appropriate properties to the file and address any issues that you’ve encountered.
Step 2: Check Color Contrast
As designers, we tend to naturally use colors that create sufficient contrast between text and what’s behind it on the page, but this is an important factor to consider for low-vision and even colorblind users. To check color contrast of a document, I like to use a product called the Colour Contrast Analyser (CCA) by The Paciello Group. This free tool allows you to pick the color of your text as well as the background color behind the text and reports whether the text has sufficient contrast at various sizes based on the WCAG 2.1 requirements (Figure 1).
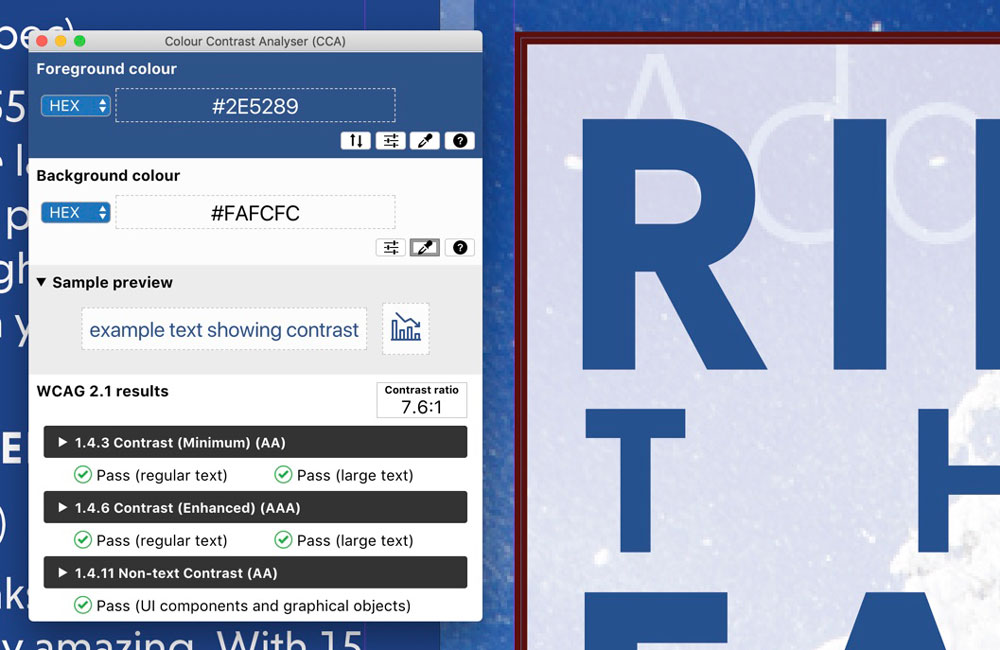
Figure 1. The Colour Contrast Analyser allows you to check the contrast of the text to the background color behind it.
WCAG is the Web Content Accessibility Guidelines—one standard used to determine if web and PDF content is accessible. If your text color does not have sufficient contrast against the background color, consider making a change in the InDesign file. It’s much easier than addressing contrast problems after the PDF file has been created.
Step 3: Add Metadata
When it comes to metadata, the Title and Language properties are always required for accessibility. Metadata can be added to InDesign documents either in Adobe Bridge (in the appropriate field of the Metadata panel) or by choosing File > File Info from within InDesign when your document is open.
Although the Title and Language fields are the only required metadata elements, I encourage document remediators (remember, that’s you) to add Author, Subject, and Keyword information to the file as well. This is especially important for public-facing documents that will be posted online. As a side benefit, adding additional metadata will assist with SEO, so Google and other search engines have a more complete picture of what’s in the document.
Adding the document Title is a multi-step process. First, you need to add the title to the Title field (in InDesign or Bridge). Then, you also must set the title to be displayed in Acrobat when the PDF file is opened. We all have files with obscure names like “flyer_fall_2019_R9a_final.pdf.” This name is just as useless to a non-sighted user as it is to a sighted user.
You can do that in Acrobat by using File > Properties. But, again, it’s better to set it up in InDesign during the export process: to display the title and define the language of the document, you can click on the Advanced category (in the Export PDF dialog box) and choose Document Title from the Display Title drop-down menu (Figure 2). Then choose the language from the Language drop-down menu.
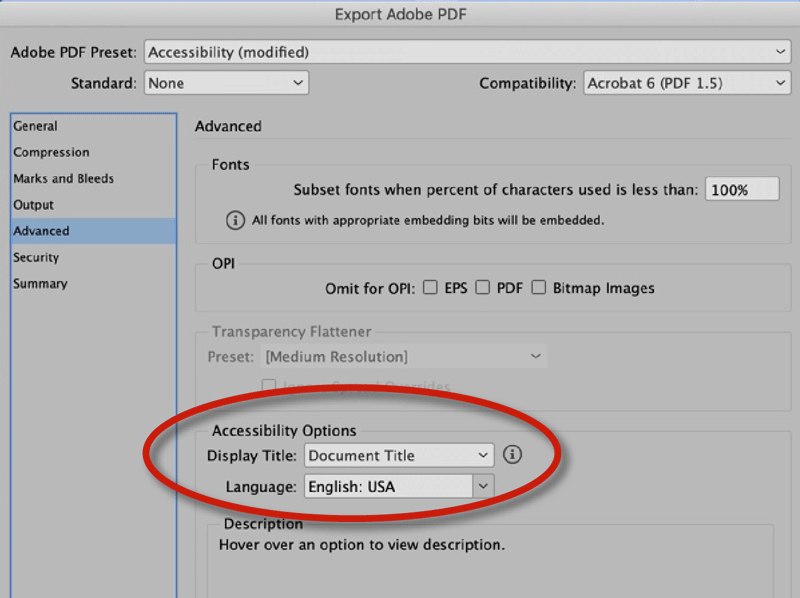
Figure 2. Defining the display title and language in the Export Adobe PDF dialog box
Step 4: Use Real Bulleted and Numbered Lists
Lists in an accessible PDF file are treated in a specific way to let the user know that a sequence of paragraphs belongs together as a list. Sighted users identify these elements automatically when they see the bullet characters and numbers at the start of each paragraph. Fortunately, ensuring that bulleted and numbered lists are structured properly in the exported PDF is actually quite simple to do in InDesign (and you’re probably doing it already). Just make sure all your lists are properly formatted with automatic bullets/numbering from the paragraph style. Or, at a minimum, make sure that you use the bulleted or numbered list formatting buttons to format the respective text. Just avoid manually typed numbers and bullets. This way, your lists will be structured properly in the all-important Tags panel in Acrobat (more about that later). (Figure 3)
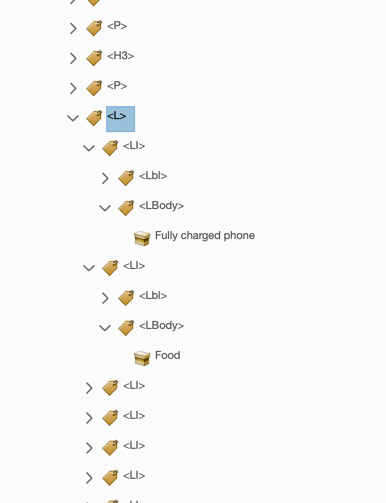
Figure 3. When using the bulleted and numbered list feature in InDesign, the tags in the exported PDF file are properly structured.
Step 5: Use Headings for Hierarchy
Headings are one of the ways we add hierarchy and structure to the text in the documents that we design. As designers, we do this naturally. We usually make the most important text the biggest, slightly less important text we still make big but a bit smaller than the really important stuff. It’s just logical, and gives visual readers the opportunity to glance over a document to find information quickly. This same benefit should be provided for non-sighted users and is accomplished by applying appropriate heading tags to the headings in a PDF document.
Accessible PDFs provide for 6 heading levels from 1 to 6, with H1 being the most important headings in a document and H6 being the least important headings in a document. Assistive software allows users to employ a keyboard shortcut to read all of the headings in a document, just as a sighted user scans the headings in a document to find the topics they’re interested in.
Proper tagging of headings is accomplished first by ensuring that you’ve applied paragraph styles to all of the headings in your InDesign document. Once that’s done, you can map the appropriate PDF heading level in that style. Start by opening the Paragraph Style Options dialog box for the heading style that you’re working with. On the left side of the dialog box, you’ll see a category called Export Tagging. Click that category to display the options; at the bottom of the dialog box you’ll see a section called PDF. In the Tag drop-down menu, you can choose the appropriate PDF tag that you’d like applied in the exported PDF file for each heading (Figure 4).
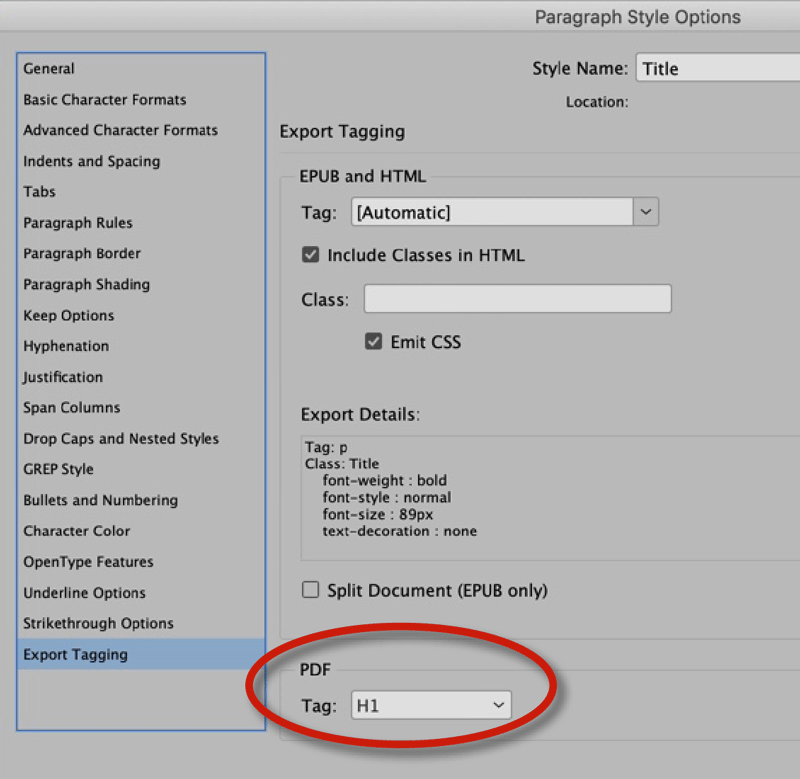
Figure 4. Defining the PDF export tag in the Paragraph Style Options dialog box
Step 6: Apply Alt Text to Images and Graphics
We’ve all heard many times the old adage that a picture is worth a thousand words, which is true for a sighted user. But pictures are a challenge for accessibility, of course. Because of this, you need to add alternate (or “Alt”) text that can be read aloud by assistive software to describe images in context.
I stress the phrase “in context” because it’s not enough to say “person standing in a room” for an image. That doesn’t provide the reader with much information. A more appropriate alternate text description might be “a woman with long dark hair and glasses, wearing business attire standing at the window in her sun-lit office.” I tell people to close their eyes and think about what the alternate text is saying. Based on the alternate text, can you envision what the photograph looks like? If not, you should rewrite it.
As designers of visual projects, it’s quite common for us to add graphics and images that add to the visual aesthetics of the project. However, the reality is that sometimes those elements are purely decorative. They only make the project more visually appealing, and there’s no value in describing those images to a non-sighted user. Such elements can be “backgrounded” or “artifacted” (Acrobat uses both terms to describe the same thing), which basically means that those elements will not be read by assistive software.
Adding alternate text and artifacting an image are both accomplished in InDesign by selecting the image with the Selection tool and choosing Object > Object Export Options. Clicking on the Alt Text button allows you to choose the alternate text source. Choose Custom to manually enter the alternate text that you’d like applied to the image. Or, you can pick from one of the XMP metadata fields of the image to extract the alternate text from the metadata field of the image to generate alternate text in a more automated fashion (Figure 5).
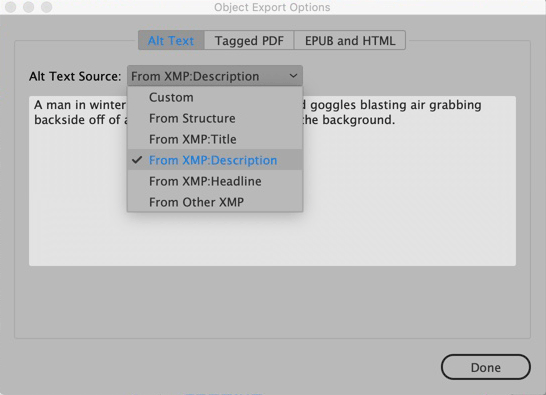
Figure 5. Adding alternate text to an image using the Object Export Options dialog box in InDesign
Clicking on the Tagged PDF tab at the top of the Object Export Options dialog box provides the option to choose what tag is applied to the selected object from the Apply Tag drop-down menu (Figure 6).
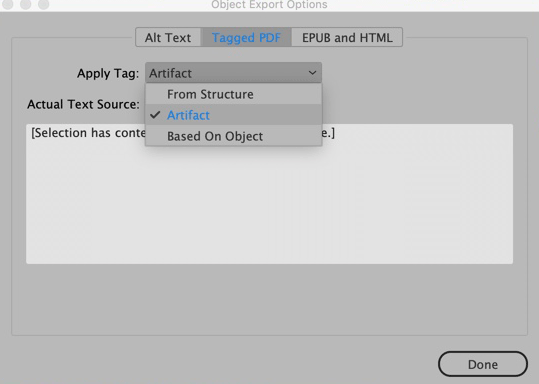
Figure 6. Applying the Artifact tag to objects that shouldn’t be read by assistive software
The primary purpose of this section is to apply the Artifact tag when you don’t want assistive software to read a particular image. Again, this is usually done when an image doesn’t contribute to the reader’s understanding of the content.
It’s also worth mentioning that objects drawn in InDesign (or copied and pasted into InDesign as paths from another application such as Illustrator) will automatically be artifacted in an exported PDF file.
Step 7: Set the Reading Order
Probably one of the more confusing concepts for beginning PDF remediators is that of reading order. Not because it is difficult to understand per se, but because there are actually two different reading orders to contend with in an accessible PDF file. Furthermore, ironically, the order as shown in Adobe Acrobat’s Reading Order panel (and Order Navigation pane) is not the most important reading order that you need to define. Let me explain.
Assistive software programs like JAWS (Job Access With Speech) or NVDA (Non Visual Desktop Access) take the tag order—as listed from top to bottom in the Acrobat Tags pane—as the order in which it reads objects in a document. As you can imagine, this order is incredibly important, since if it’s not correct, the content may not make any sense to the user. For example, think about a document such as a tri-fold brochure. When it’s laid out flat, you can’t read this document left to right as you would most other documents. So, for a document like this, it’s critical that you get that tag order correct.
How do you accomplish this in InDesign? By default, the tag order is defined in a linear manner, starting at the top left of each page in the document, moving across each page, and then down. For InDesign documents where this approach is not sufficient (again using a tri-fold brochure as an example), you need to use the Articles panel. There, you systematically determine the order that objects will appear in the Tags pane of the exported PDF file. Begin by selecting the first object in the document and using the Selection tool: drag it and drop it on top of the Articles panel. That object gets added to the Articles panel and becomes the first object that will appear in the Tags pane of the PDF. Continue adding objects to the Articles panel in the order that they should be read in the exported PDF (Figure 7).

Figure 7. Adding objects to the Articles panel in InDesign
When you’re done with that, there’s one last feature that needs to be enabled in order for the Articles panel to do its job. Go to the panel menu, and choose Use for Reading Order in Tagged PDF (Figure 8). If you don’t enable this option, it’s as if you didn’t add anything to the Articles panel at all.

Figure 8. Enabling the Use for Reading Order in Tagged PDF in the Articles panel to ensure that the tags export in the proper order in the exported PDF file
However, just because you get the tag order correct doesn’t mean you’re done. You also need to contend with the Reading Order, as shown in Adobe Acrobat’s Reading Order panel and Order navigation pane. I call this the “flow order.” It is not used by assistive software such as JAWS and NVDA, but it is often used by low-vision readers to reflow the text of a PDF file.
One way to get a sense of how this behaves is by opening a PDF file in Acrobat and choosing View > Zoom > Reflow. You’ll see the content gets taken out of the layout in which it was designed and flows for an easier reading experience (Figure 9). I liken this to the read mode found in many web browsers.

Figure 9. The Reading Order of a PDF is reflected when the text is reflowed in a PDF file.
I use the Reflow feature in Acrobat only to demonstrate the reflow behavior; low-vision users have more robust tools for reflowing the text that do a much better job. Unfortunately, it’s nearly impossible to get perfect reading order straight out of InDesign. That’s because InDesign uses the stacking order of the objects in the Layers panel to set the reading order of content in an exported PDF. For example, the bottommost object is first, then the object on top of that, and so on. For simple documents, you may be able to get away with dragging the objects up or down in the Layers panel (after clicking the triangle next to the layer name to expand it). But for most documents, this is impractical.
The result is that you’ll almost always need to fix the reading order in Acrobat after the PDF has been exported.
Step 8: Anchor Graphics as Needed
Many designs contain elements that appear in the middle of flowing text. This is often accomplished by positioning elements at appropriate locations and applying text wrap to the object to cause them to push away the text around them. The challenge for us as PDF remediators is to control where those items are read in the document. At times it may make sense to read the object at that exact location, but at other times you’ll need to make a judgment call regarding where (or if) the object will be read. By default, the object will often appear at the bottom of the Acrobat Tags pane when exported to PDF.
When using the Articles panel, objects can only be inserted before or after another object. You can’t insert an object in the middle of another object. A text story is a single object. So in order to force an image or graphic to be read at a specific location within a story, you need to anchor the object, or make the object inline within the text. By doing this, you can define exactly where in the tag order the object will be read.
There are challenges with this method, however—specifically, the fact that text wrap cannot affect the line on which the wrapping object sits. So you often need to choose to place the object at the end of the preceding paragraph, as opposed to the beginning of the paragraph where you want the object read.
Step 9: Use the Right PDF Export Settings
If you want to get an accessible PDF out of InDesign, you can’t use the Print command. This may sound obvious, but I still run into a lot of users who create PDF files out of InDesign by choosing File > Print, and then selecting Save as PDF as their “printer.” But using the Print command to create a PDF file from any application will yield a PDF file without any tags at all, so it’s a nonstarter for accessibility.
To generate an accessible PDF file, you’ll want to choose File > Export, and choose one of the PDF options from the format drop-down menu: either PDF (Print) or PDF (Interactive). Both choices allow you to generate an accessible PDF file, but I typically use the Print option unless I’m outputting a PDF that contains form fields, buttons, and other interactive content.
For creating an accessible PDF file, there are a few important options that you’ll want to enable. All of the important options for accessibility are found in the General and Advanced (Figure 10) sections of the Export Adobe PDF dialog box.
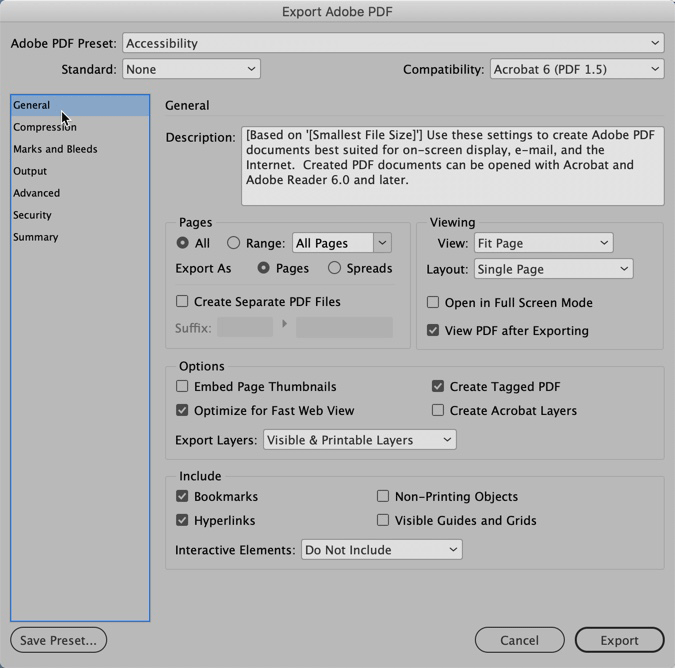
Figure 10. Accessibility options are found in the General and Advanced sections of export dialog box.

In the General Section:
- View PDF After Exporting
- Create Tagged PDF
- Bookmarks
- Hyperlinks
In the Advanced Section:
- Display Document Title
- Define Language
Step 10: Clean Up in Acrobat
When I’m creating accessible PDF files, I shoot for the 85/15 Rule: I try to do 85% of the accessibility work in InDesign (or any other source application) so that I only need to do the remaining 15% of cleanup in Acrobat. This is very much a general rule of thumb, and depending on the length and complexity of the document I may do better or worse. You’ll never get to 100% efficiency because there’s always some amount of cleanup to do in Acrobat after generating the PDF file. But try to keep that work to the bare minimum, because if you ever need to regenerate the PDF file for any reason, all of that additional cleanup that was done in Acrobat will need to be done again to the new PDF file.
The amount of cleanup that you’ll need to do will also vary depending on the standard that you’re shooting for. For the sake of this article, we’re going to use the Acrobat Accessibility Checker, which generally checks against the WCAG standard.
To check your document, open the Accessibility tool in Acrobat, and click on the Full Check option to open the Accessibility Checker Options dialog box (Figure 11).

Figure 11. Choose Full Check from the Accessibility tool in Acrobat to run the Acrobat Accessibility Checker.
Leave all of the options in the dialog box enabled, and click the Start Checking button (Figure 12).
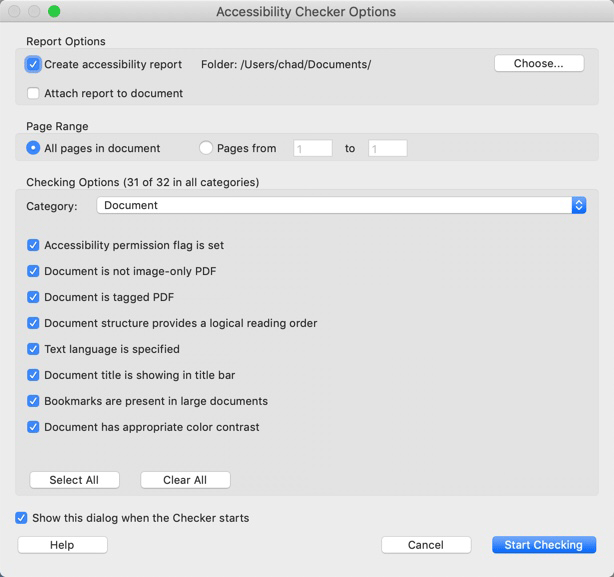
Figure 12. The Acrobat Accessibility Checker dialog box
Acrobat will run the Accessibility checker and display a report in the navigation pane on the left side of the Acrobat interface. You’ll see seven different categories in the report, and any issues that have been found will be shown in the report. The Document section will always show two issues (not errors) that basically tell you that reading order and color contrast can’t be checked by Acrobat and need a human being to perform that step.
Files exported from InDesign will always present an error for the Tab order. (Well, at least they do at the time of this writing. Perhaps Adobe will fix this in the future.) However, you can simply right-click on that error and choose Fix to remedy the problem. Other errors may require going back to InDesign to make adjustments and re-exporting the PDF file, and applying fixes in Acrobat for things like reading order, as discussed earlier.
Accomplishing Accessibility
The process of creating an accessible PDF file may seem a bit daunting after reading these steps, but in all honesty, most of what needs to be done to create an accessible PDF file comes down to creating clean files in InDesign and paying attention to detail. As you remediate more files and gain more experience, you’ll find yourself instinctively adding the necessary elements into the file that will aid in the overall process.
Furthermore, the founding principal of accessibility is “equal access for all.” Ensuring that any user, whether sighted, non-sighted, low-vision, or mobility impaired, will be able to access the content in the file that you create is vitally important. It also shows our commitment as document designers to the idea that all users attempting to read our documents should be able to do so in a reasonable and convenient manner.
Editor’s Note: Check out Chad’s LinkedIn Learning course Creating Accessible PDFs for more information.
Commenting is easier and faster when you're logged in!

Recommended for you
InDesign Magazine Issue 130: Accessible PDF
We’re happy to announce that InDesign Magazine Issue #130 (February 2020) i...
InDesign Magazine Issue 147: Illustrator vs. InDesign
Issue 147 has articles on InDesign vs. Illustrator, InCopy vs. Word, emphasizing...

Adobe Mobile Apps for Designers
Is your mobile device part of your creative workflow? If not, it should be. Here...