


Here are 10 assorted Find/Change tips. None of these are tricky, sneaky, or original. But I consider them to be required knowledge for any user of the Find/Change dialog box.
1. Beware of the scope. Use the “Search” drop down menu to specify how much of your document the find/change will affect. The contents of the drop-down list will vary, depending on how many documents you have open and what you have selected. Keep an eye on this. In my experience, it is easy to miss the search option. For example, you may think you’ve searched the entire document, but you’ve only searched the current selection.

2. Use the hover. While we are talking about scope, don’t miss the 7 buttons pictured below. They specify whether the Find/Change affects locked layers and locked objects, locked stories, hidden layers and hidden objects, master pages, or footnotes. If you have trouble remembering which button is which, just hover over the icon with your mouse still for a moment, and the function of each icon will be displayed.
![]()
3. What is it? The Find/Change dialog is an odd duck. It is a “non-modal” dialog, which means that it behaves more like a panel. You can zoom in and out, and do any other InDesign operations while the Find/Change dialog is open. If you have the screen real-estate, there really is no reason to close Find/Change at all if you use if frequently. But alas, it isn’t a panel either, so it can’t be grouped and docked with the panels on your screen, or be saved as part of a workspace.
4. Copy/paste or drag & drop. You can populate the “Find what” or “Change to” fields with text by copy/pasting or drag & dropping text into the fields. (You must have Drag and Drop Text Editing enabled in Preferences > Type to use drag & drop.) This is a good way to ensure accuracy, especially for complex text or text that includes special characters.
5. Change to Clipboard Contents. If you need to replace found text with a large amount of text, or perhaps multiple paragraphs of text, it might be easier to fill in the dialog as shown below. A long time ago, when Anne-Marie was 4 years younger, she wrote up a nice blog post about how to use this tip to find text and change it to an anchored graphic.
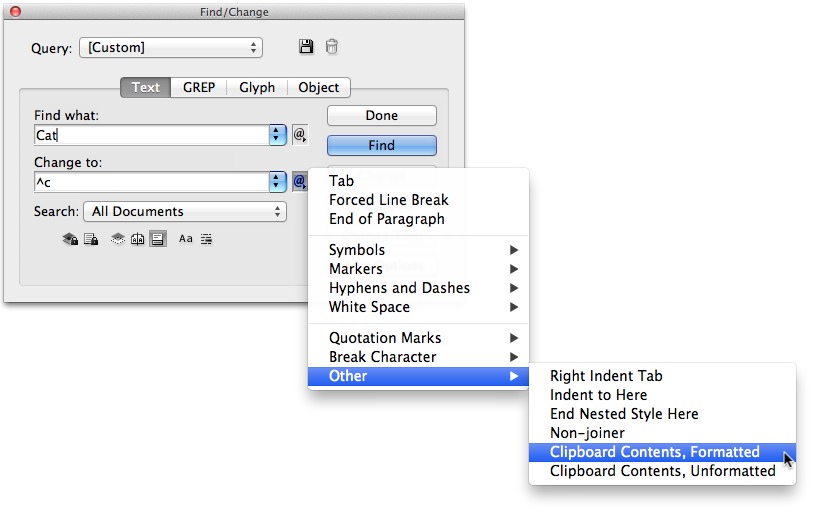
You can replace any found text with the current contents of the clipboard.
6. Zoom before Find/Change. If you are doing a Find/Change where you need to inspect and approve each change, make it easy on yourself and zoom in first. It can be difficult to locate the found text that is highlighted if it is on a complex page. But if you zoom way in, each text “find” will be centered in the middle of your screen when you click the “Find Next” button.
7. Use Story Editor. Text in hidden layers, or text in complex multi-state objects, will not display properly when it is found. To work around this, when the text is found, press Command+Y (Mac) or Ctrl+Y (Windows) to display the found text in the Story Editor, where you will be able to see it in context.
8. Save your Queries. If you have a particular find/change that you repeat frequently, save it as a custom Query by clicking on the disk icon at the top of the Find/Change dialog, and give it a name. In the future, you’ll be able to recall the find/change by choosing it from the “Query” drop-down list. Anne-Marie describes how to use this technique to create a “Clear All” query here.
9. Buy Multi-Find/Change. If you find yourself managing a lot of saved queries, you need to check out the Multi-Find/Change plug-in from Automatication. This VUPI (very useful plug-in) should be in every InDesign users’ toolbox. It lets you easily manage large amounts of find/change queries, and best of all, lets you chain together multiple queries to perform complex sequences of find/change with a single click.
10. Clean up your paragraph styles. To replace one style with another and remove any local overrides in paragraphs that have the style applied, specify the paragraph style you want to replace in the Find Format field. Specify the paragraph style to convert to in the Change Format field, and click Change All.
BONUS TIP: David describes how to use Find/Change to delete text in this post.
There you have it. I could go on with another 10 or 20 find/change tips, but that’s enough for now!
This article was last modified on December 11, 2020
This article was first published on December 21, 2012
Commenting is easier and faster when you're logged in!

Recommended for you

Add a Digit with GREP Groups
A simple introduction to grouping GREP expressions shows how easy it is to manip...

Tip of the Week: Finding Without the Find/Change Dialog Box
Sign up for the InDesign tip of the week to get a new tip, roundups of new artic...
Find More Than One Paragraph with GREP
GREP is, by default, set up to find text inside a paragraph. That is, if you sea...