

What’s New With Photoshop CC 2019

The 2019 release of Photoshop CC brings a raft of new and improved features that will enhance the way you work with images. It also includes some interface changes that bring it into line with other applications, and which may consternation at first—until you realize that they represent a more logical way of working.
Content-Aware Fill
The Content-Aware Fill dialog gives you the ability to patch a selection with texture found nearby in the image. On occasion, this can result in the wrong area of the image being sampled—as in this example, in which I want to remove the Motel sign from this scene. Selecting it and using Shift-Backspace to open the Fill dialog uses the old method, which results in parts of the building being used to fill the space:

This is clearly inappropriate for the scene. If you instead choose Content-Aware Fill from the Edit menu, you’ll now be presented with a new dialog. Here, you can paint out the areas you don’t want included in the fill, which allows you to remove that building from the area under consideration. This features a live preview, so you can see the changes made to the end result as you paint out unwanted regions:
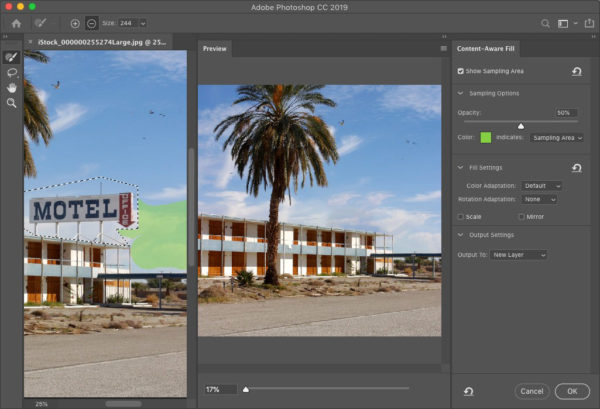
The dialog also includes the option to produce mirrored, rotated and scaled fills, all of which were previously impossible. So when removing the hands from this clock, for instance, we can choose a Rotation Adaptation method (there are several degrees available) to allow Photoshop to patch the missing areas more appropriately:

You can also now choose to output the patch to a new layer, which enables non-destructive editing for the first time.
Frame Tool
A wholly new feature is the ability to convert any shape into a ‘frame’, by right-clicking its name in the Layers Panel choosing Convert to Frame from the contextual menu. You can now populate that frame by dragging any image into it from your desktop, and it will be automatically scaled to fit. You can also convert a text layer into a frame, enabling you to fill that text with texture or images faster than was previously possible.

Blend Mode previews
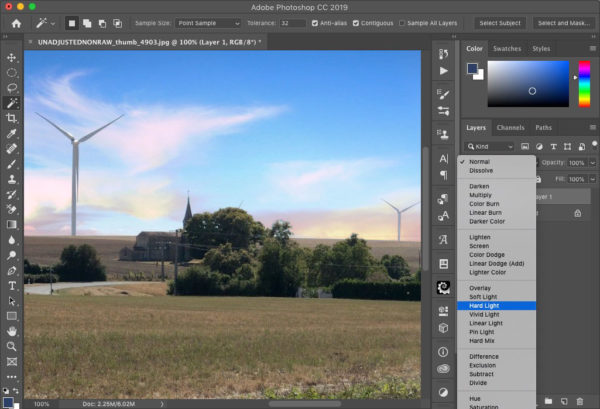
Photoshop includes a large and sometimes bewildering range of layer Blend Modes, often with such impenetrable names as Linear Light and Hard Mix. Now, you can preview each mode by rolling over it, without having to apply it first. This is especially useful for tasks such as applying a new sky to an image, where different blend modes can produce a variety of subtle effects:
Layer alignment
Photoshop has long had the ability to align and distribute layers, which is of particular benefit to web and interface designers. Now, you’re able to distribute objects of different sizes accurately, by evening out the space between those objects.
Here, the top three buttons have been selected and, in the middle version, aligned to produce equal spacing between them. But note that in order to do this they have had to be converted to Smart Objects first, so that each button and its associated text is essentially a single object; otherwise, Photoshop will misunderstand the alignment procedure, and will align all the objects incorrectly—as can be seen in the bottom example.

Changes to Undo
To bring Photoshop into line with standard working practice in other applications, using Command-Z or Ctrl-Z repeatedly will step back through the history, rather than toggling the last undo back and forth as was the previous behavior. You can still toggle, by holding the alt/option key as well. This will undoubtedly disconcert diehard users, but it does make sense. By way of compensation, the Undo and Redo items in the Edit menu now correctly tell you what you’re going to undo or redo when you select it.
Text Tool changes
In every version of Photoshop to date, you’ve had to hit the Enter key to apply a text change. Now, you simply click away from the object to apply the change. Most users will, however, appreciate the fact that you can now edit a text object by double-clicking it with the Move Tool, rather than having to select the Type tool first.
Dragging with the Type tool to create an area type box will now by default fill the box with sample Lorem Ipsum text—but it’s easy to just delete this if you don’t want it, and there’s a Preferences checkbox to turn off this feature if you never want to use it.
Free Transform changes
As with Text layers, clicking away from an object while in Free Transform mode will now commit the transformation. While this makes sense for text, it can be disconcerting when you’re rotating a layer, as you can now do so only when the cursor is close to a corner; move it more than an inch or so away, and when you try to drag you’ll find you exit Free Transform. Once again, this behavior will be unnerving at first, especially for users who are used to moving the cursor a long way away in order to produce small-increment rotations. You can still do this, however, by clicking close to the object and then dragging away while rotating.
When scaling text or pixel layers, you have previously had to hold the Shift key in order to maintain proportions. Now, proportions are maintained as a default, and you hold the Shift key to unconstrain that feature. Again, this will take some getting used to; but again, for the majority of users, who always want to keep layers in the same proportion when scaling, this will be a simpler way of working. When scaling other layers, such as shapes, the old behavior is retained.
If you drag a side handle when transforming a text or pixel layer, you’ll now scale it in proportion; again, hold the Shift key to scale it non-proportionally.
The center marker that appears when you use Free Transform is now hidden by default, as it appears some users were inadvertently dragging it when they meant to move the layer. For those who use it regularly—it’s particularly useful to be able to move it when scaling an object towards the center—it can be shown again via an option in Preferences.
You can now use simple math in number fields—so if you want to make a layer exactly one-third of the width, for example, you can type “100/3%” in the Width field.
Best of the rest
Brush Symmetry is now officially out of ‘tech preview’ mode, allowing you to mirror brush strokes across a range of preset axes. A new Home button opens the opening screen you see when no windows are open, even when you already have open documents—a quick and useful way to access your recently-used files. (You can still disable the Home Screen if you wish.)
Animated pop-up help now shows each tool in action, so you can get a better idea of what each tool does before you select it:

If you have layers with long names, they’re now truncated in the middle rather than at the end, as was the previous method. So if you have layers named “My placed company logo blue” and “My placed company logo green”, these will be truncated to “My placed co…y logo blue” and “My placed co…y logo green”, rather than both being called “My placed company log…” as was previously the case.
Speed Improvements
Photoshop CC 2019 also features some speed bumps, with tools such as Select Subject and Export As performing significantly faster. On Windows machines, startup time is now almost as fast as on a Mac.
Pls the Home screen is opened after closing photo. How I disable Home screen? After starting is diabled BUT still open after closing photo. PLS help me. Thanks
Preferences > general
Very helpful article but when, for the love of all that is holy, will Adobe update their cloud render filter to include the procedurals that AE has and update the lens flare filter to something cool and customizable??? It’s 2018!
almost as fast as with a MAC? you are kidding, right? Macs are the slowest to open programs – once they are closed. The only reason it seams faster than a PC is that MACs never close them, running in the background (the hopping nonsense at the bottom). A PC completely closes the program and starts it a second. A MAC takes minutes – I’m so glad I left a MAC working environment back to a custom PC – so much faster – in everything!!
When I mask a layer and make a smart object of it, then open the smart object, the image is permanently cropped to the masked area and the mask is gone. It doesn’t matter if the layer is put into a group or not. This is new to 2019. It’s deleting image data!
Not for me, it doesn’t: inside the Smart Object the image is still masked, although it is cropped. I can uncrop the Smart Object if I want to. I can’t understand why this is happening to you.