

Color fonts have been touted as the Next Big Thing. They aren’t universally accepted just yet, but for you early adopters, here’s a great way to build custom fonts directly inside Photoshop.
In a previous article we looked at Fontself, the revolutionary plug-in that allows users to create fonts in Adobe Illustrator. Now Fontself has introduced a new plug-in that enables you to create color fonts in Photoshop.
First, a word of warning: although you can create the fonts in Photoshop and use them in Photoshop, the number of external applications in which you can use them is at present very limited. They’ll work in most of the apps that ship with a Mac, such as Pages and TextEdit, but they won’t yet work in Illustrator or InDesign. And as for browsers… you’re limited to Firefox and Microsoft Edge for now. Having said that, color font support is likely to be built into most apps in the near future.
Color fonts are created in the OpenType-SVG format. If you create a font in Photoshop using Shapes tools, then they’ll be fully scalable. If you use bitmap tools, as we do here, then they can be scaled only up to the original creation size—up to about 500px per character.
To get started, you’ll have to buy Fontself from fontself.com. It costs $49 for either the Photoshop or Illustrator version, or $79 for both.
Open the Fontself PSD

The template document includes upper and lowercase alphabets, as well as standard punctuation, but you can add any glyphs that don’t appear here manually. Each glyph is contained in a separate layer, which is necessary for building the font.
Change the base font

The glyphs in the template are there to give you an indication of how to draw your custom font. In this instance, though, we’re going to adapt an existing font – Budmo Jiggler, which can be downloaded for free from dafont.com. The simplest approach is to select all the type layers, and unlock them using the padlock icon in the Layers panel; switch to the Type tool, and change the font to whatever you want.
Boost the opacity

Because the original template font is designed as an indication only, the opacity of the layers is set to just 20%. With all the glyph layers selected, it’s easy to change this to 100% so you can see the font at full strength.
Select the dots

To make this color font, we’re going to add a lightbulb glow to all the white dots within the characters. Choose just one letter to work on—you’ll need to treat them all individually. Select the dots with the Magic Wand tool, holding the Shift key to add each new selection to the old one. Then make a new layer, and fill the selection with any color.
Light up the dots
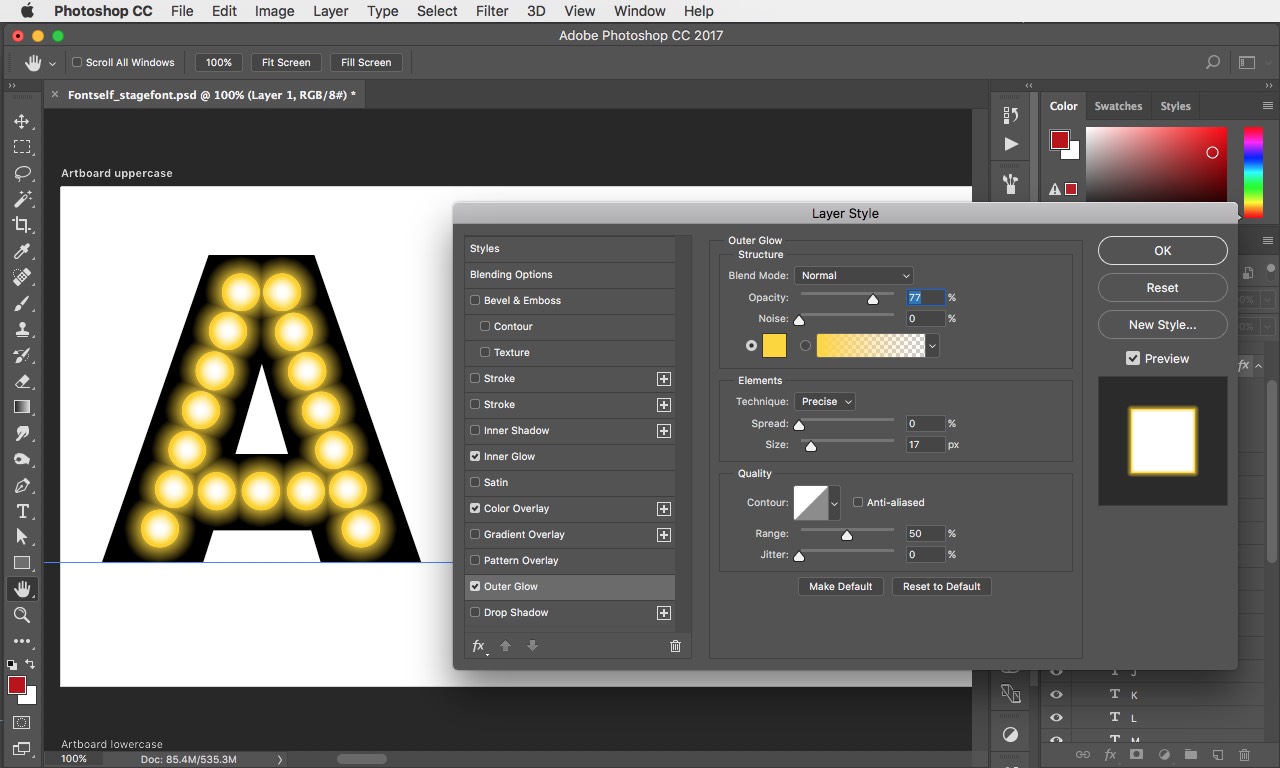
I’ve used the Layer Style panel to light these dots. First, a Color Overlay turns the dots yellow; then an Outer Glow adds the haze around the dots; and finally, a white Inner Glow adds the bright spot in the middle of each bulb. As these effects are all added with Layer Styles, it’s easy to adapt and modify them later if you need to.
Style the base font

Switch back to the glyph layer, and use the Layer Style dialog again to add effects. I’ve added a red Color Overlay, with an orange Stroke. I then made a solid Drop Shadow (100% Spread, 0 px Size) and offset it by one pixel; then I duplicated this shadow nine times, setting each one with an additional one-pixel offset. This creates the three-dimensional extrusion seen here.
Repeat the process

Now for the laborious part: repeating this procedure on all the remaining glyphs (I’m only working with upper case letters in this tutorial). To make things easier, it’s worth defining new Layer Styles for both the letters and the dots, so you can apply them to the new layers with a single click. To do this, select the layer on which you’ve built the style, and choose New Style from the pop-up menu in the Styles panel.
Merge the layers

In order for Fontself to build the font, you need to make sure each glyph is just a single layer, and that means flattening all the dots down into the text layers. This isn’t as laborious as it sounds, as you can do it all with keystrokes. Select the first dots layer, then use Alt-Shift-[ to add the layer beneath to the selection, followed by Command/Ctrl+E to flatten the two layers together. Then use Alt-[ to move down to the next dots layer, and repeat the process. I recommend that you duplicate the Uppercase Fonts group first, so you still have access to the originals should you need it.
Build the font

The next step is simple. Open the Fontself window by choosing Window > Extensions > Fontself Maker PS. Select all the glyph layers (there should be 26 of them) and drag them into the Fontself Maker panel, in the appropriate place. In this case, it’s the A-Z Uppercase alphabet slot. And that’s all there is to it.
Preview your font

It takes a few seconds for the plug-in to crunch through all the layers, after which you’ll be rewarded with a view of the entire alphabet. You can type your own text in here if you wish, to preview specific words. You can adjust the letter spacing and, once you’re happy with the result, click the Export button to make the font.
The finished font

Once your font has been built, you can install it just like any other font. Here’s some sample text set in the Mac app TextEdit. You can’t set kerning pairs in Fontself, which is why the A on the top line appears to have too much space around it – so manual kerning will always be necessary.
Color fonts are still in their infancy, but you can create some spectacular results. The font I’ve created here is based on an existing one but, of course, you can build your own color fonts from scratch using any of Photoshop’s tools. And they don’t have to be just text: you can, of course, build a font of your favorite logos or multicolored illustrations, if you want to.
This article was last modified on February 22, 2017
This article was first published on February 22, 2017
Commenting is easier and faster when you're logged in!

Recommended for you

TypeTalk: The Typographic Expressions of Stefan Sagmeister
Stefan Sagmeister is an award-winning designer known for his bold, innovative wo...
How to Perceive Brightness More Accurately
Learn how to control the key factors that can affect how you perceive brightness...

TypeTalk: A New Column on Creativepro.com
Welcome to the debut of TypeTalk, a monthly question-and-answer column on typogr...