
The next time you need to place an image inside text in Photoshop, try one of these three techniques.
Method 1: A simple clipping mask
This is fast and easy and allows you to keep the text as live, editable text.
Step 1: Choose an image
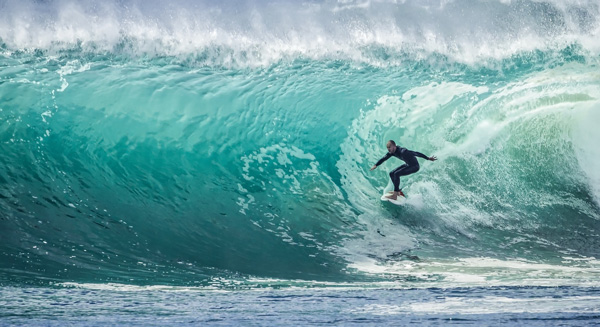
This image of a surfer is free to download, courtesy of pixabay – and you can download it here. It’s an ideal background image.
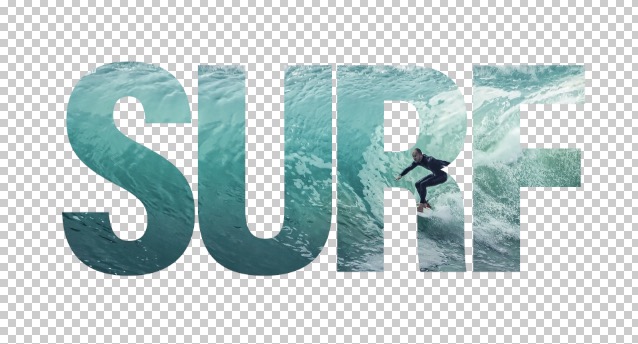
Step 2: Add your text

Choose a bold, ideally sans serif font. Thin fonts won’t work nearly as well, as you won’t be able to see enough of the background through them. Here, I’ve added the word SURF in Acumin Condensed Black.
Step 3: Tighten it up

To avoid getting big gaps between the letters, it’s worth bringing them close together. With the Type tool, click between each pair of letters and use the shortcut alt + left cursor key to bring the letters towards each other.
Step 4: Move the background

Double-click the background layer to turn it into a regular layer, then drag it above the type layer. Choose Layer > Create Clipping Mask, or use the shortcut Command+Option+G / Ctrl+Alt+G. Here’s how the Layers Panel should now look. That little arrow to the left of the background shows it’s using the type as a clipping mask.
Here’s how it looks: the background will only show up where it overlaps the text.
Step 5: Add a
new background

That checkerboard background appeared when you turned the original background into a regular layer. Make a new layer, and choose Layer > New > Background from Layer. This will give you a new white background. But the surfer is positioned a little awkwardly.
Step 6: Move the background

You can move the surfer layer independently of the text, and it will move inside it. Here, I’ve moved it so that the surfer is fully visible inside the letter R.
Method 2: Building on top of a rectangular image

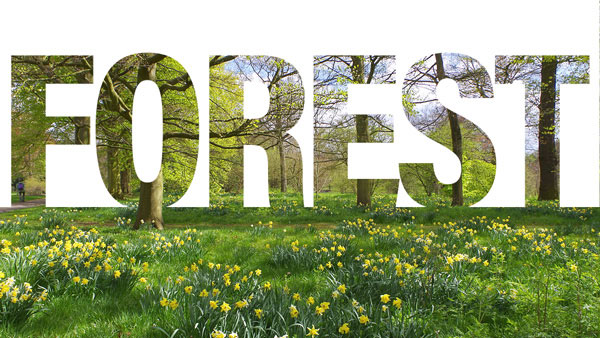
In this version, we’re going to make a word stand up on top of the background. This image of a forest comes from Wikipedia, and you can download it here.
Step 1: Add your text

As before, create your text in a bold sans serif font. Position it towards the top of the image.
Step 2: Add a blank area

Make a new layer beneath the text layer, and sketch out a rectangle with the Rectangular Marquee tool, covering all the text. Press D to make your foreground and background colors the default black and white, then use Command+Delete / Ctrl+Backspace to fill the selection with the background color.
Step 3: Duplicate the background

Select the background layer and use Command+J / Ctrl+J to duplicate it to a new layer.
Step 4: Make a clipping mask
Drag it to the top of the layers stack, above the Type layer, then use Command+Option+G / Ctrl+Alt+G to use the type layer as a clipping mask.

The top of the forest now blends into the lettering, with the bottom part fully visible below it.
Method 3: Convert to Frame

You can also convert the text into a frame and then place an image inside it. Just be aware that the text is no longer editable with this method. We’ll use this image of London from Wikipedia, which you can download here.
Step 1: Add your text

Add the text as before. I’ve set the word London so that the ascender of the ‘d’ lines up with the clock tower.
Step 2: Make a frame

Select the text layer, and choose Layer > New > Convert to Frame. As it’s a text layer, it will use the text as its name.

Here’s how the frame layer looks: you can just make out the text as blue outlines.
Step 3: Put the background in the frame

Double-click the background layer to make it into a regular layer, and Photoshop will automatically put it into the frame. Your Layers Panel will now show just one layer.

Here’s how it looks: the background is now incorporated within the text layer. You’ll see a thick gray border around the layer when it’s selected, but that won’t appear when you choose a different layer or save the file.
Step 4: Moving the content around

The layer consists of two parts: the frame and the content. If you select the frame, on the left, then you’ll move the type along with its contents. But if you select the contents, on the right, then you can move (and scale) the background inside the type.
Commenting is easier and faster when you're logged in!

Recommended for you

Creating a Color Burst Montage in Photoshop
Try this colorful collage idea the next time you want to convey imagination, vib...

Creating an Animated Christmas Banner in Photoshop
Learn how to make a simple banner that can display any text you like with subtle...

Thou Shall Not Use Comic Sans
Excerpted from Thou Shall Not Use Comic Sans: 365 Graphic Design Sins and Virtue...