

These tips originally appeared in InDesign Magazine. To have new InDesign tips delivered directly to your inbox each week, subscribe to the free InDesign Secrets Tip of the Week newsletter.

1. Where is that pesky font?
If you search for a missing font with Find Font, but you can’t see the text on the page, hit Cancel (to close Find Font) and then open Story Editor. The cursor will be highlighting the problem text.

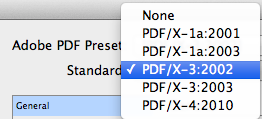
2. The PDF X-Factor
You can place RGB images into InDesign and they’ll be properly converted to CMYK when you export using the PDF/X-1a preset. If you use PDF/X3, transparency will be flattened, but RGB colors will be maintained. PDF/X4 allows unflattened transparency, layers, and RGB colors.
3. Gently Ease Into GREP
Get started with GREP the easy way: Don’t try to remember the codes! Instead, choose from the @ menu (also called the “Special Characters for Search” menu) to the right of the Find What and Change To fields in the Find/Change dialog box.

4. Take “Control” of Jittery Frames
If frames jerk and stutter when you drag them (instead of moving smoothly), you may have accidentally enabled View > Grids & Guides > Snap to Document Grid. Turn it off, or (on the Mac) simply hold down the Control key while dragging to disable snapping temporarily.

5. Table Togetherness
Yes, there is a way to force rows to stay together in a table: Select the rows with the Type tool, choose Table > Cell Options > Rows and Columns, then enable Keep with Next Row. Sadly, there’s no option for this in table or cell styles.

6. Let That Text Flow
When you have the Place cursor loaded with a long text file (such as a Word document), holding down Option/Alt and Shift and clicking tells InDesign to flow the text inside the margins for as many pages as you currently have in your document.
7. Absolute Power Over Printing Pages What do you do if you want to print the eighth page of your document, but the document begins on page 15 and is set to roman numerals? Don’t fret! Just print page “+8”. The plus symbol means “the absolute page number in this document.”

8. Jettison Justification Defaults You can (and probably should) tweak InDesign’s default Justification settings to get better looking justified text. From the Control Panel menu select Justification and try these settings: 80%, 100%, 120% Word Spacing; -5%, 0%, 5% Letter Spacing; 98%, 100%, 102% Glyph Scaling

9. Exercise Your Text Spacing “Options” You can adjust the spacing of text by holding Option/Alt and using the arrow keys. With a selection of text, press Option/Alt+left arrow to decrease tracking, Option/Alt+right arrow to increase tracking. Press Option/Alt+up arrow to decrease leading, and Option/Alt+down arrow to increase leading. With your cursor between two characters, press Option/Alt+left or right arrow keys to decrease or increase kerning.
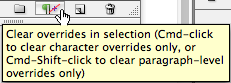
10. Removing Text Overrides the Right Way If you want to remove local overrides from text, don’t Opt/Alt click on a style. Instead, click the Remove Local Overrides button in the Paragraph Styles panel. This way is more flexible, because if you select text first, it removes overrides just from the selected text. If you have the cursor flashing, it removes overrides from the whole paragraph. If you have a frame selected, it removes overrides from all text in the frame.
This article was last modified on March 22, 2023
This article was first published on April 29, 2013
Commenting is easier and faster when you're logged in!

Recommended for you

Confusing Type Terms, Part 2
Within the world of typography, there are a variety of terms that are either con...

Sony's Music Timeline
To celebrate 125 years of musical history, Sony has unveiled a large-scale graph...

Better Tools for Tones: Why I Don’t Look at the Histogram
The histogram—the graph of tonal levels you see in photo-editing software—helps...