

In my opinion, there are some pretty useful updates to Illustrator CC 17.1 (January 2014). We now can finally round the corners on our paths easily and even create custom panels for tools we use all the time. There are even enhancements to age-old features and tools like the Pencil and Pen tools, and how we edit paths, among a variety of other enhancements. In this article, we’ll explore the most interesting of these new and improved features in this newest release of Illustrator CC 17.1. I’ve even included links to some videos I created for the larger feature updates, that go into a little more depth.
Live Corners
At last! We know have a visual method for editing the corner points on an open or closed path, called Live Corners. This lets you round selected corners, or change the corner to one of three different types (rounded, inverted round, or chamfered). Sort of like how InDesign does it, you can now either drag to edit corner points or do it numerically in a dialog box.
With a path that has corner points (take a square, for instance). With the Direct Selection tool selected, you can select a series of anchor points on one or more paths. You can then drag the Live Corners widget that appears, to easily round the corners (by default).

[[insert AI171Update_01.jpg]]
Drag the Live Corners widget
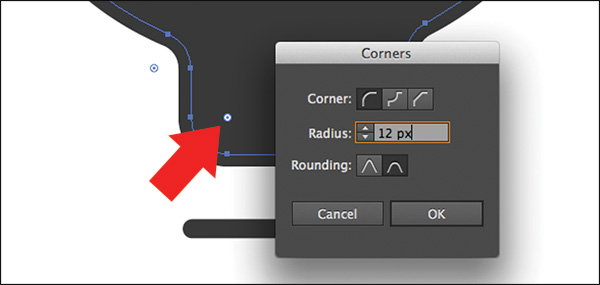
You can also double-click a Live Corners widget to modify the corner options in the Corners dialog box. The dialog box contains a third option called “Rounding.” The Rounding value can be relative (more natural radius based on the angle of the segments) or absolute (a consistent radius) and refers to the radius of the corner.
[[insert AI171Update_02.jpg]]
Edit the Live Corners options
Tip: If you Option (Mac OS) or Alt (Windows) click on the Live Corners widget, you can cycle through the three corner options (rounded, invert rounded, chamfered).
You can also access the Live Corners options in the Control panel when corner points are selected with the Direct Selection tool.

[[insert AI171Update_03.jpg]]
Live Corners options in the Control panel
Check out this video on Live Corners to seem them in action.
Path segment reshaping
When I first heard that how we edit path segments is getting added functionality I immediately went on the defensive. How dare they muck with something that works well enough for me not to have quit the program years ago. But actually, with the new methods for editing path segments you’ll soon see, I find myself actually using it in my everyday work to save bits of time here and there.
Let’s take a look at what we mean by improvements in “path segment reshaping.” Suppose you’re drawing a path with the Pen tool and need to make a change to a path you’ve already drawn. With the Pen tool and a path selected, hold down the Option (Mac OS) or Alt (Windows) and position the pointer over a path segment (between two anchor points). When the pointer changes to the Reshape Segment cursor (see the following figure), drag the segment to reshape it, unconstrained.
[[insert AI171Update_04.jpg]]
Reshape a segment with the Pen tool
Tip: You can also hold down the Shift key as you drag to constrain the movement.
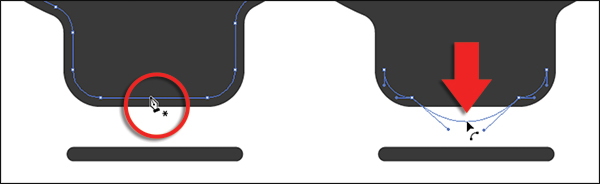
If you edit a path with the Direct Selection tool, unless it’s a straight segment (end corner points), the Reshape Segment cursor appears when you position the pointer over a selected path segment. This allows you to drag the segment unconstrained. Like the Pen tool, you can also press the Shift key after you begin dragging to constrain the handles in a perpendicular direction.

[[insert AI171Update_05.jpg]]
Reshape a segment with the Direct Selection tool
Note: The Convert Anchor Point tool, now called the Anchor Point tool, also has the new Reshape Segment cursor appear when you position the pointer over a selected path.
Check out this video to see how to work with path segment reshaping.
The New Pencil tool
There have been so many times that I jumped straight to the Pen tool to draw a path that may contain straight lines and curves, ignoring the Pencil tool. The Pencil tool drew more freeform paths and was difficult to combine straight and curved segments. Well, in this latest illustrator update, using the Pencil tool, you can now draw curves more accurately with options to extend paths, draw straight lines, and close paths.
Double-clicking the Pencil tool in the Tools panel has always allowed you to edit the tool options. Now, the “Fidelity” and “Smoothness” options in the Pencil Tool Options dialog box has been replaced with a single option: Fidelity. This makes it easier to understand what the fidelity option actually does (you know you just mess with tool options and draw to see what it does). Dragging the option slider allows you to adjust how much Illustrator smooths your path.

[[insert AI171Update_06.jpg]]
The Pencil tool options
Tip: The new Pencil tool option—Fidelity, extends to the Brush, Blob Brush, and Smooth tools.
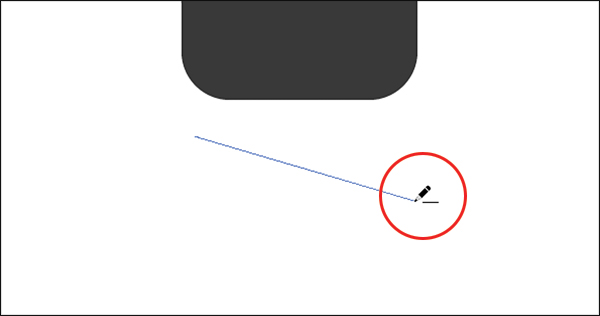
Drawing with the Pencil tool has some changes as well. If you hold down the Option (Mac OS) or Alt (Windows) key and drag with the Pencil tool, you can create a straight line.
[[insert AI171Update_07.jpg]]
Draw a straight line with the Pencil tool
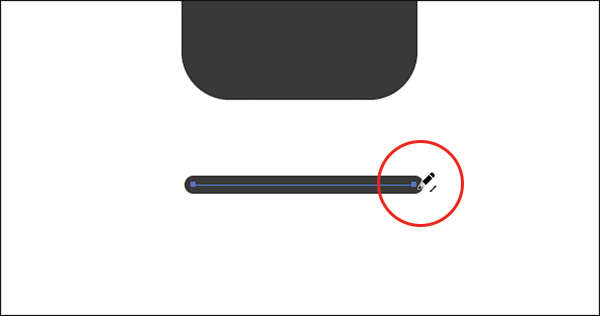
If you hold down the Shift key and drag with the Pencil tool, you can create a straight line that is constrained to 45 degrees.

[[insert AI171Update_08.jpg]]
Draw a straight line that is constrained to 45 degrees with the Pencil tool
One interesting thing to note, in previous versions of Illustrator, you could draw with the Pencil tool and press Option (Mac OS) or Alt (Windows) and the path would close. You can’t do that anymore since the key now allows you to draw straight lines. If you draw a path, and bring the pointer close enough to the starting point, a circle appears next to the pointer. When you release the mouse button, the path closes.

[[insert AI171Update_09.jpg]]
Close a path with the Pencil tool
One last thing to mention is that you can now position the pointer over the end of a selected open path and continue drawing with the Pencil tool when the cursor changes (see the following figure).
[[insert AI171Update_10.jpg]]
Continue drawing a path with the Pencil tool
Check out this video to see the new Pencil tool features in action.
Shortcut for File > Place
Okay, so a shortcut for the Place command should have been in Illustrator 4 million versions ago, but it was tricky. For those of you in InDesign, it seems a no brainer. Make the shortcut the same as InDesign—Cmd/Ctrl+D. It wasn’t that easy, however, since that shortcut (Cmd/Ctrl+D) was already assigned and would have caused a rift in the Illustrator community. So, Adobe decided to use Cmd+Shift+P (Mac OS) or Ctrl+Shift+P (Windows).
Custom tools panels
Illustrator now allows you to organize and group tools in the Tools panel into separate custom tools panels. This can be a great way to have a single, smaller tools panel that contains most of the tools you use for easier access. These custom tools panels can be docked and saved in your workspace and aren’t tied to any one Illustrator document.
By choosing Window > Tools > New Tools Panel, you can create a new free-floating tools panel that you can name.

[[insert AI171Update_11.jpg]]
Create a custom tools panel
In order to add tools to the new custom panel, you can simply drag them from the default Tools panel onto the plus (+) on the custom tools panel. To remove a tool, simply drag it away from the custom tools panel with a document open.
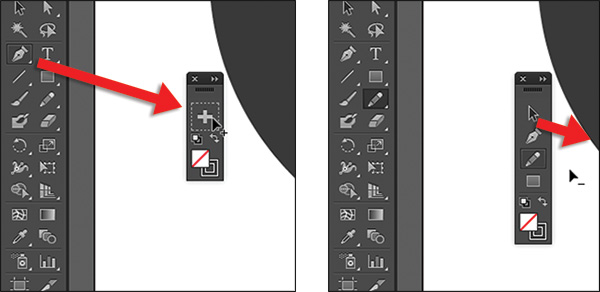
[[insert AI171Update_12.jpg]]
Add tools to the custom pane (left), remove tools from the custom panel (right)
After creating a custom tools panel, you can manage them by choosing Window > Tools > Manage Tools Panel. In the Manage Tools Panel dialog box, you can create new panels, rename and delete existing tools panels.

[[insert AI171Update_13.jpg]]
Manage the custom panels
Check out this video to see how to create a custom Tools panel.
This article was last modified on January 18, 2023
This article was first published on January 27, 2014
Commenting is easier and faster when you're logged in!
