Web How-to: Using CSS in Dreamweaver MX 2004

I have watched Web designers adopt Cascading Style Sheets (CSS) with interest. While some designers have gleefully adopted CSS as a must-have technology, plenty of developers resist adopting CSS. Yet, I think anyone who finally adjusts wonders why they waited so long.
Macromedia Dreamweaver MX 2004 makes adjusting to CSS even easier. The new Dreamweaver user interface allows developers to edit CSS styles more easily than in previous versions of the product. In fact, using and creating CSS styles is an inherent part of the development workflow. A developer has to work hard not to use CSS.
User Interface (UI) Changes
The most obvious change to the way Dreamweaver supports CSS is in its implementation of CSS within the interface. Don’t worry. For those of you familiar with previous versions of Dreamweaver, the CSS Styles panel is still around. But, you should see how things have changed.
Property Inspector. Dreamweaver MX introduced the concept of applying custom styles to a selected text object with the text Property inspector. This workflow may not have been apparent to everyone, however, since the developer had to toggle between HTML styles (which generated HTML font tags and assigned attributes to that tag) and CSS styles (which provided a pop-up menu of all custom styles defined within the available style sheet.)
In Dreamweaver MX 2004, the Property inspector only generates CSS styles, unless a user sets a preference to generate font tags. When I first saw this implementation, I thought this was rather… well… high-handed of the application. I’ve since gotten off my high horse. CSS is here to stay, and the font tag is not. Dreamweaver MX 2004 is driving that point home.
While this adjustment in the Property inspector may be transparent to users who have not been using CSS, CSS devotees will quickly become accustomed to applying custom styles at will from within the Property inspector. This is easy with the new CSS style preview available from the Style pop-up menu.
I think it is almost too easy to define new text styles within the Property inspector (and to end up with a number of poorly named custom styles in the process). Developers will need to find a workflow that makes sense. (Luckily, I have suggested a couple of workflows below.)
Before we leave the Property inspector, though, let me point out the Page Properties button (see Figure 1). In line with the other Macromedia MX products, developers can now define page properties by clicking this button. The Page Properties dialog box appears, just as it will if you choose that command from the Modify menu. As with other improvements, though, the more significant changes happen behind the scenes.

Figure 1: Defining page properties.
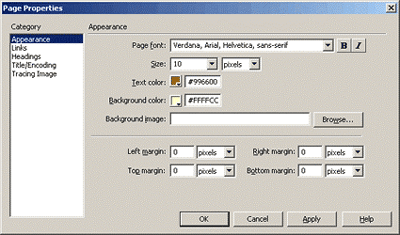
Page Properties Dialog Box. The Page Properties dialog box may look similar to the dialog box in previous versions, but it acts very differently (see Figure 2).

Figure 2: The Page Properties dialog box.
By specifying choices within the Page Properties dialog box, developers define style attributes for the body tag. Therefore, if a developer chooses to set the background color for the page to yellow and the text color to brown, those color attributes are assigned to the body selector in the head. And, to accommodate those of us who might forget, Dreamweaver will even assign the text color to TD and TH selectors so that they will be the same color!
As a special note, the Page Properties dialog box includes settings for link colors and underlining text (choose the Links category in the Page Properties dialog box). Any setting choices in this version will define the hyperlink pseudo-class selectors (a:link, a:active, and so forth). The Underline Style pop-up menu even provides an intuitive way to choose how you should use underlines within the hyperlink pseudo-class selectors (see Figure 3).

Figure 3: Settings for link colors and underlined text.
CSS Styles Panel. The CSS Styles panel should still be very familiar to developers (see Figure 4). The changes are slight. Instead of the Apply Styles and Edit Styles duality of the CSS Styles panel in Dreamweaver MX, users can only select and edit styles within the CSS Styles panel in Dreamweaver MX 2004. Users cannot apply the styles from the CSS Styles panel. The Property inspector’s Style pop-up menu does an admirable job of replacing that functionality.

Figure 4: The CSS styles panel.
Double-clicking a style listed in the CSS Styles panel will now open the external style sheet as a document in Dreamweaver, or will open the Code and Design view of the current document to the style definition in the head. This may be a little disconcerting at first, but it is nice to see the actual code for the styles. Clicking the Edit Style button in the bottom left corner of the panel will open the CSS style editor as in previous versions.
The CSS Style editor has seen little change, except for some wording changes in the New CSS Style dialog box.
Tag Inspector (with Relevant CSS Panel). The Tag Inspector has seen a significant overhaul, and this may be your new favorite place. The Tag Inspector is now a panel group, housing Attributes, Behaviors, and Relevant CSS panels.
As far as CSS goes, the Attributes panel doesn’t hold much of interest. You can quickly see the class name applied to the tag, but that is available in a few places. I think an interesting application of this panel is the display of class, ID, and style attributes. Ever find yourself creating an inline style to counteract something in a class style (I know… shudder)? Now you can see it and edit it. Or, more likely, have you ever inherited an over-styled page? Now you can quickly identify the pesky inline styles and remove them.
Far more interesting for our purposes is the Relevant CSS panel of the Tag inspector panel group. With a given tag selected, this panel will indicate any CSS styles affecting that tag. I was able to apply class and ID selectors to a tag, add some inline styles, modify the style of the tag selector, and create a contextual selector… and all of the styles defined by these various selectors were listed in the top of the Tag Inspector’s Relevant CSS panel. It even showed styles defined in a grouping of selectors. Choose a selector from the list at the top, and you can modify the style attributes below. The more I think about this feature, the more I like it (and the more I will expect to become dependent upon it).
By the way, the Relevant CSS panel even indicates styles that are not literally relevant to the selection (but that are applied to an element that is relevant). For example, if both the body tag and H1 tag have been defined with style attributes, clicking in text surrounded with H1 tags will include the body tag in the panel, but any attributes that are not inherited by the H1 tag are indicated with a red strikethrough.

Figure 5: The Tag inspector.
CSS Properties Panel. The CSS Properties panel appears if you double-click a selector or a style attribute in the Relevant CSS panel. I haven’t gotten used to this panel, and find it disconcerting if I mistakenly double-click something expecting the old CSS Style Editor dialog box to appear. This is nice, though, in that you can focus specifically on one selector, and set attributes accordingly. By the way, if the list of attributes looks long and confusing, set the display method to Show Category view. This will allow you to collapse the categories you won’t be using.

Figure 6: CSS properties panel.
This article was last modified on January 8, 2023
This article was first published on November 21, 2003


