
Hard-drive capacities keep climbing — and that’s a very good thing for professional content creators, since the sizes of files we work with appear to get bigger by the minute. With the goodness of the FireWire interface, it’s now a snap (or a click) to add external drives to your computer. What’s more, it’s also an opportunity for an easy do-it-yourself upgrade project.
You’ve probably seen the ads — high-capacity hard drives with sticker prices far below comparable models. After reading the fine print you see that it’s the mechanism only, meaning the case that encloses it is sold separately. Somehow that seems complicated.
So you take the path of least resistance (and sometimes of value and performance) and buy one of the many fully operational external FireWire drives on the market. New FireWire storage vendors seem to arrive weekly, resulting in many options.
But the alternative of purchasing a FireWire enclosure and a bare hard disk mechanism separately, and then performing the installation yourself, has merit. This approach lets you take advantage of price breaks on drive mechanisms, or pick and choose drives based on the performance characteristics offered by a particular mechanism. Even better, it lets you move a drive out from an ailing machine and still squeeze some value from an older hard disk. And it’s not that hard to do, either.
In talking to designers at the recent Seybold SF conference, I realized that most had never taken advantage of this upgrade path. In this column, I will take you through the installation of a hard disk mechanism into an interesting new FireWire enclosure from Granite Digital.
Inside your FireWire Drive
Before we get to the nitty gritty of the installation, let’s take a brief detour into the structure of an external FireWire drive.
First, I offer a paradox: There is no such thing as a FireWire hard drive. How can this be?
A number of manufacturers produce hard disk mechanisms, including Fujitsu, Hitachi, IBM, Maxtor, Seagate and Digital. These mechanisms come with an integrated, or “native,” interface that’s designed to be used inside computers. For example, most use some version of the ATA interface, which is found on the logic board of all desktop computers. Less common is Ultra SCSI, the descendant of the venerable SCSI interface; and Fibre Channel, a very high-performance interface used in servers.
However, missing from that list is FireWire — there is no mechanism with a native FireWire interface. Years ago, I saw Apple and Sony demonstrate a native FireWire drive at the Comdex show in Las Vegas. But it was a prototype and never put into mass production. Storage manufacturers considered the potential market too small and concentrated on drives for desktops, workstations, servers, and notebooks.
Besides, there was another way.
Instead of offering a native FireWire interface, all current FireWire hard drives comprise two parts: the hard-disk mechanism with its standard ATA (or IDE) interface; and a surrounding enclosure, which provides power and has a small circuit board that converts the ATA interface to the FireWire standard. The latter task is accomplished through a “bridge” chip.
Though a couple of hard disk manufacturers sell lines of FireWire drives, most FireWire storage vendors purchase the bare mechanisms from the manufacturers and then engineer their own enclosures and electronics.
A few vendors sell these enclosures empty, without the mechanism, so you can mix and match drives and enclosures. Some enclosures are high style, while others offer cushioning against noise or in case of a spill. There are enclosures for 3.5-inch mechanisms used in desktop systems and smaller ones for the 2.5-inch versions found in notebooks.
Offering an interesting twist on category, WiebeTech sells a line of FireWire storage products called DriveDocks, which avoid the enclosure altogether. The devices are small, block connectors that provide power and ATA-to-FireWire conversion to a drive.
List of Ingredients
For this project, I used a Western Digital Caviar WD 1200JB hard disk and the new FireVue FireWire 1394/Smart IDE case kit from Granite Digital. (As far as I know, there’s no relationship between the companies despite their common “digital” branding.)
The Caviar WD1200JB is a speedy, ATA hard disk mechanism with a capacity of 120 GB and a 7,200-rpm spindle speed (this is how fast the platters in the mechanism spin around). This model’s claim to fame is its large 8-MB RAM cache; the more common WD1200BB has a cache of 2 MB. The drives can be found for about $200.
Granite’s new $199 FireVue case is described as “smart,” since it supports SMART, the Self-Monitoring Analysis and Reporting Technology standard developed by storage vendors about a decade ago (see figure 1). SMART tracks various performance attributes of the mechanism and can report the diagnostic information to the host computer, utility software or other peripherals (in this case, the enclosure). So, if something on the drive begins having trouble, straying from its known parameters, then a warning could be generated — but only if the drive, computer, operating system or software support SMART. Support for this standard is increasing.
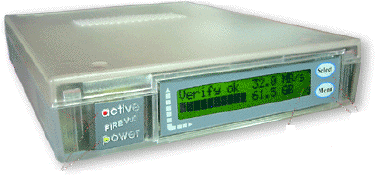 Figure 1: The major “added-value” from Granite Digital’s new FireVue FireWire 1394/Smart IDE enclosure is the LED display that offers a real-time readout of the drive’s performance. The little red and yellow lights on the left-hand side provide a general view of the drive’s status — activity and power, respectively. Like a cat sitting in front of an aquarium, I’ve found the LED readout endlessly fascinating.
For example, by toggling through a menu, the SMART electronics in the enclosure will let the user test the drive media or even erase the drive, something we usually consider a function for utility software. It also tracks in real time the time it takes for the hard disk to find a piece of data (called seeking) or how much data is being transferred over the FireWire bus. The FireVue enclosure features a LED readout that continually lists the current average data throughput and the maximum throughput achieved by the drive.
At the same time, this SMART information comes at a price premium. Most enclosures cost between $125 and $150.
The Real Nitty Gritty
Installing the drive in the case was very straightforward, with only a few details to mind. Of course, your exact requirements and the procedure may be different depending on the mechanism and enclosure you purchase — always follow the directions! But my experience here is typical and usually, the only tool needed is a Philips head screwdriver.
First, I removed a couple of screws on back of the enclosure that let me pop off the lid. Check the directions before sticking your screwdriver under the seam and lifting, since there are often breakable plastic hooks or snaps here and there. In addition, this enclosure has several small metal tabs that are a part of the electromagnetic shielding system and bending or breaking them would be a Bad Thing.
As you can see in figure 2, the FireVue Smart enclosure has an internal power supply. Smaller hard disk mechanisms can be powered through the FireWire bus, so this component may be missing on some enclosures.
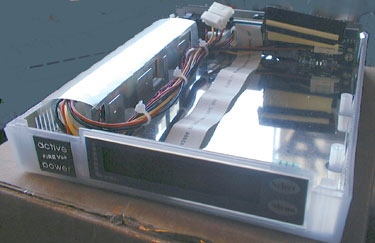 Figure 2: Peering into the inside of the FireVue Smart enclosure, it’s easy to see the power supply on the left with its multicolored wires and plug, and far in the back, there’s the small electronic “bridge” logic board that will convert the ATA mechanism to the FireWire standard. The ribbon cable in the center sends the SMART information to the front LED panel.
Most desktop-sized enclosures use a metal caddy to mount the drive mechanism to the enclosure. All drives have screw holes for this purpose, in slightly different spots; the caddy accommodates these differences. Granite calls this part a “mounting bracket.”
Before screwing down the drive and caddy combo, and attaching the power and data connectors (see figure 3), it’s important to check the IDE jumper settings on the hard disk mechanism. The jumper block is a small set of pins found with the other connector on the mechanism. The settings determine how the drive is used, mostly when it’s mounted in a computer, such as the primary drive, called Master, or as the secondary drive, dubbed Slave. The FireVue wants the jumper to be in the Master setting.
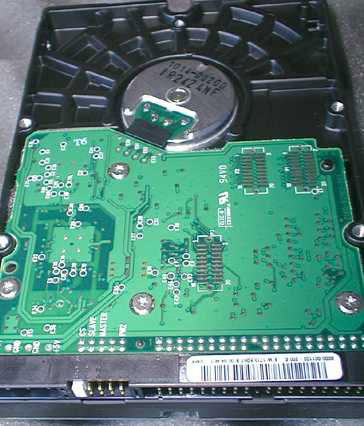 Figure 3: Here’s the hard disk mechanism. In the back is the round hub, holding the spindle and motor, while in the front is its green circuit board. At the bottom of the drive, from left to right, are the power connector, the jumper block, and the large 40-pin IDE connector. The small white rectangle is a jumper shunt on the block.
For all the incredible engineering found in the modern hard disk mechanism, these jumper settings are rather primitive — there’s no switch. Instead, you have to fit one or more small plugs, called Jumper Shunts, on a block of pins to initiate the setting (again visible in Figure 3). If you lose the shunt or need some extra, they are available at most electronic supply stores or online. A friendly tech person at a local computer repair store may just give you a couple for free. While the settings are often labeled on the mechanism’s circuit board (see Figure 4), it’s best to check with its online support page. This information rarely comes with the drive.
 Figure 4: Here’s a detail of the jumper settings on the hard-disk mechanism. In the back is the round hub, holding the spindle and motor, while in the front is its green circuit board. At the bottom of the drive, from left to right, are the power connector, the jumper block, and the large 40-pin IDE connector. The small white rectangle is a jumper shunt on the block. As you can see, I’ve yet to move it to the Master spot.
After attaching the mechanism to the case, I attached the power and data cables, and then replaced the lid. When I plugged in the power cord, the LED screen started its readout and told me the drive was ready to go. I plugged the drive into the FireWire port of my Mac OS X machine and formatted the drive with Apple’s Disk Utility software.
It worked fine. And the readout provides interesting information about how the drive is performing with large and small files as well as how various applications request data streams.
Making the Connection
Both Mac and Windows machines support FireWire drives, although most PCs require a FireWire adapter card. Windows 98SE, Windows 2000, Windows ME, Windows 2000, and Windows XP come with built-in 1394 drivers that will work with FireWire products. These operating systems can also format the drives with their included utilities: Fdisk, Format, or Disk Management, depending on the version. Keep in mind that the drivers engineered for XP are more advanced and you will see speedier performance from a FireWire drive on XP than when running under Windows 98.
I recently received a bit of flack from a couple of readers when I advised Creativepro’s Editor in Chief to use the OS X Disk Utility to check and format a drive. One of you wrote: “OS X cannot format an external FireWire drive. It simply can’t do it. No way. Internal IDE, yes, but nothing on FireWire can be formatted by the OS X operating system as yet. You can format it with the old OS 9 utility (but you must reboot in OS 9 first).”
This is an easy mistake to make in a time of OS transition. In truth, Mac OS 9’s Drive Setup utility software can’t format a FireWire drive and you will need a third-party formatting utility. It’s OS X’s Disk Utility that can format FireWire drives.
As the sage Nachman of Bratslav reminds us: “The learning for which you pay will be remembered longer.” That tall stack of Mac hard drive formatting software — still sitting on the desk in my office — provides me an easy, and expensive reminder of bygone days and functionality.
This article was last modified on January 6, 2023
This article was first published on October 17, 2002
Commenting is easier and faster when you're logged in!
