


[Editor’s Note: This article from 2007 describes how to make rounded corners in Illustrator CS6 and prior. If you’re using Illustrator CC, there’s a much easier method, as Chad Chelius shows in his 2016 post, “Working with Live Shapes in Adobe Illustrator.”]
Rounding Some Corners
I recently got a request from someone who wanted to use Illustrator to create dynamically resizable buttons for a Web site. To complicate matters, he wanted the button style to be flexible enough that left-hand corners can be rounded, and right-hand corners can be rectangular corners, or vice versa (Figure 1).

Figure 1.
I can’t even begin to tell you how often I hear requests from folks who want to round only some of the corners of an object in Illustrator. (I can hear those FreeHand users giggling because FreeHand can do that.)
So how did I do it? In a nutshell, I start with a regular rectangle. I use one fill with a rounded corner effect applied, and one without. Then I use the Transform effect to offset the fills slightly so that rounded corners are visible on one side only, or just on the top or bottom (Figure 2)
Figure 2.
Here are the steps to do this yourself:
- Draw a rectangle. Fill it with your favorite color.
- Use the Appearance panel to add a new fill.
- With the new fill targeted, choose Effect > Stylize > Round Corners. Do your thing and give yourself some nice rounded corners. (If you’re working with text, use the Effect > Convert to Shape > Rounded Rectangle option.)
- With that fill still targeted, choose Effect > Distort & Transform > Transform. Under the Move section, adjust your fill slightly so that it’s offset from the original fill. Use horizontal movements to add rounded corners to the left or right, and vertical movements to add rounded corners to the top or bottom.
If you want everything to be centered, apply a Transform effect to another fill (without rounded corners) with the exact opposite settings.
All you FreeHanders are still snickering because FreeHand can round just one corner, and opposite corners. Well, I have news for you. I can use the same technique I just employed to do just that: round any specific corner, some, or all. And of course, once it’s a style, it’s one click to apply it.
Pick a Corner… Any Corner
In Illustrator (more so than just about any other program) there are always a variety of ways to accomplish any design task. Some are more efficient than others. Some are easier to implement. Each offer pros and cons and each offer benefits for certain design tasks. With that in mind, I offer my solution for creating rectangles with a rounded corner (or three) of your choice.
Figure 3 is a rectangle that has rounded corners on two opposite sides.

Figure 3.
To make this shape, I created a normal rectangle and used the normal Round Corners effect (under the Effect > Stylize menu). I then added an additional fill, which didn’t have rounded corners. With the second fill targeted, I applied a Transform effect that applied a 50% scale to the fill, and I instructed the Transform to be applied from a specific origin point — a corner of my choice. This action effectively covered up the rounded corner with a square corner. Had I expanded the shapes, the result would look like Figure 4.
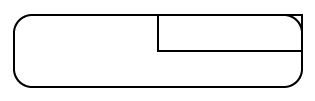
Figure 4.
The key here is in the Transform effect. Let’s see how I did this, step-by-step:
- Draw a rectangle. Apply a fill and remove the stroke.
- Choose Effect > Stylize > Round Corners and apply the effect.
- Via the Appearance panel fly-out menu, add a new fill.
- With the new fill targeted, choose Effect > Distort & Transform > Transform. In the Scale section, set both the Horizontal and Vertical values to 50%. Now for the most important part — using the 9-point proxy, select one of the 4 corners to apply the scale from (Figure 5). The corner you choose will not have a rounded corner. Click OK to apply the effect.
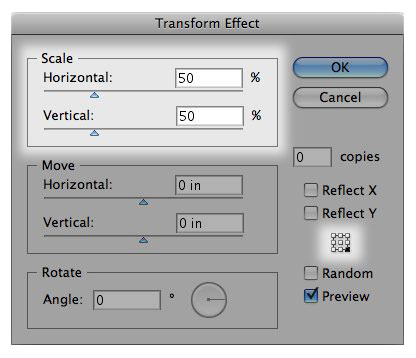 Figure 5.
 - Duplicate the fill and double-click the Transform effect in that fill. Change the origin point in that fill to specify another corner that should have a square corner. Repeat to add a third fill if you’d like. Your Appearance panel should look something like Figure 6.
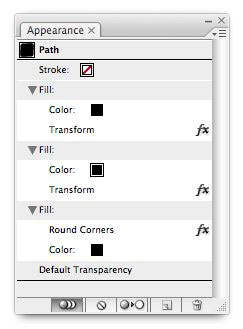 Figure 6.
You can save this as a Graphic Style so that you could apply this with a single click. You might even create an entire library of styles that stored different corners of an object as being rounded, for any design task. Of course, these are all graphic styles with multiple fills and effects. And sometimes you need just a single plain flat object with a rounded corner. You could of course draw your rectangle, quickly apply a style, expand the appearance, and then use Pathfinder to create a single final shape. But that’s a lot of clicks. So having an action that would do all this for you with a simple keyboard shortcut is better.
In fact, being that the holidays are upon us, I’ve decided to give all of my dedicated readers a gift. Two, actually.
The first is a Graphic Style library (Figure 7) you can download. This library contains a plethora of styles with different round corner effects. All you need to do is load the style library and you’re good to go. One click will give you the rounded corner(s) of your choice. Feel free to adjust the parameters as you see fit. I used a rather large round corner setting, mainly so the preview in the Graphic Styles panel clearly shows each effect.
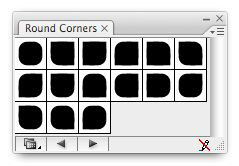
Figure 7.
The second downloadable gift is an Action that expands and combines the effect, leaving you with a flattened object. Once you load the Action, you can use the keyboard shortcut that I’ve assigned (Command-Shift-F12) or you can apply your own.
You can also copy and paste any of these shapes into InDesign if you’d like.
This article was last modified on December 14, 2022
This article was first published on December 7, 2007
Commenting is easier and faster when you're logged in!
Leave a Reply

I see a LOT of these posts are OLD but it’s easy now: Use the direct selection tool to select the corners you want and then drag the little circle in.
Hi, I found easiest and quick way to achieve rounded corners for 3 points of rectangle,leaving forth as it is, here are the steps –
1. Create rectangle, choose corner where you dont want rounded corner. with the help of pen tool ,add one point at one side of that chosen point, and second point on other side. These two points will restrict that particular corner from smoothing out.
2. Then apply Effects >> Stylize > rounded corners
3. It will only make 3 corners rounded leaving one corner as it is.
is was so helpfull …
These are actually great and very helpful for me. Thanks for this tutorial that will be very helpful!
In my adobe illustrator cc when i select the rectangle the little circle is not appears to create a radius….? how can it appears plz help me
Forget all this. I needed a box with two rounded corners and two square. Outline only so the above doesn’t work. My solution? Create it in inDesign (5 seconds) and copy and paste it into Illustrator. Done.
THANK YOU!
In Corel is lot Easier en efficient.
i want to round the corner with salection tool with the same time… not go to the effect menu….. rectengle show the rounded option butt here is mention…plz solve my problem…thenx
I use shape builder all the time. Just overlap a circle or rounded rectangle, select both, open the shape builder tool and remove the sharp edges… though it’s only available in CS5 and up.
You can use this script for free
Round Any Corner
https://shspage.com/aijs/en/
Great helpful hint, but the script “Round Any Corner” by Hiroyuki Sato accomplishes the same effect with just a click of a button. Check out this script and 19 other great scripts at:
https://vector.tutsplus.com/articles/web-roundups/20-free-and-useful-adobe-illustrator-scripts/
Why take all these steps to add multiple fills and transformations when you can just simply draw a rounded rectangle and then just attack the sides with an Erase marquee? Done in a few seconds and then you can add that as a Graphic Style.
Tried the author’s technique but then saw your comments and attempted to apply gradient and discovered that you’re right, it is more complicated with more clicks than needed.
Thank you for posting a rebuttal. I’ve saved this in my AI Technique Cheats folder! :o)
you rock dude. thanks for the downloads
Thank you so much for making these readily available, you have saved me one huge headache this evening : ) Absolute Legend !
Great. Thank you
The first steps 1-4 don’t work. Tried it four times. All I get is a rectangle with a bumped out side with rounded corners.
Thank you so much for sharing your library!
I need to know IF you can do the opposite rounded corners. I only want two out of 4 corners rounded on an image.
thanks again for any suggestions
I would love – love to know IF there is a way to do this within photoshop cs5? please drop me a line if you have an answer: ange@nuttybunch.com
thanks in advance for all your time :0)
This tutorial is complete rubbish. You are making a SIMPLE procedure into an unecessarily complicated drama.
The method you have given above is floored for a few reasons, the most obvious to me is that following your process you end up with several shapes combined. So then if you want to apply a blend mode to the overall shape (eg ‘multiply’) you get an inconsistent blend effect becuase your shapes are more opaque where their internal shapes overlap. No good.
The simple CORRECT way to solve this problem is as follows (for a shape with 2 rounded corners):
-Create a rectangle.
-Duplicate this rectangle.
-To rectangle 1 apply the rounded corner effect (effect > stylize > rounded corners)
-Then with rectangle 1 still selected go to Object > Expand Appearance (This relesases the shape from its Effect)
-Offset rectangle 2 (with square corners) so that it covers two rounded corners of rectangle 1 (use alignment controls to ensure the two rectangles are aligned).
-Select rectangle 1 and 2 and in the pathfinder pallette hit ‘Transform’ (first option).
Now you have a single shape with 2 rounded corners and 2 square corners. Obviously this method can be adapted to make a shape with 3 or 1 rounded corners.
Simple 5 second procedure.
This is very nice and it worked well. But I had difficulties having a consistent border around the rounded transform. The Border is only around the square rectangle shape. Any ideas?
thanks for the tutorial. i’m new to illustrator from freehand.
by the way your interpretation of the freehand functionality is incorrect. freehand allows you to apply a different radius to any of the corners of an object. the great thing is that this is then editable in the property inspector, so if you would like to change the radius of a corner you can easily change it at any time. of course if you like you can also go through the same process as you carried out above in freehand too.
as we all have to move to illustrator now it’s shame that it falls so far behind in some regards (this and colour management in particular), especially as certain areas (effects, etc) are more advanced.
Try this…
Turn on “Snap To Grid”, draw your rectangle, use the add new anchor point tool to add achor points on either side of the corner where you want your curve to be, then delete anchor point tool the corner point, using convert anchor points tool adjust the handles on one new points to even out the curve. (drag one handle to where the corner was) Gee that sounds complicated too! But it’s not. ;-)
Graphic style does not show up in CS4 – can you amend?
Saved my day! Thank you!
Learnt some cool tips
Your file doesn’t work. It’s empty.
The round corner Effect only works good on 90 degree corners. On all other angles, the corner radius is totally arbitrary. Real good corners are made in CAD and imported in Illustrator. Don’t try to make them perfect in there.
Sorry Freehand Folks, who have just read my post:
Here is the link to get the script that will allow you to open Freehand in Snow Leopard:
https://kb2.adobe.com/cps/504/cpsid_50468.html
Windows folks? Sorry, haven’t a clue.
What’s also easy?
For those of us migrated from Freehand anyway…
Keep your copy of Freehand! It still has uses. Or go get a free download from Adobe’s site, I think they still offer it. If you’ve upgraded to MAC OS 10.6.x, you’ll need to also retrieve the new version of “FreeHand MXa Registration” from Adobe and stick it in your Library > Application Support > Macromedia folder so Freehand opens once again.
Then just open Freehand, make your box with the 1, 2 or 3 rounded corners and save the file. Open it again in AI (CS4) and save as AI doc. Then copy and paste into your working AI doc. All done.
But thanks for your effort in giving us ex-Freehanders a library of rounded corner styles until Adobe gets their act together and allows all of us to selectively apply rounded corners in AI, without all of the tedious workaround and frustration.
I cant open this, all I get is an empty symbol box, does it not work for cs4?
THANKS a Lot. I am learing a lot of things from this Site.
Thanks A LOT >
there’s only an AI file inside. How do I open the Round Corners window like you have.
Thanks for this tutorial and for the gift of your rounded corners library…that will be very helpful! :)
Debbie
So much.
You can use this script: https://www.adobe.com/cfusion/exchange/index.cfm?event=extensionDetail&extid=1045709#
And pick any corner to transform only that corner!
Makes it so much easier :)
Sorry for the newbie post, but I’ve been trying to create buttons like this for a while now. Thanks for the help with the rounded corners.
How do I make the recessed text and the simulated brush metal finish? If this is something easy, can you just point me in the right direction? My google searches came up empty.
Thanks again.
I use a javascript from Adobe Exchange, called “Round Any Corner” that rounds a single corner, or as many corners as selected. Works great. The script prompts a radius input in points with the default set to 10. Download it here: https://www.adobe.com/cfusion/exchange/index.cfm?event=extensionDetail&extid=1045709
I do this all the time. I never thought to use graphic styles and/or scripts.
Here’s how I create less than four rounded corners on a rectangle:
1. Draw the rectangle at the desired size.
2. Draw a circle with the correct radius for the corners you wish to create.
3. Align the circle to the corner of the rectangle you wish to round. (If you’re going to round more than one, make a copy of the circle first.)
4. Using the direct selection tool, delect the arcs and point of the circle except the arc that will become the rounded corner. I find it easiest to first delete the arcs, then go back in keyline mode and delete the stray points that are left.
5. Using the direct selection tool, delete the corner point of the rectangle where the rounded corner will be.
6. Select one end point of the arc, and the nearest endpoint of the rectangle, and join them together to restore the edge of the rectangle. Repeat for the other edge to complete the shape.
7. If you wish to round another corner, go back to step 3.
Not necessarily better, but as the author said there are almost always multiple ways to accomplish the same task in Illustrator, Photoshop, etc.