
Inside Web Design: Surveying Your Viewers to Add Interactivity to Your Site


Applications: FTP application, any HTML editor
Operating Systems: Macintosh, Windows
Though we often tend to think of our Web sites as relatively static, there are a number of things you can do to make them more active, even inviting to your viewers–things that allow them to participate in your site. Among these options, none are more personal than surveying your viewers for their opinions. While we may not be able to resolve the problems that a certain southern state had in the polling of their citizens, we can show you how to add a cool survey function to your site using a simple CGI (common gateway interface) without ever worrying about a pregnant or dangling chad.
How it Works
The premise for the survey function is relatively simple. Through the use of a server-side include, you insert the code that displays the survey, similar to the one shown in Figure A. Once the viewer makes his choice, he then clicks the Vote button to submit his selection. The page then refreshes with the results displayed where the survey originally appeared, as shown in Figure B. We’ll also include a cookie to the page that will prevent the viewer from voting more than once–something our government has a hard time ensuring.
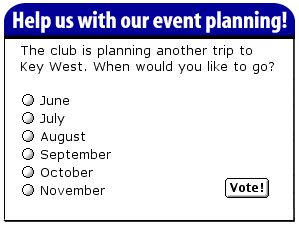
Figure A
Adding a survey is a great way to get viewers to return to your site.

Figure B
The survey results may often surprise you!
In order to use the survey function we’ll highlight in this article, you’ll need to make sure that you can use CGIs on your server. Since these are the defacto standard for scripting, chances are good that this won’t be a problem. The CGIs will run on both UNIX and Windows servers, though they’re only officially supported for UNIX. You’ll also need PERL 5.0, as well as its location on your server. By default most servers set this at the path usr/bin/perl, but you’ll save yourself a bit of troubleshooting by making sure of this early on. Finally, you’ll need the ability to use SSIs (server-side includes) on your server, as well as know the syntax to evoke them. Granted, this is already sounding a little difficult but we promise we’ll walk you through each step so you can use your brainpower for something more important.
Our Choices of Software
While there are a number of CGIs available to create surveys, we’ve found Quick Poll to be the easiest, most full-featured one available, especially when you consider that it’s free. To begin, fire up the trusty browser and go to https://ethereal.virtualave.net/soft/qpoll/downloads.html and download the current version of Quick Poll (which at press time was version 3.1). Once you expand the file, you’ll find that it includes 10 files, which for the unassuming Web designer will be a little mysterious and daunting–especially if you open and try to make sense of them. In reality, the only reason you might need to open the files is to change the PERL pathway. For example, PERL 5.0 on our server is at usr/bin/perl instead of the usual usr/local/bin/perl, so we had to open each of the files that referenced PERL and alter this one line. Fortunately, this is always the very first line of the script, as you’ll note in Figure C. The files that reference PERL are qpadmin31.pl and qpoll31.pl. (You can open these files in any simple text reader or word processor.)
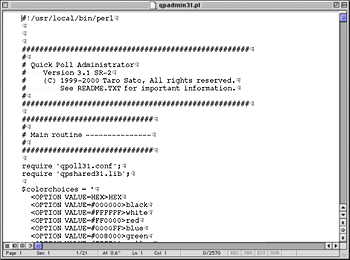
Figure C
You may need to alter the path for PERL in a few of the scripts.
The next thing you’ll need to do is create resource and data directories to contain the data for your polls. To do this, you’ll find it easiest to start from your favorite FTP application. Just go to the main directory of your site and then choose the option that allows you to create a new directory. Name the first qpdat and the second qpres. If you have a location on your server that isn’t available to the public, you can move the qpdat folder there, in case you’re afraid of folks viewing the raw data for your surveys. Once you’ve created the directories, you now need to set their permission characteristics. (For more on what this means and how to do it, refer to the idebar “Granting permission.”) Set the qpdat directory for full read, write and executable permission for everyone (777) and the qpres directory for full permission from the owner and read and executable for the group and others (755).
For the CGI to work correctly you need to tell the script where to locate the directories you just created along with the location of the administration CGI. To do so, open the file named qpoll31.conf and change only the paths in the colored lines shown in Figure D. Assuming you placed your data directory on the server’s local directory and the resource directory in the main directory of your hard drive, you should only have to change the domain name in the path. Likewise, although we haven’t yet moved it there, the path for the qpadmin31.pl file should be correct after you change the name of the domain.
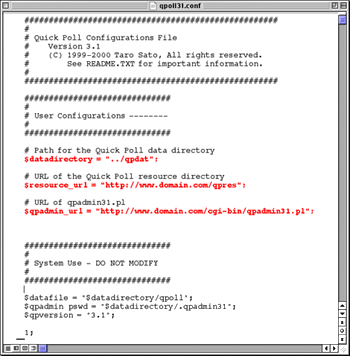
Figure D
You need to tell the script where certain components are located.
Next, you need to move all the other files onto your server and set their permission levels. Since these files are all text-based, be sure to use the ASCII transfer function on your FTP software. On your server, open the cgi-bin directory and move the files shown in Table A into it, setting the permission of each file accordingly. Then open the data directory (qpdat) and move the sample poll files (all the files that begin with qpoll) and set their permission levels to read and write only (666). Finally, move the file named spacer.gif into the resource directory (qpres) using a binary transfer and then set its permission level to readable and writable to the owner, and readable for everyone else (644). With all this done, you’re ready to begin creating your own survey.
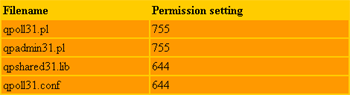
Table A
Move these files to the cgi-bin directory and change their permission settings.
Opinionated Setup
To begin developing your first poll, fire up your Web browser once again and go to www.yourdomain.com/cg-bin/qpadmin31.pl (replacing of course the yourdomain portion of the address with, well, your domain). When you do, the CGI displays a login screen as shown in Figure E. Since this is the first time you’ve accessed the CGI, you don’t have an Administrator ID or Password. To create one, just enter it in the appropriate fields and click the Login button. You’ll then be asked to log in again. When you do, the CGI displays the Quick Poll Administrator page. From here you can create, view the results or delete polls.
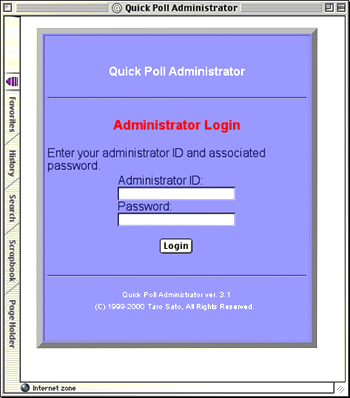
Figure E
Once you log in, you can create any number of surveys.
Since we want to create our first survey, click the New Poll button to display the page shown in Figure F. The administrator page is divided into five categories–essential poll settings, table style, color scheme, poll question and poll choices. By making minor changes to each of the default settings on this page, you can control the look and feel of each of your surveys. Table B summarizes the categories and each of their options. Rather than go through each of them in-depth, we’ll just highlight the most important ones.
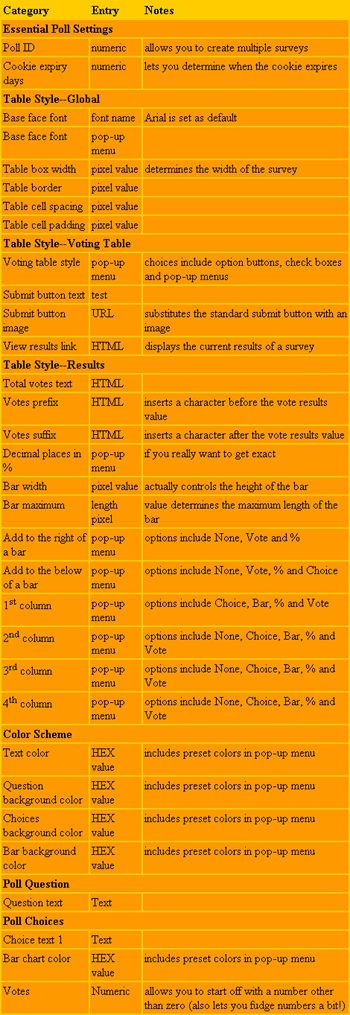
Table B
You can create a custom survey with just a few clicks of the mouse.
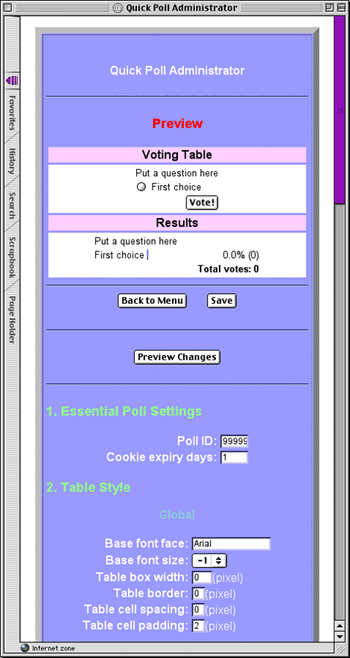
Figure F
It’s easy to control nearly every visual aspect of your survey.
As you can see, it gives you a sample poll with only a single voting option. To customize the poll, first enter a Poll ID. This number can be anything from 1 to 999999 but must be unique to all other polls. This number is how you will identify the poll on your page. It also allows you to easily include any number of surveys to your page. The next item, strangely labeled Cookie Expiry Days, is the number of days the viewer must wait until he can vote again. If you’re going to be replacing the poll monthly, we’ve found it best to enter 31 here. That way you can make sure it’s only one vote per viewer (or at least from the same machine).
The next section, Table Style, allows you to format the size and appearance of the survey, including the width of the survey, replacing the submit button with a graphic. Another nice feature is the ability to include a link to view the results of the survey, even before voting. One thing you have to be careful about is the maximum length for the bar results, as this value overrides the global value set for the size of the survey. That means while your survey may fit perfectly on your page, the results could wreak havoc on the design of your page.
Once you get to the bottom of the page, you’ll realize that there are only two places for your users to enter choices for possible answers. No problem–just click the Preview Changes button to view your survey thus far. Then when you scroll to the bottom of the page, you find your two choices along with space for a third. Continue this process until you’ve completed your survey.
Using Your Survey
Once you’re satisfied with your poll, you’re ready to throw it into a Web page. To do so, you’ll first have to include a portion of text that will set the cookie for the poll. Begin by inserting the following text within the <HEAD> tags:
<META HTTP-EQUIV=”Set-Cookie”
CONTENT=”cookie=set; path=/”>
Next you need to set the SSI command to display the survey in your document. While the commands for SSI may vary according to your server, we’ll use the basic #include virtual command in the syntax:
<!–#include virtual=”/cgi-bin/qpoll31.pl?
=>poll_id=999&action=replace”–>
This example will display the poll with ID number 999 and when the viewer votes, will be replaced with the results page.
Once you’re familiar with this syntax, you might want to review your survey and include a link so that those willy-nilly viewers can see the current results before they vote. To do so, simply go back to the Quick Poll Administrator and in the View Results Link field insert the following command:
<A HREF=”/cgi-bin/qpoll31.pl?poll_id=999
=>&action=view”>See Results</A>
This will put a link to the results page at the bottom of the survey.
Alternative Designs
As you’ll quickly notice, there are a multitude of ways you can change the look and feel of your survey–from changing the font face and size to the color of the text and the bars in the results section. But the most drastic way to vary your survey is by including graphics for your choices instead of or in addition to words. To do so, you simply enter the reference to the images in the format <img src=”https:///yourdomain.com/image.gif” align=absmiddle>. When you’ve finished with such a survey, it will end up looking more visual, as illustrated in Figure G.
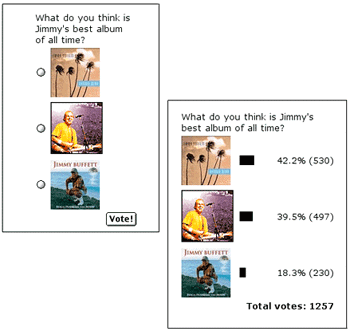
Figure G
Which is Your Favorite Album?
All That You Survey
It’s important to keep your viewers returning frequently to your site, especially if you’re making big bucks from those banner ads. By adding interesting, even controversial, surveys to your site, you entice them to return often. After all, as we learned last year, everyone wants to have his vote counted.

Copyright © 2000, Element K Content LLC. All rights reserved. Reproduction in whole or in part in any form or medium without express written permission of Element K Content LLC is prohibited. Element K is a service mark of Element K LLC.
This article was last modified on January 8, 2023
This article was first published on April 23, 2001
Commenting is easier and faster when you're logged in!
Leave a Reply

I can’t find the Quick Poll Freeware described in the article. Is it still available? If not, can you suggest a good alternative?
Thanks
claire