Inside QuarkXPress: Working with Embedded Paths

Application: QuarkXPress 4.x
Operating Systems: Macintosh, Windows
It isn’t really a big deal that QuarkXPress can read the embedded paths of imported images–most design applications are capable of that. Not so common, though, is a desktop publishing application having the ability to create and edit simple paths. QuarkXPress’ Clipping feature makes this possible. How QuarkXPress works with paths and what exactly the Clipping feature enables you to do is what we’ll cover in this article. For example, we’ll show you what happens when a bitmap image with clipping paths is imported into QuarkXPress and what the application enables you to do to those paths, as shown in Figure A.
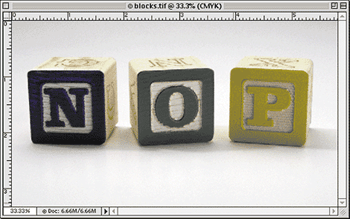
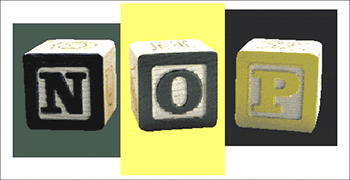
Figure A
By adding a clipping path to the original image, we were able to isolate the blocks from the background and create a new background behind the image in QuarkXPress.
What’s a Clipping Path?
Simply stated, a clipping path enables you to outline a specific area in an image so that, upon exporting or outputting it, the area outside the path is rendered transparent. The beauty of clipping paths is that they don’t alter the actual image.
To be more precise, a clipping path is made up of a series of points joined by straight and/or curved line segments. The more detail contained in the image, the more complex the clipping path will be, and the more memory it will require.
You may apply clipping paths to virtually any image format QuarkXPress supports, such as EPS, BMP, TIFF, PICT, JPEG and GIF. The format in which to save your images depends on how you intend to output the document. TIFF and EPS files are used most often for print materials; JPEG and GIF files are meant for online viewing only; BMP and PICT files are low-resolution formats and shouldn’t go further than your desktop printer.
A clipping path’s outcome depends on many factors. The application, method and file format used to create an image with a clipping path all will make a difference. The biggest determining factor, however, is your level of expertise with regard to creating paths. For instructions on how to create a clipping path, see the article “Creating clipping paths in Photoshop 5” in the February 2000 issue of Inside QuarkXPress.
Types of Paths
The way in which QuarkXPress lets you work with clipping paths is most clearly understood by looking at the Clipping tab of the Modify dialog box. In order to access it, however, you must first import and select an image within a picture box. Then press [c][option]T ([Ctrl][Alt]T in Windows), or choose Item > Clipping.
Item
The first pop-up menu on the Clipping tab is Type. The first selectable option is Item. This is the default setting for images that don’t contain clipping paths or alpha channels. (In earlier versions of QuarkXPress, images with embedded paths automatically activate the Embedded Path option.) Choosing Item will also hide most embedded or clipping paths.
For example, if you want to use in its entirety a TIFF image that contains an embedded path, selecting Item turns off the path and shows the entire image. This is much easier than returning to the original image file and deleting the path.
Note
- : Since QuarkXPress always uses the designated clipping path of an EPS file, selecting Item won’t perform the same function as it would with a TIFF file.
Embedded Path
When you select an image with a clipping path (instead of an embedded path), Embedded Path becomes the active Type selection, as shown in Figure B. When this option is active, additional choices become available with which you can edit the path.
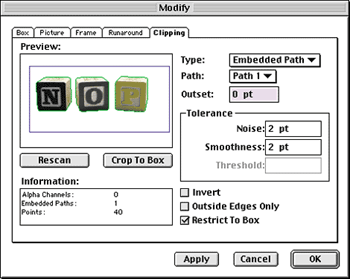
Figure B
Embedded Path automatically becomes active when you select an image that contains a clipping path.
The Path pop-up menu, located directly below the Type pop-up menu, enables you to select other paths that exist in the original image. This option is very useful for when you want to show different areas of an image in multiple instances.
For example, we could create separate paths around each of the building blocks of our original image. Then place the image in three different areas of our QuarkXPress document, each with a different path selected. The result would be three different images created out of just one file.
Alpha Channel
An alpha channel is similar to a clipping path, but instead of isolating an area with a path, a separate color channel is used to create an 8-bit black-and-white or grayscale mask. When Alpha Channel is active in the Clipping tab, it can be converted into a clipping path. An alpha channel must be saved as a TIFF to be recognized in QuarkXPress.
The Threshold option is used to adjust the sensitivity of pixel grayscale values in your image, which in turn enables you to control how closely the isolated areas are clipped. Pixel values lighter than the grayscale percentage value entered are excluded from the clipped area, while the darker areas are included.
Non-White Areas
The Non-White Areas option enables you to create a path of your own. To do so successfully, however, the picture condition must be nearly perfect. The area to be clipped should be a light-colored object or image surrounded by uniform darkness (or vice versa) and in sharp focus. If your picture features flat color or is out of focus, trying to use the Non-White Areas option to create a clipping path may simply be a waste of time.
Successfully creating a clipping path using Non-White Areas will come mostly from trial-and-error Threshold and Offset settings. For the most part, it’s not usually worth the time and effort you’ll have to put into it since the paths are generally low quality and there’s no guarantee they’ll even print properly.
Picture Bounds
Selecting Picture Bounds from the Type pop-up menu on the Clipping tab enables yet another interesting feature. The paths shift to the outside edges of the image, much like when you choose Item. But now you can inset or outset the path from the picture’s edge, as shown in Figure C.
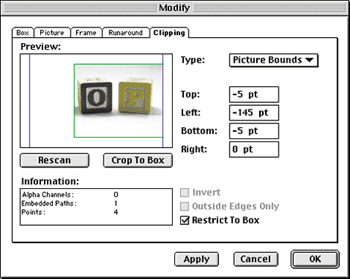
Figure C
The Picture Bounds option enables you to reposition the clipping paths.
Setting Clipping Path Options
The remaining options in the dialog box enable you to further control the image seen through your clipping path. Certain options become available, depending on which clipping type you select.
Outset
Outset is the next pop-up menu in line on the Clipping tab. If, for some reason, the clipping path needs to be spread or choked (enlarged or reduced), this option enables you to do so in points. To spread the path, you enter a positive value; to choke a path, enter a negative value into the text box. For example, you’d use this when you place an image into QuarkXPress and then notice part of the background bleeding through that didn’t get clipped properly. Instead of returning to Photoshop to fix the problem, you can simply change the Outset value to choke the path just enough to mask the white. Since a good path is based on how close you can get to the outline of the image without seeing any traces of the surrounding area, this is a very important option. Altering a path in this way for minor changes is acceptable; for larger corrections, however, you’re better off using photo-editing software, which is more adept at creating paths.
Invert
The Invert option, located towards the bottom of the Clipping tab, enables you to reverse the area currently being clipped. For example, if the path or channel applied to your image clips out the intended area and leaves the background you meant to hide, you can simply select the Invert check box to correct the situation, as shown in Figure D.

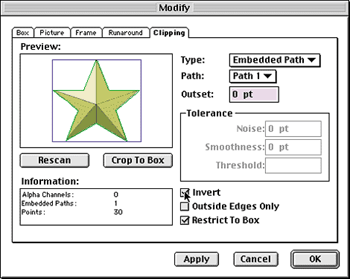
Figure D
Select the Invert check box to switch which area of a clipped path is shown.
Outside Edges Only
While clipping to the non-white areas of your image, the Outside Edges Only option enables you to exclude pixels that are lighter than the threshold and include a value within the interior of your isolated image area. For example, if your image contains inner areas of equal color to the background being clipped, choosing this option limits the clipping path to only the outer area.
Restrict To Box
While using a clipping path to clip an image, it’s possible for parts of your clipped image to appear outside your picture box. While the Restrict To Box check box is selected, the image and path are restricted to only your clipping path settings and the image’s picture-box boundaries. This feature was clearly shown in the article “Breaking the bounds of the standard picture frame” in the February 2000 issue.
Setting the Tolerance
The next group of options, which includes Noise, Smoothness and Threshold, is found within the Tolerance panel. Each option enables you to fine-tune a clipping path.
Noise
The Noise text box controls QuarkXPress’ clipping path sensitivity to pixel area size. The value entered sets the dimensions of the area to be ignored. For example, entering a value of 10 points tells QuarkXPress to ignore pixel areas less than 10 points.
Smoothness
The Smoothness text box enables you to control how closely the shape of your image is followed. This setting has a direct effect on the complexity of the clipping path that’s created. The more detail around the contours of your image area, the more points will be required to describe it. If a path has too many points, QuarkXPress attempts to decrease them by raising the smoothness setting during printing. This sounds okay, but the result is a less accurate path.
Threshold
The Threshold text box becomes available only if either the Alpha Channel option or Non-White Areas option is active in the Type pop-up menu. When the Non-White Areas option is selected, any pixel shaded below the threshold value is excluded from the clipping area and any pixel above it is included. The exact opposite is true for the Threshold option with Alpha Channels.
Complex Options
Besides the options we just described, the Clipping tab contains two more buttons and an Information window that details your image’s path complexity. Knowing the complexity of your paths is important. As we mentioned earlier, the more complex they are, the longer the image will take to print–especially at higher resolutions.
Tip
- : Open Prepress Interface, or OPI, is an extension to PostScript many print service bureaus use that replaces low-resolution placeholder images with their high-resolution counterparts. Oftentimes clipping paths in TIFF images won’t output correctly if using IPO swapping.
Each time you select a new clipping path type, the image is automatically scanned and the chosen clipping path applied. Use the Rescan button, below the Preview window, to update the clipping path after you enter new values into any of the text boxes. Clipping paths appear in the preview window as colored outlines surrounding the clipped image.
Clicking the Crop To Box button automatically resets the clipping path to apply only to parts of the image that appear inside of your image’s picture box. The aim of this option is to reduce the overall clipping path complexity. Without selecting this button, your clipping path may be unnecessarily complex.
Editing a Clipping Path
As we said, even if an image’s path were created in an application other than QuarkXPress, you may still make adjustments to it manually. However, this process can be tedious if major shape changes are involved; a steady hand is required while using the Bézier drawing tools. Also, there’s no guarantee how a clipping path created in another application and altered in QuarkXPress will output, so proceed with caution.
With that said, to edit a clipping path, select the picture box containing the clipped image. Now, press [option][shift][F4] ([Ctrl][Shift][F10] in Windows), or choose Item > Edit > Clipping Path. While in this editing mode, the points and segments describing your clipping path become visible as a colored outline with points. Use the Item tool to move, add or delete points on the path, as shown in Figure E. You can convert the segments that join them from lines to curves, or vice versa.
Tip:
- While editing a clipping path, hold down the [option] ([Alt]) key while clicking on a segment to add or delete a point.
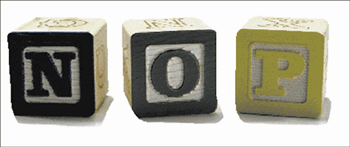
Figure E
Here we used the Item tool to adjust the path so that some of the original item’s shadow shows through. As you can see, however, the results weren’t too desirable.
As you edit your clipping path, you’ll notice that all the usual Bézier resources come into play. The context-sensitive Measurements palette (press [F9] to access) displays all relevant point and segment properties. You may use buttons on this palette to change the state of points and/or segments. As you make changes to the path, the visible image portions are updated automatically.
After editing a clipping path, press [option][shift][F4] ([Ctrl][Shift][F10] in Windows) to return to the normal editing state. Once your clipping path has been manually edited, it will be listed as User-Edited Path in the Type pop-up menu of the Clipping tab. If you change this setting after editing a path, your changes will be lost.
The Right Path
QuarkXPress’ Clipping feature provides a variety of options with which you can customize embedded paths and channels, as well as create them internally. To what level you take it depends on the image, the way in which the document will be output, and your level of expertise.

Copyright © 2000, Element K Content LLC. All rights reserved. Reproduction in whole or in part in any form or medium without express written permission of Element K Content LLC is prohibited. Element K is a service mark of Element K LLC.
This article was last modified on March 12, 2022
This article was first published on April 30, 2001


Hay,
Your article help me a lot. Exciting post for whom want to understand thank you so much Special thanks to writer to give us such imaginary things :)
Interesting article for those who want to understand the Embedded paths.
Sample image demonstrating each point would have been awesome.