

In photography, blurring the background helps draw attention to the subject of the photo. It’s not hard to do with a digital SLR camera because of the digital sensor’s or film frame’s size (also called the format), but what if all you have is the small-format digital camera in your pocket? You can blur the background with almost any camera if you can control the factors that affect what’s in focus. And when you shop for a compact digital camera, you can look for certain features that make it easier to blur backgrounds.
In some photos almost everything appears to be in reasonably sharp focus, from nearby objects to distant objects. In other photos only a thin slice of the total depth of the scene (at the actual focus distance) appears sharp, and the rest is visibly blurred out of focus. The range of the distance that’s in focus is called the depth of field. It starts from the focus point (the distance of your subject), with the range of acceptable focus extending in front of and behind your subject. The photographic techniques for using depth of field to blur the background are the same no matter what kind of camera you have, but the limitations of small-format compact cameras make you work harder than you would with a camera with a larger frame format.
Move the subject closer to you and farther from the background
Make the camera-to-subject distance as small as possible, and make the subject-to-background distance as large as possible. This shifts depth of field toward you and away from the background so that it blurs. Controlling this ratio of distances is helpful when your compact camera’s minimum depth of field is relatively deep, and it’s the only technique in this article that you can use with a typical smartphone camera. It’s also one reason why macro photos have such shallow depth of field: You’re very close to the subject, so the range that’s in focus is much closer to you than to the background.

The pair of warning signs is on two entrance doors open several feet apart in parallel. I can’t move the background door farther away, but in the second photo I move closer to the foreground sign. That’s enough to visibly blur the background sign. No camera settings were changed.
Open the lens aperture as much as possible
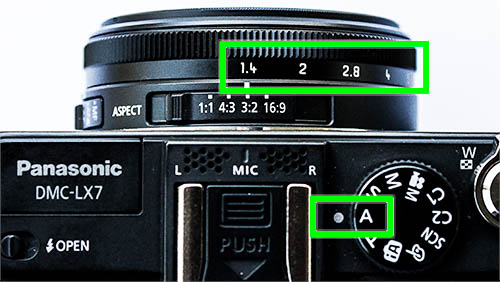
As you open the lens aperture wider, you narrow the depth of field. That’s why, all other things being equal, a lens set to f/2 has much shallower depth of field than a lens set to f/16. While every experienced SLR photographer knows this, what’s different today is that more compact digital cameras have a lens aperture that you can manually set to f/2 or less. If blurring backgrounds with a compact camera is important to you, shop for a camera with that capability. (Remember, a lower f/stop value indicates a larger aperture.)

The first photo has an aperture value of f/2.8. Opening up to f/1.4 blurs the background much more in the second photo. But this is only possible because the compact camera I used is capable of f/1.4 and manual aperture control, as shown below.
Use a neutral density filter to avoid overexposure
There’s a potential problem with opening the aperture all the way to blur the background. In bright light, such as a sunny day, a lens at maximum aperture may let in so much light that the camera can’t avoid overexposure. (On many compact cameras, the range of available shutter speeds, apertures, and ISO speeds is limited compared to an SLR camera.) To counter this, some digital compact cameras have a built-in neutral density (ND) filter that that you can switch on and off. A neutral density filter physically limits incoming light for a scene that would otherwise be too bright for the camera to achieve the exposure you want.

The first photo has an aperture value of f/2.8. In the second photo, opening to f/1.4 increases background blur, but it contains overexposed highlights because the camera is at the limits of its shutter speed and ISO speed. Turning on the neutral density filter solves the problem in the third photo.
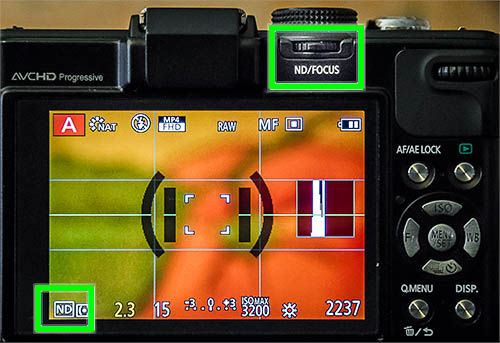
On this compact camera, pressing the ND/Focus dial at the top turns on the ND filter, as shown by the ND indicator at the bottom.
If your digital compact camera doesn’t have a ND filter built in you might be able to attach one, but not all compact cameras let you attach a filter as easily as on an SLR camera lens. Remember to stop using the ND filter when you’re no longer in very bright light, because you usually want the camera to have as much light as it can get.
Zoom in
When you use a lens with a longer focal length, the narrower angle of view magnifies out-of-focus areas. You may be able to take advantage of this effect if your compact camera has a zoom lens. Zoom in on your subject and the background blur will appear to increase. This is one reason portrait photographers tend to prefer longer focal lengths.
There’s a misconception that longer focal length directly reduces depth of field. Actually, it doesn’t. What you really see is the same out-of-focus background enlarged due to the narrower angle of view. If you take the same photo with a longer focal length and a shorter focal length, and you crop the shorter focal length photo to make the subject the same size as it is in the longer focal length photo, you’ll see that the actual depth of field is the same.
When it comes to controlling depth of field, the traditional gap between SLR cameras and compact cameras has been narrowed by advanced digital compact cameras with features like a manually controlled large aperture lens and a built-in neutral density filter. Some compact cameras even have sensor sizes that are closer to that of an SLR. These features can help you can more easily blur backgrounds under a wider range of conditions than with a typical compact camera, especially when you combine those features with traditional
depth-of-field techniques.
This article was last modified on July 21, 2014
This article was first published on July 21, 2014
Commenting is easier and faster when you're logged in!

Recommended for you

PowerPoint How-To: Hide Onscreen Content in Slideshow Mode
See how you can have content on your PowerPoint slides that will print but not s...

How to Create Realistic Watercolor Effects in Photoshop
Learn how to use Photoshop to create hand-brushed watercolor effects that don’t...

Tackling Missing Glyphs
When a document mysteriously opens with dozens of characters set to the "dreaded...