

CreativePro Tip of the Week: Using the HUD (Heads-Up-Display) Color Picker in Photoshop

This CreativePro Tip of the Week on using the HUD (Heads Up Display) Color Picker the Photoshop interface was sent to CreativeProse email subscribers on June 21, 2017.
Sign up now and every week you’ll get a new tip, plus roundups of new articles, and exclusive deals sent right to your Inbox!
Just scroll down to the bottom of this page, enter your email address, and click Submit! We’ll take care of the rest. Now, on with the tip!
Did you know that Photoshop has a color picker that you can access right at your cursor—if you can handle a little finger gynmastics?
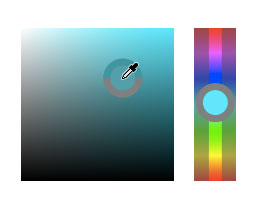
When using a painting tool, to display the HUD (Heads-Up-Display) color picker on the Mac, hold Control+Option+Command then click and hold the mouse button.
On Windows, the shortcut is Shift+Alt+right-click.
The HUD color picker is made up of two parts, a square for choosing saturation and brightness, and either a strip or wheel for choosing a hue.
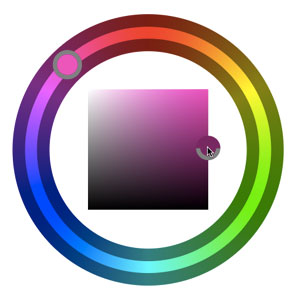
To jump from one part of the picker to the other keep holding down the mouse button, release the other keys, and press the spacebar. Move your cursor over the other part of the picker, then release the spacebar.

Yes, it’s somewhat ridiculous, but you might get the hang of it after a few tries. (Or you’ll curse me and this tip for ever making you aware of the HUD color picker. It’s a risk I’m willing to take.)
You can set the size and style of the HUD color picker in General preferences.

The HUD can be displayed as either a strip or a wheel (select the shape and size from Preferences > General HUD Color Picker).
It’s quite hard to pick the right color in the HUD color picker but it’s quite fun since the color change is smoother. Thanks for sharing your tips.
thank you
To jump from one part of the picker to the other keep holding down the mouse button, release the other keys