

Review: Photoshop Touch 1.0 on the iPad 2

Pros: Great selection and compositing tools; very good retouching tools.
Cons: Missing some simple, critical features. Interface needs polish. Limits to file size. All original metadata gets stripped out.
Rating: 7/10
It’s been two years since the release of the iPad, but Adobe has finally made an entry into the iOS image editing market with the release of Photoshop Touch 1.0. Available previously for Android systems and now for the iPad 2, the $9.99 app offers an assortment of Photoshop-derived technologies in a touch-based interface. The result is a curious mix. On the one hand, Adobe has delivered some of the most advanced image editing technology available for the iOS platform, but on the other, they’ve left out some simple basics. Whether the app is a good choice for you depends on what type of editing you need to do in the field.
A Touch of Photoshop
iOS is, of course, very different from any desktop operating system. There is no windowing system, no standard for getting files into or out of an application file I/O, and nothing in the way of a file system. Consequently, Photoshop Touch looks very different from any version of Photoshop that has existed on a desktop operating system. That said, there are still some familiar bits here and there for users who are comfortable with Photoshop.
When you first launch the program, you’ll be presented with a simple screen that offers you the choice of viewing a tutorial or starting a project. Adobe has cleverly built a tutorial mechanism into the program, and a good assortment of tutorials ship with the application. These lead you step by step through various editing operations, guiding you through each button or tool that you should click on. It only takes about 10 minutes to work through all of them, but this should be enough to get you up to speed.

Figure 1: Photoshop Touch provides a simple set of built-in tutorials that do a good job of getting you up-to-speed on the application.
A Project is simply the Touch equivalent of a Photoshop document. I assume that Adobe has chosen not to call it a document because the program does not actually produce any equivalent to a PSD document. Instead, any projects that you’ve made appear in a project gallery. Open up an existing project, and you’ll find your project in whatever state you’d last left it, layers and all.

Figure 2: The Project Gallery lets you view all of the projects you’ve created in Photoshop Touch.
When you create a new project, you’re taken to a browser that lets you select an image to add to your project. There are several image sources available from within Photoshop Touch. You can open an image that’s currently in your iPad’s photo roll, which are the same images that you see when you browse images in the Photos application. That means images you moved over from iTunes, shot with the built-in camera, or saved from an email or web page can be opened.
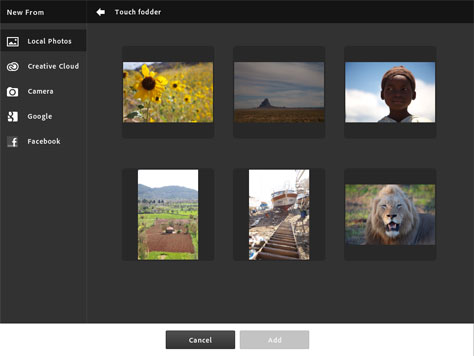
Figure 3: Photoshop Touch lets you open images from a variety of sources, including the iPad’s photo roll.
You also have access to files from Adobe’s Creative Cloud service, as well as Google, Facebook, and the built-in camera.
If you have the iPad Camera Connection kit, you can import images from your digital camera into the iPad’s photo roll. From there, they can be imported into Photoshop Touch. However, because Apple keeps the images walled off in their own virtual “sandbox,” it’s not possible for developers to get access to any raw file data that you might have imported. In other words, there’s no equivalent to Camera Raw in Photoshop Touch. Instead, the iPad’s OS-level raw converter handles raw conversion and passes a finished image to Photoshop Touch.
This means that you won’t have access to any of the raw controls that you may be used to in Photoshop CS. White balance adjustment, highlight recovery, higher bit depths — these are all absent from Photoshop Touch. Adobe can’t be faulted for this; Apple simply doesn’t allow developers access to the requisite data.
The Interface
Once you’ve started a project and added an image, you’ll find yourself in Photoshop Touch’s simple interface. Rather than a document window, you will simply see your image. The usual touch gestures let you zoom in and out of the image, while dragging with two fingers pans the image. You can even zoom and pan at the same time by combining a pinch with a drag. As you zoom, an onscreen text box shows the current magnification level.

Figure 4: Photoshop Touch’s interface shows your image surrounded by some simple tool palettes.
While these basic navigation controls are very intuitive and simple, I’d like to see the addition of some kind of shortcut for fitting the image to the available space and for zooming to 100%.
On the left side of the screen you’ll find a simple toolbox with some familiar looking icons. As in Photoshop, a tick mark on a tool indicates a pop-out menu that houses additional related tools. When you select a tool, it shows in white at the top of the toolbox, and the toolbox fills with parameters for that specific tool. In other words, the toolbox becomes the equivalent of the Photoshop Command Bar.
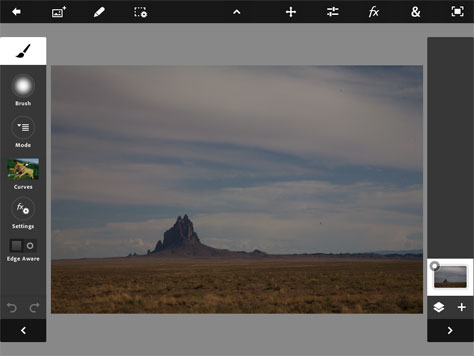
Figure 5: When you select a tool, the toolbox fills with parameters for that tool, similar to Photoshop CS5’s Command Bar.
Tap on the tool icon at the top of the box, and you’ll return to the full toolbox view.
This is a clever use of screen space, but it can be a little annoying when you’re learning the program. If you simply want to tap on a tool to read its tool tip to find out what it is, you’ll then have to tap your way back to the Toolbox to continue exploring.
At the bottom of the toolbar are buttons for Undo and Redo, and a control for collapsing the toolbox against the side of the screen to free up screen space. When collapsed, a simple small tab remains that allows you to reopen the palette.
The right side of the screen has a similar collapsible box that houses the program’s layer controls.
Finally, at the top of the screen, you’ll find what appears to be another toolbar but is actually a menu bar with tool icons instead of menu names. Some of the menus are rough equivalents of Photoshop menus. For example, there’s a menu with things that would normally be in an Edit menu (such as fill, stroke, transform) and another with options for managing selections. An Adjustments menu pops up a menu with thumbnails showing all sorts of adjustment options, while the FX menu provides access to Filter-type operations.

Figure 6 The majority of Photoshop Touch’s features are accessed from its menu bar.
There’s an “&” menu which includes an odd assortment of functions from cropping to image sizing to tools for adding gradient fills to a layer.
All in all, the organization feels a little haphazard, as if Adobe doesn’t quite yet have a clear paradigm on how their features should be organized. Fortunately, the feature set of Photoshop Touch is small enough that it’s not hard to quickly learn which features are where.
A Typical Workflow
With the Photoshop moniker in its name, one expects to be able to follow the same editing workflow one would use on the desktop and for the most part, that’s possible.
I always start all imaging with geometric corrections — cropping, straightening, and so on — and Touch provides a Crop option in the “&” menu. When you choose to crop, you will be taken into a dedicated cropping environment. The rest of the interface will disappear, leaving you with your image on a plain gray background. A small assortment of cropping parameters sits in a toolbox at the bottom of the screen, while crop handles allow you to drag out your desired crop.

Figure 7: The Crop tool in Photoshop Touch provides a very small assortment of cropping options.
You can choose to lock the aspect ratio to preserve the image’s original aspect ratio, and you can activate a control for snapping the crop boundary to the edge of the document. But overall, the crop control is underpowered. It offers no ability to specify a desired aspect ratio and most importantly, provides no straightening capability. These are two fairly critical — and fairly simple — operations, and why they were left out is a real mystery. (On the other hand, Photoshop didn’t get a straighten control until CS2, so maybe this shouldn’t be a surprise.)
If you need straightening, you’ll have to turn to a third-party solution, such as Image Straightener that offers precisely the type of straightening feature that Photoshop Touch needs.
At this stage of my normal workflow, I would also tackle any barrel or pincushion distortion, vignette, or chromatic aberration problems, using either the Lens Correction filter, or Camera Raw. Photoshop Touch doesn’t include any facility for making these types of edits.
Next comes spot removal. Photoshop Touch includes both a Clone Stamp tool and a Healing Brush tool, either of which works very well for tackling sensor dust or removing telephone wires or other pesky elements.
There is no Option/Alt key on the iPad, of course, so Photoshop Touch provides a Source button that allows you to select the source point for your cloning operations. This is a very nice interface, and while you may not be able to redefine the source point as quickly as you can with a keyboard and mouse, it’s still very functional.

Figure 8: The Photoshop Clone Stamp and Healing Brush tools provide very effective interfaces for managing source points.
What’s a little complicated, though, is painting with your finger, for the simple reason that when finger painting, it’s hard to see what you’re doing. To help with this, you can activate a separate pointer. This gives you a cursor just like you would normally have, which you can control by moving your finger on the lower half of the screen. This is a clever workaround that is very effective, but if you have serious plans for Photoshop Touch, I heartily recommend buying an iPad stylus such as the Wacom Bamboo Touch. Every bit as responsive as your finger, a stylus makes it much easier to see what you’re doing during a painting operation.
Brush size is controlled through a nice popover window that houses simple sliders for size, hardness, flow, and opacity.

Figure 9: Brush size and other parameters are controlled through a simple popover.
While these two tools are very capable, I do miss the Spot Healing Brush tool for simple dust removal.
Tonal adjustments come next in my regular Photoshop workflow. You’ll find relevant adjustments under the Adjustments menu.

Figure 10: The Adjustments menu provides an assortment of tone and color adjustments.
Auto Fix provides a single-click solution that automatically adjusts tone and color. It’s a very capable tool and may be all you need for many images.
Brightness/Contrast provides simple brightness and contrast sliders. Unfortunately, they feel more like Photoshop’s old Brightness And Contrast adjustment, rather than the improved control that appeared in CS3. It’s very difficult to maintain a black point while working with this control.
Levels offers a full-featured levels adjustment, with separate input and output sliders, the ability to adjust individual channels, and a histogram display behind the levels control.
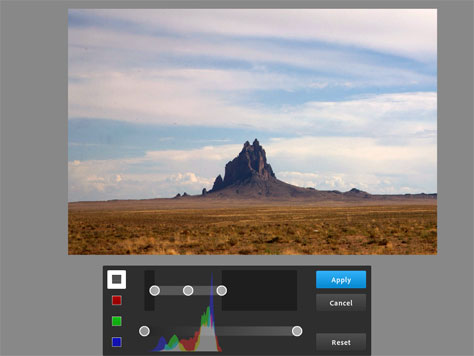
Figure 11: The Photoshop Touch Levels adjustment provides a great way to adjust tone.
As with all of the Adjustment controls, when you select Levels, you’re taken into a modal environment — all other interface elements disappear, leaving you with a view of your document, and a Levels control locked to the bottom of the screen.
Unfortunately, in all of these modal environments, the control window covers up a lot of your document. This means that you’ll need to zoom and pan to arrange your image on-screen with the control. After applying the edit, though, you’ll need to enlarge your image again. It’s very annoying that the program doesn’t do this for you, or provide an option to do it automatically. It makes Photoshop Touch feel unfinished and clunky.
There are no eye-dropper controls in the Levels adjustment, so correcting color casts can be tricky. Similarly, there’s no output histogram display, so you’ll need to rely on your own understanding of how the histogram is changing as you adjust the Levels sliders.
A Curves adjustment provides a simple curve. Because of its small size, adding a lot of points can be tricky, but for simple tonal adjustments, it’s quite usable.
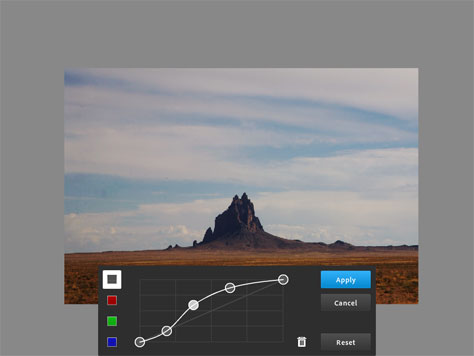
Figure 12: The Photoshop Touch Curve adjustment. Here you can see how editing windows usually cover up part of your document.
You might see the Shadows/Highlights adjustment and think that it will offer the same control as Shadows/Highlights in Photoshop — adaptive controls that automatically identify shadow and highlight areas in an image and lighten or darken them. That’s not what this tool is.
Shadows/Highlights in Photoshop Touch is just a four-point tone curve that you access through four simple sliders: Darks, Shadows, Lights, and Highlights. While you can easily make effective tonal adjustments with this control, I miss the adaptive adjustment from Photoshop, which makes short work of brightening shadow areas in an image.
For Color Correction, you have Color Balance, Replace Color, and Temperature, and a simple Saturation adjustment. The Temperature adjustment provides a very effective tool for correcting white balance and is a great addition to the program. Adobe’s choice for the other color correction controls is a little weird, though.
Replace Color? Is this a feature that people use a lot? I would gladly do without it in favor of a saturation control that allows me to adjust the saturation of specific color ranges. As it is, the Saturation adjustment is a simple global adjustment. Color Balance, meanwhile, has always been a tricky control to work with as it is such a blunt instrument.
To finish out a workflow, you’ll want to resize and sharpen. The resize command lets you specify pixel dimensions but offers no other units, or any ability to specify a resolution. If you need to deliver an image with particular size specs you’re out of luck.
The Sharpen adjustment offers a single slider that lets you add more sharpening. It’s plainly an unsharp mask operation, and with only an amount slider, you’ll be hard pressed to tackle difficult sharpening situations.
Finally, note that there are no Adjustment Layers in Photoshop Touch. All your edits will be destructive, though the program does provide multiple undos. Also, since you can duplicate layers, you can try to keep edits discreet, and buy yourself a way to back out of them later.
Selective Editing
Although there are no Adjustment Layers, you still have two ways to make localized edits. The first is to make selections and then apply an edit through that selection. Fortunately, Adobe has pulled some of their best selection technology from the Creative Suite and included it in Photoshop Touch.
The Scribble Selection tool works just like the old Photoshop Extract control. With the Keep brush, you paint the inside of an edge that you want to select along, and then use the Remove brush to paint along the outside of the edge you want to select along. When you’re finished, Photoshop defines the selection.
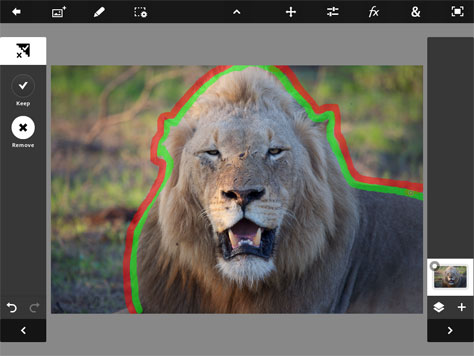
Figure 13: With the Scribble Selection tool, you can paint to define a selection around an edge in your image.
This Scribble Selection would be of dubious value on its own, but Adobe has included the wonderful Refine Edge feature from Photoshop CS5. With it, you can easily refine the edge of your selection, making it simple to select hair, transparency, and other subjects that are difficult to mask. Feather, Inverse, and other critical selection controls are also provided. The only additional selection control I’d like to see is a Hide Selection option.

Figure 14: As in Photoshop CS 5, Refine Edge in Photoshop Touch does an excellent job of automatically masking around hair and other tricky masking subjects.
Your other selective editing option is to use the Brush tool. In Photoshop Touch, a brush can be used with paint or with an effect. If you choose an effect, then you can select from an odd mix of effects culled from the Adjustments and FX menu in Photoshop.
For example, to lighten or darken an area, I would simply choose the Curves adjustment (Levels is not an option), configure it to perform the lightening or darkening that I want, and then paint that adjustment into the appropriate area. Because I can control the opacity of my brush, I can easily paint different amounts of the effect into my area, giving me a very powerful selecting toning tool.

Figure 15: Here I’ve configured the brush tool to paint with a Curve effect. This has allowed me to brighten the lion’s eyes.
A Dodge and Burn effect is also provided, which does a nice job of brightening or darkening without introducing weird hue shifts. It doesn’t seem to provide the full latitude of Photoshop’s dodge and burn tools, however.

Figure 16: As a final edit to this image, I’ve used the Temperature adjustment to warm the image. It’s done a great job of altering the white balance of my shot.
Other controls
Photoshop Touch includes a number of other tools and features. The Blur and Smudge tools are there in the toolbox along with the Eraser. Meanwhile, the layer options provide control of blending mode (though some of my favorite modes, such as Hard Light and Soft Light are not included), as well as merging and flattening controls.
There are no layer masks for painting masks into a composite, so you’ll have to make do with the eraser. The Add Fade command, though, gives you linear and radial gradients with adjustable mid-points and provides a good solution for complex blending.
Perhaps the one feature I was most looking forward to is not here: robust black-and-white conversion. The Black and White adjustment simply provides a stock black-and-white conversion with none of Photoshop’s excellent controls for adjusting the tone of specific colors.
Noticeably absent, too, is any good way of creating a vignette. While you can kind of make them with a radial gradient or the Lighting filter, these are a far cry from the wonderful vignette features included in Adobe’s desktop apps.
The FX menu contains a varied mix of filters from natural media to alternative processing looks. The amount of control varies from effect to effect.
The Layers controls also allow you to create a Photo Layer, which activates the iPad’s camera while leaving all other layers visible. This lets you shoot an image directly into a composite, allowing you to craft composites in real-time.
Output
When you’re done editing, you can save your project, although there’s no way to export any type of layered Photoshop file back to your desktop. From the Project gallery, you can choose to create a JPEG or PNG from any of your projects, and these can be saved to your photo roll, attached to an email, or sent out to various social media outlets.
Saved images have maximum pixel dimensions of 1600 x 1600 pixels. So, if you’re shooting with a camera that captures a larger image, it will be sampled down. For the shooter who needs to be able to process and transfer full-res images, this fact may be a deal-breaker for serious use of the app.
It should be noted that none of your image’s original metadata is included in your output images. Everything, including the original camera EXIF database, is stripped out.
Now, before you go flaming Adobe for this, it’s important to understand that this is not their fault. Apple does not provide access to metadata to third party developers. The data that comes out of the photo sandbox is pixel data only.
Photoshop touch
Photoshop Touch is an odd little app. On the one hand, there is some exceptional technology, such as Refine Edge, available under the hood. On the other hand, I’m not sure Adobe has a clear idea of what this application is for. There are some very high-end features that make it a candidate for serious image editing, yet you can’t straighten an image, and the color correction is weak.
By giving it the name Photoshop, the implication is that this is a professional tool, except that Adobe has chosen a weird feature set that is a mix of “professional,” and “fun consumer-y.” For example, there’s no way to adjust saturation of a specific color range, but you can apply a goofy halftone pattern with a single click.
The Apple App Store is full of iOS applications that offer lots of toy camera effects and other easy ways to stylize your images. If this is what Adobe was going for, then they’re behind the curve, as programs like PhotoToaster provide more effects and better control.
If the goal was high-end editing, then Adobe is off to a good start, but nik’s Snapseed offers more essential features in an interface that is much easier to use.
Perhaps the problem comes down to the question of what kind of editing people need to do on a tablet. If the goal is simply to give people a way to get their images looking cool before they post them to Facebook, then Photoshop Touch is both over- and under-powered. If the goal is to give serious photographers a small, lightweight, powerful field tool, then Adobe has missed the boat.
Granted, some of the problem comes from Apple. Pro photographers need to be able to output images with metadata, and Apple doesn’t allow that. Until they do, the iPad will not be suitable for pro work. Sadly, Apple doesn’t seem to feel that the pro market is one they need to indulge any further.
It’s easy to say “it’s just a version 1 product,” and certainly, Adobe has a good start here, but Snapseed is also a version 1 product, and it feels better-conceived, and more thoughtful in its design.
Still, although it lacks some critical features and although its interface has some quirks that make it feel a little bit like a beta product, Photoshop Touch is definitely the way to go if you need retouching and compositing tools on your iPad.
I’m a longtime user of Photoshop and waited eagerly for Adobe’s entry into touch pad photo editing apps. I purchased Photoshop Touch as soon as it was available, and, am sad to say, was disappointed. Even for a longtime user of Photoshop, the interface is clumsy and difficult to learn. It is slow and laborious to use, and fails to exploit the joy and speed that photo editing on the I Pad can bring.
Snapseed, on the other hand, understands very clearly how different editing on a touch pad device is, and their product is easy and intuitive to learn, quick to use, and just plain fun.
I believe touch pad will be the dominant photo editing platform of the future, and hope Adobe brings a better, easier to use application out, before it gets left in the dust of changing technology.
Exporting for Photoshop requires cumbersome steps and Adobe Creative Clud account. Unorganized interface, difficult to use without a stylus, sluggish at times escorts Sydney