

The Power of the Gradient Tools in Lightroom

Most of the editing tools in Lightroom CC and Lightroom Classic CC apply to an entire image, not selective portions of it. Sometimes, though, you want more control, such as adding drama to a flat sky or brightening specific areas that are in shadow. Sure, you could toss the image to Photoshop for those edits, but Lightroom’s gradient and brush tools can handle them. Here’s how.
Each of the tools I’m discussing create masks, where adjustments apply only to the active areas the tools create. Lightroom doesn’t include a formal layers feature, so imagine that the Linear Gradient, Radial Gradient, and Brush tools act as overlays.
Applying linear gradients
A common edit to landscape photos is to enhance the sky, which often appears too bright when you expose for objects in the foreground. But there’s still plenty of data in there to draw out more detail, especially if you’re shooting in Raw mode. It’s the perfect task for the Linear Gradient tool.
Why a gradient? It allows the effect to blend into the rest of the image, avoiding tell-tale hard edges that sometimes result when selecting areas in Photoshop. It’s an approach that doesn’t draw attention to itself.
Open an image in the Detail view (Lightroom CC) or the Develop mode (Lightroom Classic CC) to edit it, and then do the following.
1. In Lightroom CC, click the Linear Gradient button (or press L); in Lightroom Classic CC, click the Graduated Filter button (or press M).
The Linear Gradient tool in Lightroom CC

The Graduated Filter button in Lightroom Classic CC
2. Drag the tool from one edge of the image to create a gradient, such as down from the top when adjusting a sky. In addition to a transparent red overlay indicating the mask, the control features three lines: The top is the opacity of the mask at 100%; any area above that line is at full visibility. The center line is the midpoint of the effect, attached to the anchor point. The bottom line represents the end of the effect, at 0%.
Dragging the top and bottom lines repositions where the effect begins and ends. Placing them close together results in a tight gradient, while putting them farther apart spreads out the effect. They remain equidistant from the midpoint, so dragging one line affects the other.
Drag the anchor point to move the entire gradient. You can also rotate the gradient around the center by dragging on the middle line, away from the anchor point.
A Linear Gradient fills the sky in Lightroom CC
3. With the gradient in place, use the controls in the panel to adjust the tone, color, and sharpness of the masked area.

The adjustment controls apply only to the gradient area
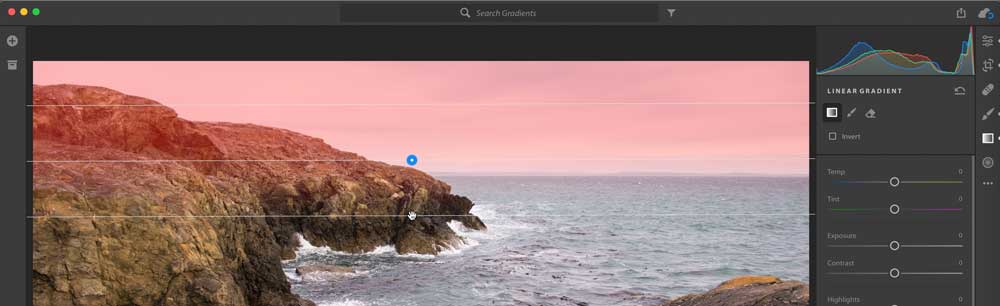
One side effect of a linear gradient is that unless you’re shooting photos of the empty ocean with a nice clear horizon line, objects in the scene are bound to be affected by the adjustment, such as the rocks at the upper-left corner of the image above, which are now darker. To fix that in Lightroom CC, switch to the Linear Gradient Eraser tool; in Lightroom Classic CC, click the Brush button in the Graduated Filter panel, and click Erase below the effect controls.
Then, paint out the area you wish to not be affected by the mask. Use the Size, Feather, Flow, and Density sliders to control the appearance of the eraser. As you work, you can adjust the brush size using a mouse’s scroll wheel or with two fingers on a trackpad; hold Shift while you do so to change the Feather value without going over to the panel.

Erasing parts of the mask in Lightroom CC
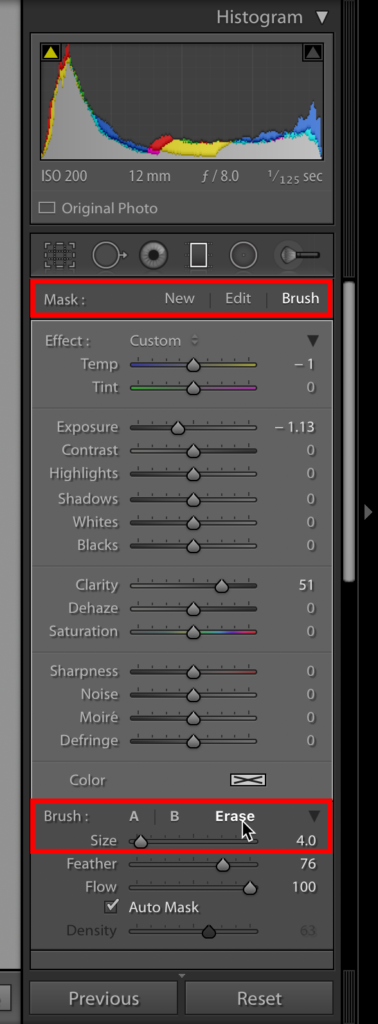
The controls for erasing parts of a linear gradient in Lightroom Classic CC
Conversely, you can use the Linear Gradient Brush to paint the effect anywhere on the image. Or, hold Option/Alt to toggle between the two modes. The adjustment settings apply to all areas that include the mask. To show or hide the mask itself, press the O key.
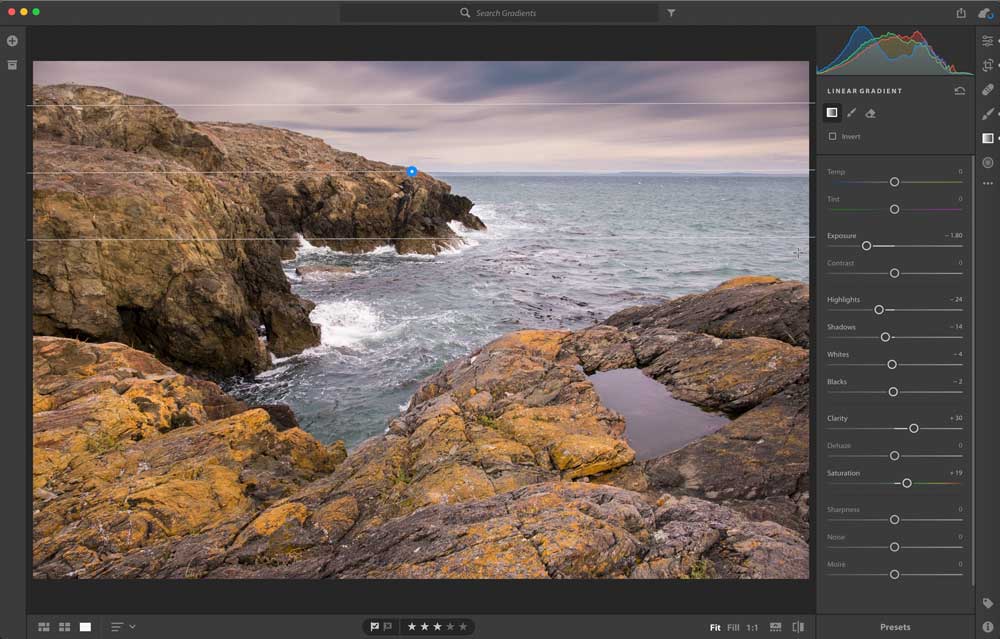
The rocks are now no longer in artificial shadow.
Although, as noted above, Lightroom doesn’t include a layer feature, you can add as many gradients to the image as you’d like. For example, let’s say you want to darken the sky, but also brighten the foreground. When you’re done with the gradient at the top, select the Create and Edit Gradients button (Lightroom CC) or the Mask: New button (Lightroom Classic CC) and draw a new gradient. To switch between the gradients you’ve created, select their anchor points.
Radial gradients and brushed areas
A Radial Gradient works in the same way, but its effect encompasses an oval. It’s great when you want to draw attention to an area in a subtle way.

In this shot, I want to reveal more detail in the boat without raising the shadows in the entire composition.

Adding a radial gradient and inverting it (so the effect occurs within the oval, not outside it) draws attention to the boat while blending into the surrounding area.
I also find myself using it as a quick and easy way to brighten or warm a person’s face if I don’t want to take the image into Photoshop for more extensive work. It’s great for group shots, too, when someone ends up in shadow.

I brightened this portrait just a bit using a radial mask around her face.
When you want to do more pointed work, switch to the Brush tool (Lightroom CC) or the Adjustment Brush (Lightroom Classic CC) and paint areas to mask them, and then use the same adjustment controls to change the look of the masked areas.
By the way, gradients and brushed areas sync to Lightroom CC on iOS and Android devices, so you can continue to edit them when you’re away from your computer. I’ve occasionally picked up my iPad Pro to do brushwork using the Apple Pencil in Lightroom CC for iPad when I don’t want to use the mouse on my Mac, or I don’t have a digitizer connected.

Pick up your editing in Lightroom CC apps on mobile devices, such as the iPad version here.
Gradient on a curve
For some photo edits, sending an image from Lightroom to Photoshop is the right call, particularly when there’s a lot of work to be done. But quite often the gradient tools in Lightroom CC and Lightroom Classic CC can accomplish what you need.