

Four Under-the-Radar Lightroom CC Features Worth Knowing About


Adobe’s new Lightroom CC application is a streamlined sibling to Lightroom Classic CC—though “streamlined” can also be a euphemism for “contains only a subset of features.” But don’t let Lightroom CC’s 1.x version number scare you off. Although it doesn’t match Classic’s feature set, it does include helpful features that make it more than a bare-bones image editor. Here are some features you may not know are available that can help you edit and manage your photos.
1. Your best friend, Option/Alt
“Streamlined” can also mean “every feature doesn’t require its own button.” In Lightroom CC, holding the Option (Mac) or Alt (Windows) key unlocks several helpful editing features.
- In the Edit panel, hold Option/Alt when dragging any slider in the Light controls to check for clipping—areas that are completely white or completely black.

Option/Alt-dragging the Exposure slider reveals areas that have blown out to white.
- When you hover the mouse pointer over a tool name, you can click to reset that tool (the name changes to indicate this, such as “Reset Exposure”). When you hold the Option/Alt key and click the name of a pane, such as Light or Color, all of the pane’s sliders are reset to their default values.
- In the Detail pane, hold Option/Alt when dragging the Sharpening slider to view a grayscale preview, which helps check for crispness.
- Similarly, holding the modifier while dragging the Radius and Detail sliders (click the exposure triangle to the right of the Sharpening slider to reveal these finer controls) previews the image as an embossed, high-pass view to see where the settings are affecting the image.
- Also, in the Sharpening controls, hold Option/Alt while dragging the Masking slider. A higher Masking value applies the Sharpening setting to contrasting edges, but leaves larger areas alone. It’s great for sharpening a person’s facial features, like eyes, without exaggerating the texture of the skin on their cheeks, for instance.
- Hold Option/Alt when applying a vignette to see a starker version of the effect that gives you a better idea of where it’s being applied.
In a similar vein, one great feature in Lightroom Classic CC is the ability, when using the Spot Removal tool, to turn on Visualize Spots and see an inverted, high-contrast version of your image that exposes dust spots and grime. Lightroom CC doesn’t include that specific command, but a variation of the feature is there: with the Healing Brush active, press the A key.
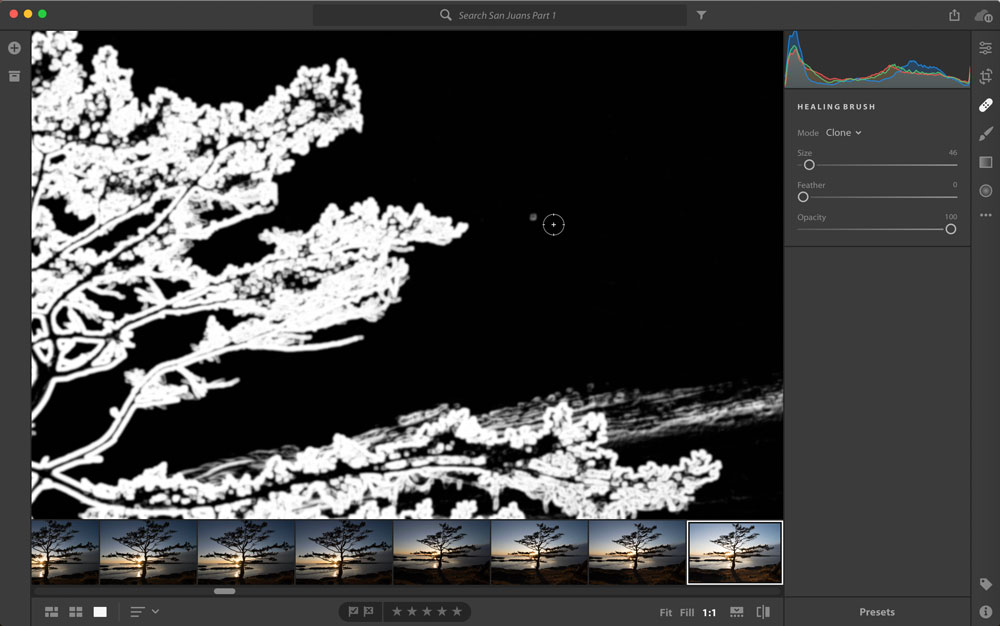
Press A with the Healing Brush active to find artifacts from a dusty lens or sensor.
2. Copy and paste edits
Lightroom CC includes the same core image editing engine and features as Lightroom Classic CC, and also one of the most helpful features when working with multiple photos from the same shoot. When you make adjustments to one image, you can copy those settings and paste them to a similar image.
- Open the Edit panel if it’s not already open (press E or click the Edit button at top right).
- Click the ellipses (…) button and choose Copy Edit Settings, or just press Command/Ctrl-C.
- Switch to another image.
- Click the ellipses (…) button and choose Paste Edit Settings, or press Command/Ctrl-V.

Copy the edits from one photo and then paste them onto another.
All of the edit settings are copied and pasted, including linear and radial gradients, Healing brush fixes, and Brush tool strokes. Unlike Lightroom Classic CC, however, you don’t have the option of choosing which adjustments to apply when you paste them. Also, you can paste to only one image at a time, not a bunch in one action. Still, it’s a great time-saver when you want to make a common correction to many photos, such as fixing white balance.
3. Load and Save presets
If a company ships an image editor without presets, does it really exist? Lightroom CC includes an array of editing presets for one-click color and black-and-white adjustments. In the Edit panel, click the Presets button and then choose from the list that appears.
The advantage of presets, though, is to be able to apply your own styles. If you’ve used (or continue to use) Lightroom Classic, it’s likely you already have a bunch, or you’ve downloaded third-party ones. Lightroom CC can use them, but you need to copy them to the right location:
- In the Edit panel with the Presets list visible, click the ellipses (…) button and choose Open Presets Folder; the Develop Presets folder opens
- In the Finder (macOS) or Explorer (Windows), copy the presets file you want to add (which ends in .lrtemplate) to the Develop Presets folder.
- Restart Lightroom CC.
Going in the other direction, if you hit upon a combination of edit settings that you want to use for other photos, create your own preset, like so:
- Edit a photo to your liking.
- In the Edit panel with the Presets list visible, click the ellipses (…) button and choose Create Preset.
- Give the preset a name and click Save. The preset appears in the User Presets category in the list.

Create your own presets to use later.
4. Store originals on an external disk
Lightroom CC stores your entire library in one place. On the Mac it’s in a package file, which is a folder that looks and acts like a file (within your Pictures folder); under Windows it’s a folder buried a few layers deep (specifically, Username\AppData\Local\Adobe\Lightroom CC). That’s great if you have a multi-terabyte hard disk as your startup drive, but less ideal if you’re on a space-constrained laptop.
Even in the latter case, Lightroom CC does something smart: since all your photos are uploaded to Creative Cloud, the application selectively removes image files from your disk. They’re still available—if you edit one, it’s downloaded from the cloud as needed. But that means you’re relying entirely on the cloud to store your originals. From a backup perspective, that makes me nervous.
Instead, store your originals on a large external disk connected to your computer. That makes it easy not only to have instant access to your photos while you’re at the computer, but you can create a duplicate of that drive for backup purposes.
- Open Lightroom CC’s preferences and click the Local Storage option.
- Enable the “Store a copy of all originals at the specified location.”
- Click the Browse button and specify a location on your external disk.
- Click Done.

Choose an external disk for storing your photo originals.
A copy of each original is still stored on Creative Cloud, giving you access to any image in your library on all versions of Lightroom CC—desktop, mobile, or Web. When you’re not connected to that hard disk, you don’t lose any capability to edit your photos. As you edit a photo, the original is downloaded to Lightroom CC.
Here’s the best part: Let’s say you take your laptop on a photo shoot, and the external drive holding your originals remains at home. As you import new images, they’re saved to the internal disk. But when you return home and connect that external drive, Lightroom CC automatically moves all the new originals to that drive, without any action on your part. (In Lightroom Classic CC, you need to manually move the images between disks in the Library module.)
Islands in the Stream(line)
Lightroom CC has deservedly gotten some knocks for not being as full-featured as its older sibling, Lightroom Classic CC, and part of that is because the interface and approach are less cluttered. But there’s still plenty of activity under the surface if you know where to look for it.
Hi; I just found this article and thank you so much for writing it. I do have a question on terminology, around the word “Original”. “Store a copy of all originals at the specified location.” I have this turned on, but is it storing just the original upload to Adobe’s cloud, or the upload plus edits as they are made. I want to make sure I have a full backup of photos and edits. Thank you, Marc
Question: when Lightroom CC backs up the Original to the external hard drive as you recommend, does it also back up the edits and changes you made to the photo via processing?
In other words, say I decide NOT to use Lightroom a few years from now. If I imported my “Lightroom Library” from this external drive would the latest version of each of those photos and the associated metadata be preserved with each imported photo? I know historically Lightroom Classic backed up the “catalog” and “photos” separately so am curious how this works in Lightroom CC (which I now notice with the latest update is just called Lightroom!).