Page set-up
To define the text area of a page in InDesign, you set the four margins (top, bottom, inside, outside). However, most publishers provide the top and inside margins and the width and the height of the text area so that to set up a page, you have to translate those parameters to what InDesign can handle (four margins).
However, though the latter – supplying top and inside margins and width and height of the text area – makes perfect sense (after all, the text area is a frame that sits on a page at a particular location), the trouble is that dimensions and sizes are usually given in different units: the (trimmed) page size is given in millimeters (in inches in the US), the top and inside margins in picas, the width of the area in picas and its height as a number of lines of a certain point size.
InDesign's measurement input fields are fairly flexible in that you can do things like 12pt + 3mm, which is then shown in the document's unit. That in itself is often useful, but what we would like is a window that shows the values and their units as we entered them rather than convert them to the document's unit.
Another issue is that it's a bit of a hassle to set the baseline grid such that the first line in the text frame aligns with the baseline and sits as defined by the frame's first-baseline setting. We'll come back to that after showing how the script works.
An example. A British academic publisher that I worked for a lot specifies the pages of the main text as follows ('head margin' corresponds with top margin, 'back margin' is another term for inside margin):

As you see, three measurement units are used: millimeters, picas, and points.
To use these data to set up an InDesign document, you go to InDesign's Document Setup window:
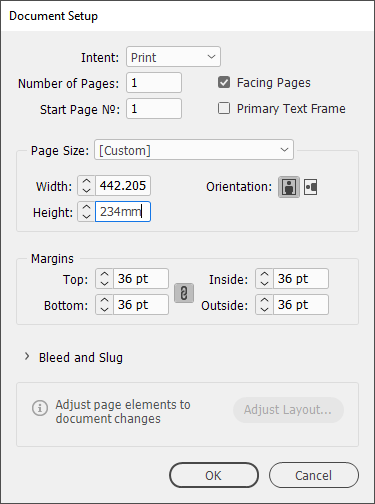
My document measurement units are set to points, so that any value I enter is converted to points. For example, 442.205pt corresponds to 156mm. In itself there's nothing wrong with that, but it makes it hard to check a document's parameters later.
Setting the width and the height of the page is easy. So are the top and inside margins. The outside margin we can still manage by entering the page width minus the inside margin minus the text measure. Unfortunately, entering 234mm - 4p6 - 27p doesn't work in the Document Setup window (it does elsewhere, e.g. in the Transform panel), but here we can enter 156mm - 31p6 instead, which works. However, the bottom margin we can't set directly in the Document Setup window: 256mm - 5p6 - (40*13pt) doesn't work. And, remember, we want to set the baseline grid as well.
Since we're going to calculate various things we might as well use a script.
Setting up a page
The page set-up script can be used to enter all the data mentioned earlier, and some more. When you enter measurements with a unit (such as '156mm'), they are shown as you entered them. When you don't add a unit the value is shown in points. The script handles units the same way that InDesign does ('p' for pica, 'pt' for points, etc.).
Run the script and enter all values. When you use the data from the type specifications shown earlier, the script's window looks as follows:
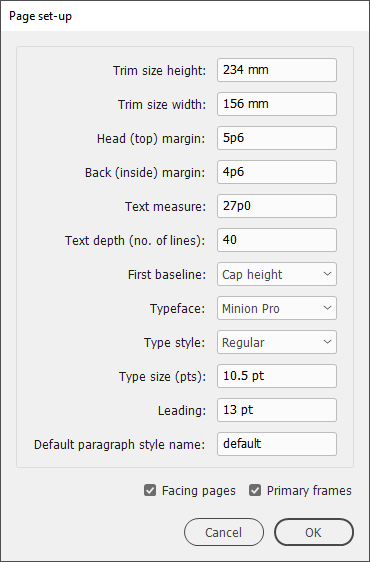
The window displays values in millimeters, picas, and points. Apart from the margins and the dimensions of the text area, a number of other things are set up as well:
First baseline The options are Cap height, Real ascender height, and Ascender height. This is used to position the baseline grid. For ascender height InDesign takes the font's ascender value, which is not usually the real ascender. To use the real ascender, select Real ascender height.
Typeface Select the typeface used in the main text.
Type style Select the type style used in the main text.
Type size Enter the leading. This is used to calculate the height of the frame (and, therefore, the bottom margin).
Default paragraph style name Enter the name for the paragraph style to be used for the main text. This style should be further specified later, naturally.
And, finally, there are two checkboxes to enable facing pages and whether you want to use primary text frames.
The document
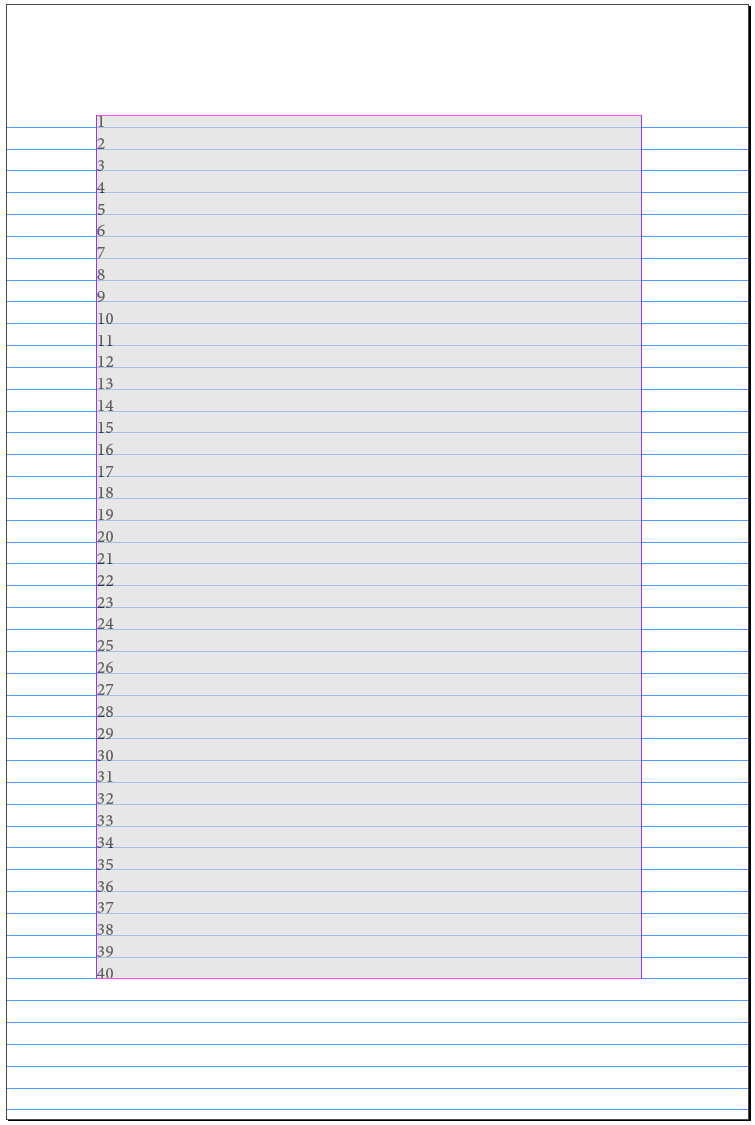
The script creates a new document using the data that you entered. To preview the set-up, the script places a shaded text frame that covers the text area and shows the text lines. When you're satisfied that all looks as expected, simply delete the frame: it has no function other than the preview.
Why bother?
Given that the text area is simply a text frame, you might wonder why you should bother converting the publisher's specifications (location and size) to the four margins. After all, the top margin is the top of the frame and the inside margin, the left side of the frame (on a right-hand page).
You might argue that setting up a document using the four margins is really going back to word processors, which, in the absence of text frames to flow text in the text area, have to use the margins. Therefore, you argue, you might as well forget about the margins and place a text frame the size of the text area, at the top–left position defined by the values of the top and left margins:

One reason to use the margins, however, is that InDesign uses them in some areas to place objects. For example, custom anchored objects can be placed relative to one or more margins.
Another aspect of the script is that it positions the baseline grid correctly.
Version history
9 Oct. 2024: Added the option 'Real ascender' for the first baseline offset. InDesign uses the value built into the font, but that's usually not the real ascender of ascender letters.
25 Oct 2021: First posted.
Useful script? Saved you lots of time?
Consider making a donation. To make a donation, please press the button below. This is Paypal's payment system; you don't need a Paypal account to use it: you can use several types/brands of credit and debit card.
Installing and running scripts
Questions, comments? Get in touch