Building an Underwater Scene in Photoshop, Part 1
The Oscar-winning film The Shape of Water opens with a stunning sequence in which an everyday living room is submerged under water, with furniture floating around and, at the end, featuring a woman floating above a sofa. It’s an impressive scene, and required complex lighting effects and post production work. Here’s how you can reproduce the effect on a still image in Photoshop.

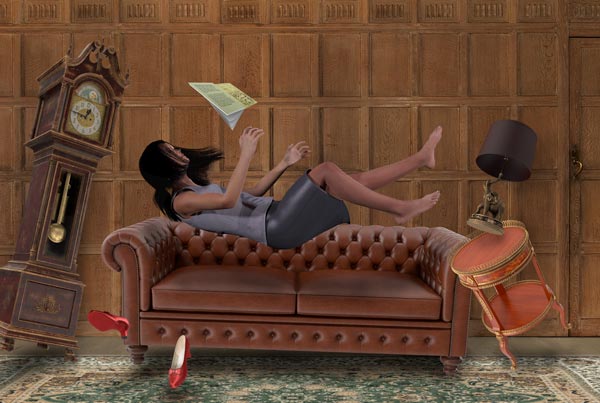
Step 1: Choose your model
The person in your image is key to this effect. You can photograph someone lying down, and remove the background, or try to find one in an image library. I made this woman in the figure modeling app Poser, which allowed me to position the limbs and hair exactly as I wanted them.

Step 2: Build a background
The effect works particularly well with a head-on view of a room. Find one and photograph it, if you can clear the clutter away first; I built this simple scene from photographs of a wall and a carpet.

Step 3: Add some props
It’s the floating objects that make this scene come to life. You can simply rotate photos of everyday furniture, but it helps to get some unusual angles, such as those seen on the table, lamp and shoes. I sourced all the objects seen here from the 3D image library Pixelsquid. You can read our review of Pixelsquid here (but note that the service is no longer free).

Step 4: Add shadows
Shadows give the objects a distance from the surfaces they’re supposed to be floating over. Paint the shadows on a new layer above the background layers, using a large, soft-edged brush. Set your brush opacity to just 10% so you can build up the shadows in stages.

Step 5: Check the contrast
In the scene so far, the background wall was too bright, drawing attention away from the objects and floating woman. Adding a Curves or Levels adjustment layer to it allows you to darken the layer, with the option of being able to change your mind later.

Step 6: Pay attention to detail
Although it’s only a small element, that table lamp won’t look right without a cord. The simplest way to create is to set the Pen Tool to draw a Shape, then draw the cord. In the Options Bar, set the Fill to none, and the Stroke to a dark blue color, with a weight of around 5 pixels (depending on the size of your image).

Step 7: Shade that cord
Even though the cord is only a stroked object, you can still add effects to it. Open the Layer Styles dialog, and add an Inner Bevel to make it look more three-dimensional.

Step 8: Pay attention to detail, part 2
The book supplied by Pixelsquid has a plain gray cover. It’s worth taking the time to add a real cover – I’ve used Jules Verne’s 20,000 Leagues Under the Sea – as well as some text on the back cover. Use Free Transform to distort the cover, holding Command/Ctrl as you drag each corner to match the position of the corners of the book. It all helps to make the image that much more convincing.

Step 9: The image so far
Here’s the base image, with all the components assembled. We’ll look at how to make it appear to be under water in the next tutorial.