With Final Cut Pro, it’s Look Out Hollywood
If you love technology as much as we do, this is an exciting time to be alive. With new standards in high-speed processors and miniaturization, what once seemed like science fiction has now become science fact. Over the last few years, with all the new gadgets and technology, it has become increasingly more difficult to wow us. That was, of course, until Apple got into the digital video-editing game with Final Cut Pro.
This application, coupled with an iMac DV or G4 PowerMac, allows you to transfer the 500-lines-per-inch images from a digital video camera to the computer, edit the video, and then output it the rendered file as a final professional-quality video. All from equipment costing less than $5,000!
The problem is that most people are a little afraid to try their hand at video editing. Historically, the high cost of equipment, coupled with the apparent complexity, kept people away. But, with today’s new applications, editing a video isn’t just simple, it’s loads of creative fun. But don’t believe us. Follow along as we go from capture to completion with a simple video-editing project of our own using Final Cut Pro.
From DV to Your Mac
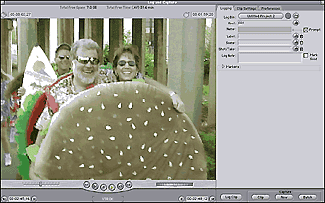
The first thing you’ll need to do once you launch Final Cut Pro is import some form of digital media to work with. You could use stock footage from a CD or DVD, but why not be original and bring in your own footage? If you own a digital video camera, chances are it includes a port labeled IEEE 1394 compliant–this is your basic FireWire connection. To import the footage you’ve recorded into Final Cut Pro, choose File > Log And Capture, and then click the Play button located near the bottom of the window. The video from your camera will then begin to roll in the preview window, as shown in Figure A.
Figure A: Importing video from your camera is a simple point-and-click operation.

When you find the beginning of a clip you want, you can either click the Mark In button or press the I key. Then, when you find the end of the clip, click the Mark Out button or press the O key. Next, click the Log Clip button to display the dialog box shown in Figure B.
Figure B: When you log a clip, it’s a good idea to give it a meaningful name and possibly include some background information.

Notice that we’ve given the clip a title along with a short note. This is helpful as you build more clips into your work. After you’ve logged the clip, continue until you’ve marked each of the video segments you need.
At this point, you haven’t brought the video to your hard drive; rather you’ve just told the program which portions of the tape to import. To complete the capture process, simply click the Batch button in the Log And Capture dialog box. The program then takes control of your digital video camera, rewinds the tape, and begins capturing all the clips you’ve logged. When you’ve finished, the clips will appear in the Browser window, as shown in Figure C.
Figure C: Each of the clips you capture appears in the Browser window.

At this point, you could begin placing the clips in sequence to complete your video. However, you’ll probably want to edit the in and out points of the individual clips. To do so, just double-click on the filename in the browser to display the Viewer window. You can then fine-tune the beginning and end points by dragging the In Point and Out Point markers to the precise location, as shown in Figure D. Next, click the Play button to preview your handiwork.
Figure D: Once you’ve logged the clips into the browser, you can fine-tune where the segment begins and ends.

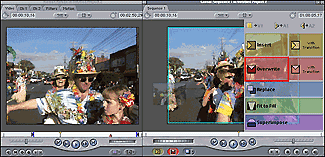
After you’ve set the in and out points, just drag the image from the Viewer window to the Canvas window. When you do, you’ll notice that an option frame appears, allowing you to insert the image, overwrite existing video in the project, replace the current clip, fit the clip to fill, or superimpose the clip, as shown in Figure E.
And you’ll also notice that you can insert or overwrite the clips with transitions if you like. (Final Cut Pro includes over 60 preset transitions.)
Figure E: To assemble your video, simply drag the clips into the Canvas window.

Adjusting the Clips
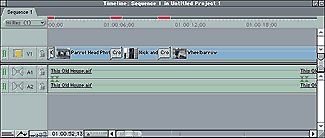
Unless you’re a seasoned pro, chances are you’ll want to alter the clips considerably, possibly alter the transitions, and maybe even add an underlying audio track to your project. To do so, simply bring up the Timeline window shown in Figure F.
Figure F: Each of the clips appears in the timeline as a rectangular box.

By default, the timeline uses a video track and two audio tracks. However, there’s no reason to feel limited–Final Cut Pro will let you add tracks as you need them.
Notice that in Figure F each clip is displayed as a small, rectangular box along the timeline. In some cases, you may also see small, overlapping icons between clips. These are the transition markers. To make changes to the timing or sequence of the clips, just drag them around the timeline as you would icons on your desktop. If you want to alter the motion of a clip, or add a filter setting to it, double-click on the clip and it appears in the Viewer window.
Final Cut Pro also includes standard video-editing tools such as Roll Edit, Ripple Edit, Slip And Slide Item, and Razor Blade. While these tools may not mean anything to the novice, anyone who’s done any serious video editing will know that these reveal the hidden power behind Final Cut Pro.
Back to Tape… or CD… or the Web
With our video-editing project complete, we’re ready to save the output so others can revel in our new-found talent. First, save your changes and then choose Sequence > Render All to allow Final Cut Pro to complete the high-resolution versions of your cuts and transitions. Depending on the size and complexity of your project, the rendering could take anywhere from a couple of minutes to a couple of hours. While that may seem like a lot of time, consider the fact that it used to take days to render the same type of files. Be happy with the rendering speed.
Once the file’s rendered, we’re ready to output it to another medium. Since we imported and worked with the video in a digital format, we can easily export it in pure digital format as well. That means there is no generation loss at all. What goes out of the machine will look as good, if not better, than what went into the machine.
But the great thing is that we’re not limited to outputting the file back to tape. You can save the project as a QuickTime movie, complete with streaming hints to play on the Web, or you can use one of the presets to save the file for playback on CD-ROM. And remember, it’s all digital so you know it’s going to look good.
Taking Things to the nth Degree
In our example we showed you how easy it is to import, edit, and output a simple video. In doing so we might have given you the idea that the program isn’t capable of advanced features. That’s simply not the case. Final Cut Pro flawlessly implements features you’d expect only from high-end video-editing packages. Features like complex compositing and layering, sophisticated filters and key effects, and full support for third-party plug-ins made for Adobe After Effects are all included. You can turn a clip into slow motion complete with frame blending or create motion blurs to add a greater sense of activity to a clip. The program even allows you to import Photoshop files, complete with intact layers for further editing and compositing.
Specifics
Final Cut Pro 1.2 is currently available from Apple and normal software retailers for around $999. The updated version is optimized for the PowerMac G4 and a zippy-quick Velocity Engine to give you rendering three times faster than ever before. The program supports both component NTSC and PAL analog video using Pinnacle System cards. For more information, sample projects, and a list of compatible add-ons, visit the product site at www.apple.com/finalcutpro.
Conclusion
Final Cut Pro is one of those programs that grows with you. As you learn more about video editing, the tools you’ll need are right there in the application. But, if you want to keep things simple, you won’t find the interface cumbersome. Like so many things Mac, it doesn’t allow anything to stand in the way of your creativity.

Copyright © 2000, Element K Content LLC. All rights reserved. Reproduction in whole or in part in any form or medium without express written permission of Element K Content LLC is prohibited. Element K is a service mark of Element K LLC.


