

Widget Wonderland: Adding Social Media Buttons and Widgets to Your Website or Blog
Getting the word out has never been something you can do all by yourself: It takes a village. Even Paul Revere, as he galloped from town to town in 1775, needed to enlist the help of influential networkers in each community to make sure his message got to everyone who needed to hear it.
In the social media age, reaching the widest possible audience involves encouraging your audience to assist you in getting the word out — by making it as easy as possible for them to reshare your content with their own friends and followers.
Case in point: Several weeks ago, when I updated my website to announce a new session of the social media class I teach, one of my friends tweeted a response asking me why there were no built-in sharing buttons on the page for the class.
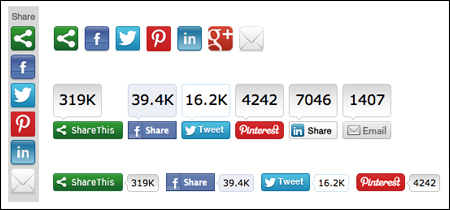
Figure 1: Adding sharing buttons to your site encourages your website’s visitors to share your content with their own friends and followers.

Hmm. Fair question, I thought. The truth is, I’ve always had a fairly DIY approach to my own social media sharing, because that tends to give me the most control over how I set up my posts. So even though lots of websites and blogs have sharing buttons embedded right on the page these days, I often look right past them. If I want to share a link on Facebook, I usually just copy the URL from my browser’s address bar and paste it into Facebook’s publisher. (Or if I do use a Share button, the one on the Facebook toolbar for Firefox is usually handiest.) If I want to tweet a link, I usually start by shortening the link (I like to use the J.mp version of Bit.ly’s URL shortener) and then paste that into the tweet composer on Twitter.
But it’s important not to be limited by our own biases. Obviously, lots of people do take advantage of the convenience of using those built-in buttons or they wouldn’t be so widespread. And since the goal is to make it as easy as possible for my audience to share my content, I was missing an opportunity to do that by not making those buttons available.
Plus, even for those of us who don’t tend use the embedded sharing buttons, their presence on the page can serve as a subtle visual reminder that the content we’re looking at is ready and willing to be shared.
Of course, sharing buttons are just the beginning of the nifty social media bells and whistles you can decorate your site with. Each of the major social media sites (and plenty of the minor ones, too) offer an array of customizable widgets and plugins you can place on your own site that allow you to do things like display some of your recent postings, encourage people to follow your social media accounts, allow visitors to your site to register or comment using their own social media accounts, and much more.
So in this article, I’ll start by looking at how you can easily add a set of social media sharing buttons to your site or blog, by using a handy all-in-one service. And then we’ll go on a little tour of the various buttons and widgets that are available from the four biggest fish in the social media sea: Facebook, Twitter, Pinterest, and LinkedIn.
One Stop-Shopping for Social Media Buttons
If you’re daunted by the idea that rounding up and adding buttons for a bunch of different social media sites might be a time-consuming project, don’t worry — you don’t have to add them one at a time. There are a number of services that are designed to make it easy for you to add a customizable set of social media sharing buttons to your site, all in one swoop.
In deciding which of these services to use for my own website, I compared several of them, including two of the most popular — AddThis and ShareThis. I found ShareThis to be the clear winner, both in terms of how easy it was to customize the buttons and get the necessary code and instructions, and also how well the buttons worked once I added them to my site.
Here’s how the process of creating buttons with ShareThis works. Start by visiting the ShareThis homepage, and click Get Sharing Tools in the menu bar at the top.
Figure 2: Click Get Sharing Tools in the menu bar at the top of ShareThis’s homepage.

On the next page, you’ll see a list of platforms to choose from. If the buttons are for a freestanding website, you’ll be able to choose a style for your buttons and customize them right on the ShareThis site. (If you choose certain blogging platforms such as WordPress and Blogger, or content management systems like Drupal and Joomla, you’ll be given handy instructions on how to install and customize the ShareThis plugin for your chosen platform.)
Figure 3: Choose whether the buttons you’re creating are for a freestanding website, or for one of several popular blogging or content management platforms.

Let’s move ahead with the options for a website. Clicking the “Step 2. Style” tab takes you to the page where you can choose how you’d like your buttons to appear.
Figure 4: A few of the available styles you can choose for your ShareThis buttons: a vertical bar; a horizontal row of simple buttons; a horizontal row of buttons with counters at the top showing how many times the content has been shared by each method; and a horizontal row with the counters at the right side of each button.
The options include everything from horizontal rows of simple buttons, to bars that can float vertically on the left or right side of the web page, or horizontally along the top or bottom, to the rather amazing “ShareEgg” that slides open to reveal buttons when you move your cursor over it.
Figure 5: The animated ShareEgg. When you move your cursor over it …

Figure 6: … The ShareEgg slides open to hatch a row of sharing buttons.

Once you’ve chosen a style, click the “Step 3. Customization” tab, and you’ll arrive at the page where you can choose exactly which social media sites and services you’d like to include in your button set and in what order they appear — as well as options such as how your buttons are positioned and what size they are.
Figure 7: Some of the customization options in Step 3. You can reorder the buttons by dragging them up or down in the list on the left, remove buttons by clicking the x that appears when you mouse over them, and add more buttons from the list on the right by dragging them over.

Once you’re finished customizing, click the green “FINISH: Get the Code” button.
Figure 8: Click the green button when you’re ready to grab your code.

ShareThis will ask you if you’d like to create an account, which will give you access to analytics — data on how many people are using your ShareThis buttons to share your content.
Figure 9: You can choose to create a ShareThis account if you’d like access to analytics data, or skip that by clicking “No thanks, just give me the code!” in the upper-right corner of the window.

But here’s one of the things I like about ShareThis: If you’d rather not sign up, you’re allowed to opt out by clicking “No thanks, just give me the code!” at the top of the window. That will open a window with your code and instructions. There’ll be some JavaScript code that goes in the header of your HTML, along with the scripts for the buttons themselves that go in the body of the webpage.
Figure 10: The window that delivers your code, along with instructions for where to place it in your HTML file

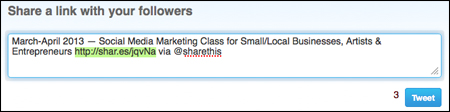
Here’s another thing I really like about ShareThis. When you click ShareThis’s Twitter button, the tweet it generates contains a URL that’s already shortened to conserve characters, using ShareThis’s own URL shortener (shar.es).
Figure 11: The tweet window that opens when you click ShareThis’s Twitter button contains a pre-shortened link to save space.
By contrast, the Twitter button that AddThis supplies includes the full-length URL in the tweet it creates, eating up precious tweeting space. Sure, you could copy the URL and shorten it yourself using another service, but by the time you do that there’s no longer any real advantage to using the button rather than tweeting the long way.
Getting Buttons, Widgets, and Plugins Direct from the Source
As I mentioned earlier, all of the major social media sites offer an array of customizable buttons, widgets, and plugins that you can add to your own site. For each of the following sites, the process is largely the same as the one we went through above: You can start by browsing the selection of goodies that are available and choosing the button or widget you want. For widgets, you may be presented with a few options to customize how they appear on your site. Once you’ve made your selection and finished tweaking it, you’ll be provided with the necessary code to add to your website.
Facebook’s Social Plugins
Now let’s look at some of the buttons and widgets that the major social media sites offer directly, starting with Facebook.
Facebook calls its various buttons and widgets social plugins, and when you’re ready to install, or at least browse through them, there are two easy ways to get to them.
You can access them through the admin panel for your page by choosing Update Info from the Edit Page menu at the top of the screen, and then clicking the Resources tab in the right-hand column. On the Resources tab, click the “Use social plugins” link under the “Connect with people” heading.
But there’s an even quicker way to get there. Just use this handy URL: https://developers.facebook.com/docs/plugins/.
The selection includes three different buttons: the Like button, the Send button (which allows users to send the content as Facebook messages), and the Follow button (which allows users to follow a particular Facebook user).
Figure 12: Facebook’s Like, Send, and Follow buttons

The Comments plugin allows users to comment on your site’s content using their Facebook accounts. (You might find that having users post under their real names improves the quality of the comments that get posted, since the ability to hide behind anonymity sometimes brings out the worst in Internet commenters.)
Figure 13: Facebook’s Like Box is shown on the right, with some of the options you can customize on the left.

Some of Facebook’s available widgets include:
The Like Box, which displays the most recent postings from your Facebook page and includes a Like button at the top
The Activity Feed, which shows visitors to your site which of their Facebook friends have Liked or commented on your site’s content
The Registration plugin, which allows users to register for your site using their Facebook account
The Facepile plugin, which displays pictures of Facebook users who have Liked your page or registered for your site
Note that the Like Box shown above can only display content and a Like button for an official page on Facebook — the Like Box isn’t available for a personal profile. If you’d like to feature your personal Facebook profile on your website, your best option is to create a profile badge, which you can do via the Facebook Badges page.
Figure 14: A profile badge points people toward your personal profile on Facebook.
Twitter’s Buttons and Widgets
You can access Twitter’s selection of buttons by clicking the Resources link in the bottom panel of Twitter’s left-hand column, and then clicking the Buttons tab on the Resources page. Or go there directly via this link: https://twitter.com/about/resources/buttons.
Figure 15: The four buttons available from Twitter

In addition to the sharing button, there’s a Follow button to encourage people to follow your Twitter account, a Hashtag button that lets you point people toward any particular hashtag you want to promote, and a Mention button that encourages people to address tweets to your account.
You can get to Twitter’s widgets by choosing Settings from the Account menu in the upper-right corner of the Twitter website, and then choosing the Widgets tab from the left-hand column. (And once again, there’s a handy link you can use to go there directly: https://twitter.com/settings/widgets.) On the Widgets tab, click the “Create new” button, which takes you to the rather dashingly named Widgets Configurator.
Figure 16: An example of the User Timeline widget, which shows off a few recent tweets

Twitter offers four types of widgets:
The User Timeline widget, which displays recent tweets from your account, with a Follow button at the top
The Favorites widget, which displays tweets from other users that you’ve favorited recently
The List widget, which allows you to feature one of your Twitter lists (you can choose any list that you’ve created or that you follow, and the widget will display recent tweets by members of the chosen list)
The Search widget, which lets you display recent tweets that include a particular search term, such as a hashtag you’d like to promote
Pinterest’s Buttons and Widgets
You can access Pinterest’s buttons and widgets by choosing “Pin It Button” from the About menu on Pinterest, or via this direct link: https://about.pinterest.com/goodies/
Figure 17: Pinterest’s buttons and widgets

Pinterest’s goodies include two buttons and two widgets:
The Pin It button, which lets users pin images from your site
The Follow button, which lets users follow your Pinterest account
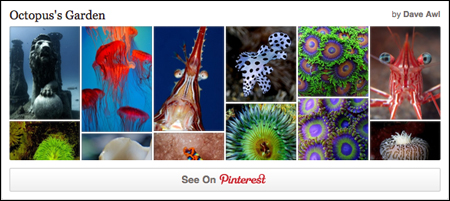
The Profile widget, which displays up to 30 of your recent pins along with a “See on Pinterest” link to your account
The Board widget, which is similar to the Profile widget but lets you put the focus on a particular board from your collection
Figure 18: An example of a Pinterest Board widget
LinkedIn’s Buttons and Widgets
You can get to LinkedIn’s buttons and widgets by clicking the Developers link in LinkedIn’s footer, and then choosing “Plugins” from the Documentation menu at the top of the page. Or to go there directly, bookmark this link: https://developer.linkedin.com/plugins.
Figure 19: LinkedIn’s Share, Follow, and Recommend buttons
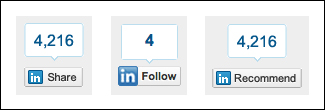
In addition to its Share button, LinkedIn’s available buttons include a Recommend button that lets LinkedIn users recommend your business’s products and services, and a Follow Company button that lets users subscribe to updates from your business’s Company Page on LinkedIn.
Figure 20: An example of a LinkedIn Member Profile

Other widgets and plugins that LinkedIn offers include:
The Member Profile, which displays a business card-like summary of your Linkedin profile on your webpage
The Company Profile, which displays a summary of key information about a Company Page on LinkedIn, and includes a Follow button
The Company Insider box, which displays customized information about a company — including who in the user’s network works at the company, as well as recent new hires and job changes
The Jobs You May Be Interested In box, which allows you to display a selection of job listings — you can choose to have the box display either a selection of listings posted by your company, or a selection of jobs on LinkedIn that are personalized for each user
The Sign In with LinkedIn plugin, which allows users to register for your site using their LinkedIn identities
The Apply with LinkedIn plugin, which lets users respond to job listings on your site using their LinkedIn identities
Don’t Let the Bells and Whistles Take Over
Whew! Now that we’ve looked at the options, it’s up to you to decide which ones you’d like to install on your website, and where. The key is to find the right balance between utility and clutter, since overloading your site with too many widgets could wind up distracting visitors from your content. Don’t be afraid to ask for feedback on what’s useful and what isn’t; another great aspect of the social media age is that it’s easy to find out what your audience is thinking.