

Isolating Layers in Photoshop
In Photoshop, you can isolate layers to work on objects without having to search through dozens of layers, locking, or hiding everything that might get in your way—but beware! The feature works differently depending on whether you are working with a vector layer or an image layer.
IsolateLayersCSMenuItem
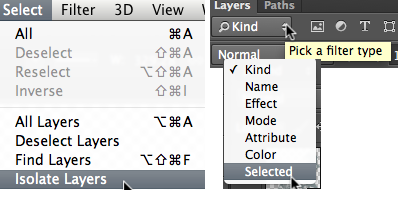
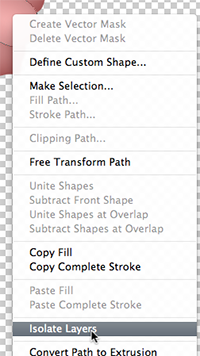
The Isolate Layers command lives in the Select menu. In the Layers panel filter menu, choose “Selected” instead. Or Ctrl-click/right-click on an object to choose Isolate Layers from the context-sensitive menu.
Isolate Vector Layers
If you’re familiar with Isolation Mode in Illustrator, you already understand why you might want to isolate layers in Photoshop. The concept is the same. By isolating layers, you can edit one object that is obscured by others and avoid accidentally editing anything other than the object at hand. You can see how your edits look in context and simplify your view of the Layers panel while you’re working.
There’s more than one method for isolating your layers: “Isolate Layers” in the Select menu, and “Selected” in the Layers panel filter list.
If you want to select a single object directly on the document, rather than search in the Layers panel for it, select either the Path Selection or Direct Selection tool, then make sure that All Layers is selected on the tool’s Options bar. (Enabling Active Layers prevents you from accidentally selecting/editing any layer that isn’t already highlighted in the Layers panel, so that’s not useful here.) You can now double-click on a single object to enter isolation mode. Photoshop won’t dim other layers as it does in Illustrator, but you’ll see that your object is isolated in the Layers panel. And of course, you’ll see the active path in the document window. Double-clicking away from the object exits isolation mode. While in isolation mode, you can modify the element directly, duplicate it, or add additional layers to alter it.

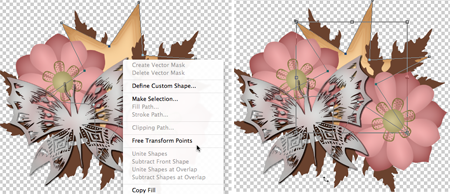
After double-clicking on the top layer of pink petals, the Direct Selection tool could modify the path without accidentally selecting the flower center above or the layer of petals below.
In the illustration below, I’ve isolated the star shape, selected only the inner corner points with the Direct Selection tool, then transformed the shape while observing how it looks with the other elements. I added a Layer Style, duplicated and rotated the element, then duplicated both layers by Option/Alt-dragging them above the originals in the panel. Using the Move tool, I repositioned them. Lastly, I changed the color of two shapes before exiting isolation mode.
When using the Isolate Layers filter, top layers don’t block edits to layers below, and adjustments are quick to make without searching in the unfiltered Layers view.
Double-click to select doesn’t work for multiple objects. For that, use one of the Path selection tools while holding down the Shift key before choosing Isolate Layers, or target with the Move tool, Auto-select Layers enabled on the Options bar. With Selected active in the filter list, each layer is automatically added when you click on it. In this illustration, I isolated two petal layers, clipped a Pattern Fill layer to one, then copied this layer by holding down Option/Alt while dragging it above the second shape. Using Isolate layers makes it easier to copy the same edit to noncontiguous layers, rather than trying to drag them all around a crowded panel.

By first isolating layers, you won’t have a problem finding which layer gets the copy of an edit, even if there are several in the unfiltered Layers panel (right) that look alike.
Isolate Layers with Image Layers
To select the image layers you want to isolate, choose the Move tool with Auto-select Layers (or Group) enabled, then click on an object to highlight it in the Layers panel. Choose Selected from the Layer panel’s filter menu and the layer/group is isolated in the panel. You won’t see any visible change in the image, but once in isolation mode, you can add more layers by clicking on them in the document window. To prevent accidental selection, yet still be able to add layers to the panel from the document window, turn off Auto-select, Ctrl-click/right-click on the object, then select it from the context-sensitive menu. Of course, you can scroll through the Layers panel and highlight them for isolation that way—very tedious. If you don’t want a selected object to be part of your isolated layers, Ctrl-click/right-click on the layer’s name and choose Release from Isolation. To release all the layers at once, Option/Alt-click on the little red square in the panel, turning off all filtering.

If you’ve accidentally selected a layer, or have finished with its edits and no longer want it cluttering your view in the Layers panel, Ctrl-click/right-click and choose Release From Isolation.
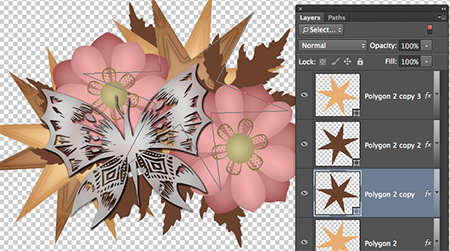
Using Isolate Layers with image layers, I easily edited objects in the illustration below by isolating those I wanted to have similar edits. For instance, I selected all the leaves, then clipped a Color Fill layer to one and changed the leaves to a Fall red. Since some of the layers were Smart Object instances, I could have edited one and had the effect ripple through to all instances. But not only is that often slow, I have to want the exact same effect for each instance. Using Option/Alt-drag to copy my fill layers in the panel is both quick and versatile. For example, I was able to change each leaf’s color individually for more variety.

After isolating all the leaves, selected adjustments were Option/Alt-dragged in the panel to copy them. Later, just the Color Fill layers were isolated to separately adjust each leaf’s color for variety and definition.
If you’re used to selecting layers using the Move tool with Auto-select Layers enabled in the Options bar, be aware that the Move tool can select Fill layers, Shapes, and image layers of all types, but it can’t select Adjustment layers. In the following illustration, I clicked on the red ivy and the yellow hibiscus with the Selected filter active. Only the Color Fill layer was selected for the ivy, since the Move tool can’t “see” anything below a solid image layer, and only the orange hibiscus was selected, because it also can’t see Adjustment layers. Fortunately, the context-sensitive menu not only lists all the layers it finds beneath my cursor, it lists them in layer order, making it fairly easy to select the layer I want. Of course, giving my layers descriptive names would have been even more helpful.

When the Move tool with Auto-select Layers/Groups doesn’t select what you want, Ctrl-click/right-click to bring up the context-sensitive menu and select the layer by name.
If you haven’t been using Isolate Layers, you’ll want to give it a try when you have files with several layers, or if you regularly work with overlapping vector layers. It takes practice to get used to working with isolation, but you’ll save time in the long run.