The Mac Authority: iTunes Brings the Digital Audio World to Every Mac
Application: iTunes
Operating Systems: Mac OS 9/Mac OS X
With its arsenal of QuickTime, FireWire, Final Cut Pro, iMovie 2 and the upcoming release of the SuperDrive/iDVD combination, it’s pretty safe to say that Apple has made its mark in the world of digital video. In fact, the Macintosh is now recognized as the leading consumer video-editing platform. So where else could they go other than the audio side of the moving picture? With all the current products to encode and decode CDs, as well as software available that made it possible to create your own audio CDs, what could they do to differentiate themselves? Make it easy, that’s what. And with their release of iTunes they did just that. It’s powerful, it’s fast, and it’s easy. Oh, and it’s absolutely free to boot.
Smooth Tunes
Besides the robust set of features that we’ll review in a moment, the greatest thing about iTunes is its simplicity. In fact, when you compare the program, shown in Figure A, to the RealMusic or Microsoft Media Player alternatives, you might dismiss the program as being too simple with too few features, especially given the fact that it includes features that you have to pay for with the other programs. The truth is that Apple has just once again proven that it’s the king of the user interface. The program has every major feature that the other two programs include, plus a few tricks of its own. (SoundJam users will find the program oddly familiar, since much of the software was licensed from the folks at Casady and Greene.)
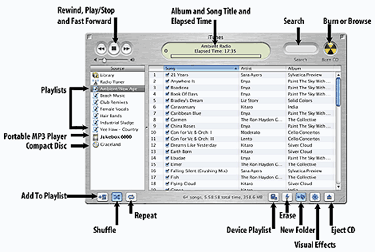
Figure A
The iTunes interface is much cleaner than most of the other MP3 players you’ll encounter.
Starting Off
You’ll recognize the first aspect of simplicity when you go to download the application. Instead of going to some arcane FTP site or busy server, just log on to your iDisk. Tucked neatly in the Software:Apple Software folder, you’ll find the iTunes Installer.smi disk image. Drag this file onto your desktop and then double-click on it to launch Disk Copy. When you do, a folder named iTunes Installer appears on the desktop. Open this folder and then double-click on the Install iTunes file to display the standard Apple installer. Select a drive to place the file on and then click the Install button. Once installation is complete just restart your computer. If you don’t have an iDisk you can download the installer files at: www.apple.com/itunes.
When you run iTunes for the first time, it displays the iTunes Setup Assistant shown in Figure B. Besides helping you set the application as your main MP3 player, the assistant also scours each of the volumes attached to your computer and automatically creates references to any MP3 files on the drives. This is an especially nice feature if you have your music files spread out in several different places. But keep in mind that it can take your Mac quite a bit of time to scan all the volumes you’re connected to. If you’re a neat freak and all of your tunes are in a single location, you can simply drag the folder onto the iTunes icon or into the application’s window.
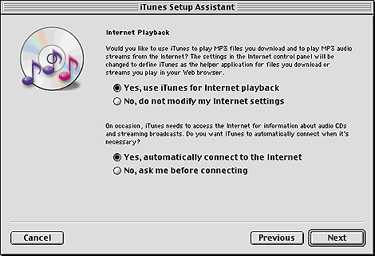
Figure B
iTunes is very easy to install.
Categorizing and Filing
Once you’ve imported your music files, it’s time to make use of iTunes’ excellent playlist capabilities. For example, let’s say you wanted to create a playlist of all of your beach tunes (the ones that make you crave boat drinks). To do so, first choose File > New Playlist and then name the item that appears in the left side of the iTunes window. But what’s a playlist without any music?
To add music to the list, enter search criteria in the Search field at the top of the iTunes window. As you enter each letter, the music list is instantly reduced to match your search–even when you have thousands of songs in your library!
Once you’ve selected all the tunes you want for your playlist, just drag them onto its name, as shown in Figure C. Another easy way to create a playlist is to hold down the [option] key as you select the tunes you want and then simply choose File > New Playlist from Selection and name the playlist. Or if that’s not enough alternatives, you can also click the New Playlist button in the bottom-left corner of the window. When you do, an untitled playlist appears in the Source portion of the window.
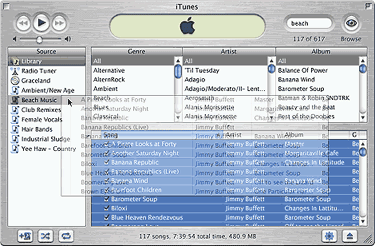
Figure C
iTunes makes it easy to create custom playlists.
The great thing about iTunes is that you can create any number of playlists. And since the Search field allows you to search by Song, Artist, Album, Genre, Year or Comment, it’s easy to locate the songs you want to include in them. iTunes can hold up to a maximum of 32,000 songs so you shouldn’t have to listen to the same music all the time.
Ripping Your Own Tunes
So maybe you’re a little more upstanding than other folks and decide that you’re not going to be tempted by sites like Napster–you only want to use iTunes to record the CDs you own. Not a problem with iTunes. Just insert the audio CD you wish to encode (a term the under-30 crowd refers to as rip) into your CD-ROM drive.
When you do, iTunes automatically compares the CD to the thousands in the CD Database. (The CD Database, commonly referred to as CDDB, is a site that provides album names, song titles and other information about your audio CDs.) Once it finds a match, it loads the information into the window. If no match is found, which usually only occurs on independent or very obscure CDs, iTunes lets you enter the values for submission to the database. For more information about CDDB, visit their Web site at: www.gracenote.com.
Once iTunes displays the names of each of the songs on the CD, activate the check box next to each of the songs you want to, er uh, rip. Then just click the Import button in the upper-right portion of the iTunes window. You can also just select the songs you want to encode and then drag and drop them on the Library icon in the Source window. From there, iTunes begins ripping each of the songs at up to eight times the normal speed. As you’ll notice from Figure D, the progress and speed are displayed in the window where the song and album titles normally appear. With the speed that iTunes encodes, you’ll find it relatively easy to build a large library of MP3 tunes in a matter of hours.

Figure D
iTunes can encode audio tracks faster, with great bit-rate, than most MP3 encoders.
Burning Your CDs
Simplicity is also the key when it comes to burning your audio CDs. Simply select the songs or playlist you wish to load onto the CD and then click the Burn CD button in the upper-right corner of the iTunes window. The program then estimates the time it will take to burn the CD and asks you to insert a blank CD. It’s that easy! At press time the Apple CDW burner is the only drive that works with the application; however, Apple has promised to release a number of drivers for the software in a matter of weeks.
Musical Preferences
A nice feature of iTunes is that you can listen to the song as you encode it. What’s more, once it’s encoded, you can continue listening to the song while you insert and begin ripping songs from another CD. Once the first song is over, iTunes immediately begins to play the next song you’re encoding. Or if you want you can even listen to a playlist while you encode CDs. That means that you never have to rip songs in silence! To play tunes as you encode them, choose Edit > Preferences and activate the Play Songs While Importing option. As you explore the Preferences dialog box you may be surprised with the number of options available to you in iTunes, especially the options on the Advanced tab shown in Figure E. For instance, while many of the other MP3 encoders (especially the free ones) limit the quality of the CDs you rip, iTunes can encode up to 192 Kbps–the maximum rate you’ll find for a consumer-level encoder. You’ll also notice that iTunes allows you to set the burn rate for your CDs as well as the time inserted between tracks. If you have multiple CD burners, you can even choose between them directly from iTunes.
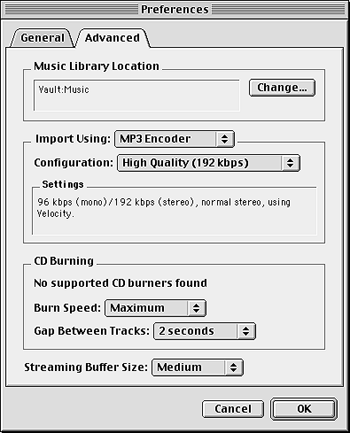
Figure E
You can set the quality level for the audio files you rip in iTunes.
Groove in the Karma
If you’ve ever wondered what software developers do when they’re bored (or possibly over-medicated on NyQuil) you’ll be able to find out with the Visuals feature in iTunes. When you activate this option by choosing Visuals > Turn Visuals On, the iTunes window turns into a light show direct from the early 1970s as seen in Figure F. While at first we must admit we thought it a bit silly, it’s sort of addicting and captivating (especially if you’re working with a good dose of NyQuil).

Figure F
Apple’s iTunes lets you see the music–or at least a visual representation of it.
A Couple of Issues
Granted, iTunes is a first attempt for Apple and it’s an excellent application, but there is one oversight that we hope Apple takes care of in the future–the Shuffle mode. When you frequently listen to a playlist you created, chances are you’d prefer to shuffle the tunes up a bit. That way the playlist doesn’t grow monotonous. And while the program does include a Shuffle mode, it plays through the same shuffled order each time–not in a continually random manner like you’d expect. That is, it only shuffles the songs in your playlist once. Another omission that we hope will appear in an update is the ability to control the program with AppleScript. That way you could trigger iTunes to launch and play a set playlist at any given time of the day.
Requirements
In order to use iTunes as an MP3 player/encoder you’ll need to be running Mac OS 9.04 or later (Apple recommends Mac OS 9.1). If you want to burn CDs, you’ll also need an Apple-approved CD-RW drive. To find out whether your burner will work, visit:
www.apple.com/itunes.
End of the Song
Overall, iTunes can easily stand up against the other MP3 players and encoders on the market and with the ease in which it can burn audio CDs, it’s well worth looking into for your everyday needs. It’s easy to use, it’s powerful, and it’s free–what else can you expect from software?

Copyright © 2000, Element K Content LLC. All rights reserved. Reproduction in whole or in part in any form or medium without express written permission of Element K Content LLC is prohibited. Element K is a service mark of Element K LLC.


