The Digital Art Studio II: Duplicating Photoshop’s Smart Objects
This post is part of a series called The Digital Art Studio, in which Sharon Steuer shares her ideas for integrating traditional and digital tools into a creative workflow.

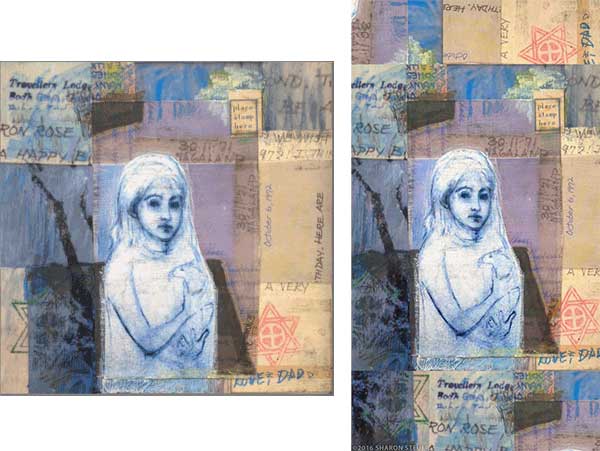
Working with duplicates of a Photoshop smart object allows you to easily experiment with different ways to transform a square composition into a vertical one.
In recent years, I’ve evolved a process for creating collages that moves fluidly back and forth between traditional and digital tools. The source materials for the collages are my own traditional and digital paintings and drawings, as well as previous collages. Also in the mix are personal letters sent to me as a child, digitized along with the rest of the imagery, all of which is archivally printed on paper or fabric. No matter how a collage begins—on the computer, or with cut images—the computer, drawing and/or painting tools, and a pair of scissors are usually involved in some part of the process.
Last month, I was looking over my finished paintings, drawings, and collages trying to find a suitable one that could serve as a submission for a call for entry. ArtSpan, the San Francisco organization that hosts the oldest and largest Open Studios in the country, was accepting submissions by its member artists for the cover of this fall’s Open Studios Guide. This year’s theme was “Vitality to celebrate the strength and stamina of San Francisco artists,” in response to the devastating effects that skyrocketing costs have had on our artists (see SOS San Francisco: A Case Study for Collective Visual Brainstorming for a related CreativePro story on this). The final size of the art needed to be 6″ x 10.875″ and there needed to be plenty of space that could accommodate the necessary type elements. Since none of my more recent works seemed a natural fit for the proportion or theme, I decided to see if perhaps a vertical variation of my 6″ square “Blue Angel of Letters (panel 2)” could fit the necessary requirements.
Scanning this one-of-a-kind collage into Photoshop, I converted the image into a Smart Object from the Layers panel pop-up menu (see Welcome to The Digital Art Studio for details on how to make a shortcut for this). Next, I chose the Crop tool, and in the Control panel I made certain that the Delete Cropped Pixel option was disabled. I chose Ratio in the first pop-up, and entered the desired proportions for Height and Width fields (you can click the horizontal arrows icon to swap these values if you enter them in the wrong order).
![]()
Using the Crop tool, I zoomed out a bit so I had room in the image area, and experimented with resizing and shifting around the properly-sized crop marquee. When I found a possible starting point, I pressed Return (Enter on Windows). For this image, I chose a cropping where the original image was centered, with a bit cropped off the sides, and blank space on top and bottom. Since the rhythm of the composition was a modified grid, I decided to experiment with adding grid elements to the top and bottom. And to minimize repetition, because I’d visually cropped the left and right sides, I would start by using those sections hidden in the center for the top and bottom.
Duplicating an original smart object layer creates a clone of the original. Duplicating either of the smart object clones creates another clone. Double-clicking on any of these clones allows you to edit all of the clone instances.
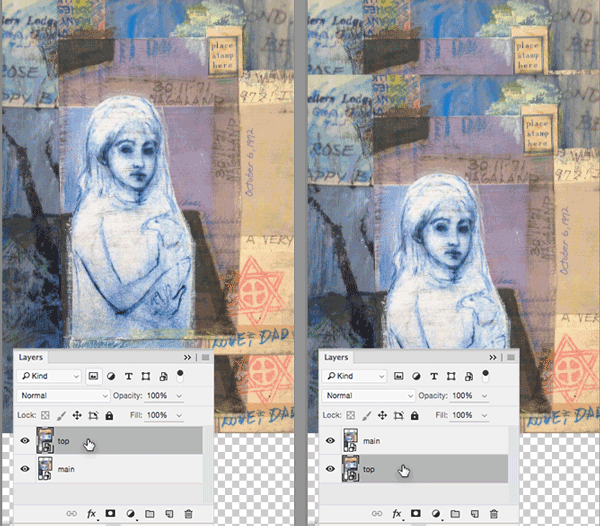
To create a duplicate (clone) of a smart object layer that also prompts you to name it meaningfully as you create it, either 1) hold Option/Alt, and in the Layers panel drag the smart object layer to the New Layer icon, or 2) in the Layers panel, click on a layer and press Command-Option-J/CTRL-ALT-J. Naming the layer for the area it was to occupy (such as “top”), I then moved the cloned layer below the main image in the Layers panel stacking order.

Because I had disabled the crop pixel option, the areas of the image not visible in the main image were available for my use in the clone. I also wanted to rotate layers, as well as to modify which area was in view. Using the Move tool I shifted around which portion of the image was visible, and used Command-T/CTRL-T to invoke Transform for the rotation. In my case, I wanted to constrain rotation of each clone layer to 90 degrees so I held Shift while rotating (Transforming) the layer.

Although I did very little to modify this image, it would have been simple to do so. To apply any variation to all iterations of that image, double-click any of the clones, add layers or adjustment layers or filters, save that version and close it. In the main image, all versions of that image will update. You can also make adjustments to just one of the clones by adjusting opacity, adding layer masks, or live effects. Or to apply a separate Adjustment Layer hold Option/Alt to “clip” that adjustment to that layer. To modify a number at once you can also select one or more clones and choose New Group from Layers from the Layers panel pop-up menu.
If you wish to create a duplicate of the image that is NOT linked to the others (it will look like the others, but it will NOT be updated along with the others like a clone), you can invoke a somewhat hidden command that designer Jill Dahl showed me at the recent CreativePro conference on Photoshop and Illustrator: hold Control (on the Mac) or Right-click with a mouse, and then click on that smart layer in the Layers panel to open a pop-up menu, and choose New Smart Object via Copy. To see a bit more about the differences between duplicates of smart object versus making new versions that are copies via Julieanne Kost’s blog).
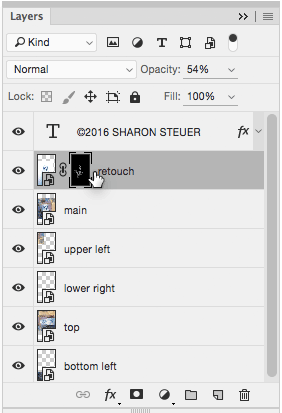
To finish my vertical variation of the composition, I added a layer above and I pasted in a sharper, brighter version of the main image. Holding Option/Alt I clicked the Layer Mask icon to create an inverted layer mask, hiding that new layer entirely. Using semi-transparent painting tools I subtly painted into the layer mask to reveal just the areas I wanted to appear slightly sharper and brighter, and to reveal a bit of the detail that was lost in the darker values.


Although this image was not ultimately chosen for the ArtSpan catalog, this new variation will likely become a source image for future traditional and digital collages.


It’s a great digital art work. I like your work method.
Thank you Amzad!
Let me know if there’s something specific you’d like to see next.
best,
Sharon