Take Charge With Adobe Bridge: Controlling Chaos with Metadata — Part 1
All of us, from photographers to production artists, from web designers to illustrators, have more files stored on our mega terabyte disks and servers than we can reasonably wade through when trying to retrieve that one specific file. Folders and file-naming conventions help us organize, but opening each folder, one level at a time, is very time-consuming. Fortunately, Adobe Bridge helps us when digging through an avalanche of folders by making it easy to add, and later search on, metadata. In this article, I’ll show how metadata gets added, how to control what you see, and describe two initial methods for adding metadata to a file.
By using metadata to limit the files Bridge displays, viewing hundreds of files (left) becomes instead a manageable few (right).
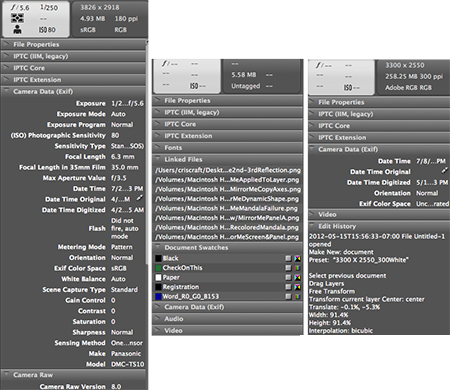
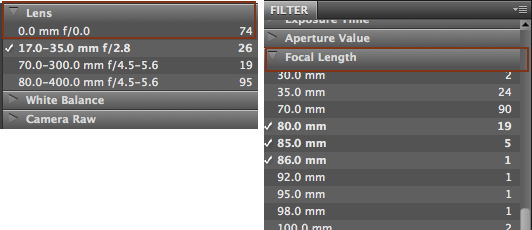
With only Bridge running, you can tell quite a lot about a file merely by selecting it in the Content panel, then opening the Metadata panel and reading the information already added—such as the lens and exposure settings from a camera, an audio file’s tempo or composer, a video file’s pixel aspect ratio, or a file’s swatches and links used for printing. (If the Metadata panel isn’t in your workspace, see Take Charge With Bridge: Tailoring Workspaces to Suit You for more on using panels.) You can use any of this data to filter the files Bridge will preview. For instance, you know the day’s shoot used three different lenses, but all the photos are in one big folder. Instead of scrolling endlessly to find what you shot with the wide-angle zoom, just select that lens from the Lens category in the Filter panel. Or narrow your search by choosing specific Focal Lengths.
A Camera Raw file (left) displays different categories in Bridge than an InDesign file (middle) or a Photoshop file (right).
Metadata automatically added during file creation helps with winnowing down the number of files in a folder to search through. Eagle eyes may notice a 0.0 mm f/0.0 lens in the Lens list: Nikon owners can use old lenses that don’t provide that data to the camera.
Metadata Preferences
To keep from being overwhelmed by the amount of metadata Bridge displays, take a look at the Metadata section in Preferences (you can open Preferences directly from the popup menu in the Metadata panel). At the very bottom of the section are two options: Hide Empty Fields and Show Metadata Placard. Unless you need to be reminded that a field is missing metadata, you’ll want to Hide Empty Fields to shorten the lists. The Placard at the top of the panel provides basic camera information at a glance, so if you mainly work with text documents, save space and hide it. Next, hide categories you never use, such as DICOM for medical files, and hide fields within categories you don’t need, making it easier to quickly spot the fields you want.
Limit the fields shown by removing a checkmark next to a field. Remove an entire category by placing a checkmark next to it to select all the fields, then removing the checkmark again to hide the category.
The Metadata Panel
Thus far we’ve been talking about metadata automatically added during file creation. Adding custom metadata exponentially increases metadata’s value. Keywords and File Info will get discussed in future articles. Most other metadata gets added using the Metadata Panel or Metadata Templates. The most direct, but least efficient method calls for adding metadata directly in the panel. To add copyright information, for example, open the IPTC category, click between “Copyright Notice” and the pencil icon (which indicates the field is editable), then type in the highlighted field. Press Tab or the Apply icon at the bottom of the panel to add your entry, or cancel the entry with the Esc key or Cancel icon. Select Copyright Status by clicking on the arrow and selecting from the popup list. Fields with a File icon next to them open to display a list of subfields, allowing for multiple entries under one field.
Clicking in the blank area between the field’s name and the Pencil (editable) icon highlights an area for adding your text.
An arrow at the right of a field indicates a list of values to choose from, while clicking on a file icon displays subfields. The trashcan deletes a subfield.
If most of a field name is hidden, hover over the edge of the name until a double arrow appears, then drag to the right to disclose the entire name.
The metadata you’ve just added gets added to all the files that are selected; you’re not limited to adding it to one file at a time. However, using the Metadata panel to add information is best when the information you’re adding is specific to that file— a unique description of the contents of an image or document, for instance. For adding information useful to many projects, it’s quicker to use Metadata Templates. Templates can add a copyright, update (replace) an old email address, or append additional information to existing metadata. Using Photo Downloader to copy camera files to your computer lets you apply a metadata template at the same time, making it very efficient for adding contact and copyright information to your photos.
Photo Downloader lets you choose a template to automatically apply metadata to all the camera files you select for downloading.
Metadata Templates
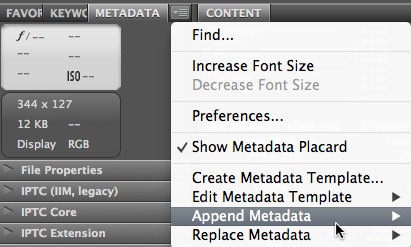
To create a new template, choose Create Metadata Template from either the Tools menu or the popup menu in the Metadata panel. Form fields are similar to those in the Metadata panel. Save each template with a descriptive name. Don’t try to put all the relevant information for a given file into one template. Apply a copyright template when using Photo Downloader, for instance, but create separate templates for other types of information, such as model releases or location, and then use Bridge to append only the relevant templates to your selected files.
Create a template that makes it possible to add different types of information in one pass to selected files.
Edit templates when some, but not all, information changes, such as the copyright year or an email address, then reapply it to replace old information before sharing your files. Once a template no longer serves a purpose, delete it from your list. Unfortunately, there’s no menu item for deleting templates. Choose Tools > Create Metadata Template, open the dialog’s popup panel, and choose Show Templates Folder. In your System’s file window, delete any templates that you no longer need.
The Metadata popup panel has most of the commands you’ll need for using metadata templates. The Increase Font Size command makes it easy to read the metadata.
Choosing what information needs to travel with your files, and applying that information quickly and efficiently helps everyone. In future articles I’ll cover working with the File Info dialog, adding labels and ratings, and using keywords to aid searches and control the chaos that can result from having too many files and too little time to deal with them.


There is one unfortunate side effect of changing a file’s metadata; it also changes the modification date which, along with the filename and filetype, is a common way of searching for duplicates. A file that is identical in every way other than the metadata will not be flagged.
That means that it is important to perform any ‘housekeeping’ before editing the metadata. Any duplicate copies of the file that are inevitably propogated will be true copies, and should be even easier to locate.
Love it! Thanks!
I think you always include a warning about compatability problems with lr-hierarchicalSubject between Bridge and Lightroom.
Thank you for sharing! It is always great to know this type of nuisances in advance.
How do I add fields to the metadata for a number of images? I was thought Bridge had some of the same functions as FileMaker so that you can add custom fields. Where are the controls for this?
Bridge isn’t like FileMaker. The Metadata panel offers the common fields used by most artists and designers, but it doesn’t offer the ability to add custom fields. You might investigate the File Info dialog, accessible through Bridge under the File menu. Adobe has made SDKs available for it, so scripting of some sort is possible.