

Stabilize Camera Footage with Warp Stabilizer in Premiere Pro
Adobe Premiere Pro is one the best video editing tools available. In addition to general day-to-day editing, it has power features such as the Warp Stabilizer tool, which can help you adjust “shaky cam” footage in post production.
If you’ve ever shot handheld video footage and thought to yourself, “this could have come out better,” or, “I wish I’d had a tripod,” then the Warp Stabilizer tool can help you. This tool is fairly straightforward to use and you can see a quick tutorial on this tool here.
Premiere Pro Warp Stabilizer Tutorial
The Warp Stabilizer attempts to create a smoother overall image by automatically adjusting and re-cropping your video footage frame by frame to reduce the jarring motion effects that come from a lack of manual stabilization when shooting handheld. By controlling the settings, you can determine how much smoother you want your image to feel. This is one of the most useful techniques when doing handheld shooting and pans for product related videos, such as the one demonstrated in the tutorial.
The Warp Stabilizer tool in Premiere Pro CC takes advantage of the Mercury Playback Engine and its ability to utilize the GPU of your computer in speeding up rendering. So having a powerful graphics card can help with performance when using this tool on your video footage.
Note: When using the Warp Stabilizer tool, you cannot alter the speed of your timeline footage for the clip. If you want to adjust the speed of the footage, you would need to do so first, then apply “Nest” to the footage before applying the Warp Stabilizer effect.
How to Avoid Shaky Camera Footage In The First Place
While the Warp Stabilizer in Premiere Pro is a lifesaver, it’s better to not need it in the first place. There are a few techniques and accessories you can use to stabilize your camera when shooting video in the field.
Ideally, you should shoot with a tripod, but there can be several other options available, depending on your situation.
Using a DSLR Shoulder Rig
Using a DSLR Shoulder Rig, is one option that works very well when shooting in the field, capturing b-roll, or at events. Shoulder Rigs are also used when filming movies, television, or commercial productions. They offer an advantage of combined mobility, stability, and flexibility in terms of accessories.

Typically DSLR Shoulder Rigs include a counterweight to help you balance the load of your camera. One of the other notable features is the combination of a Matte Box and a Follow Focus. The Matte Box allows you to block out additional light sources and reduce flares that could occur. The Follow Focus allows you to maintain camera stability, while still manually adjusting the focus ring of your camera. These features are especially helpful when it comes to shooting active subjects or trying to produce particular cinema techniques such as reversing subject focus.
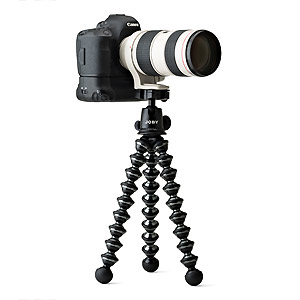 Using a Gorillapod
In a situation where a tripod, monopod, or shoulder rig isn’t something you have space or time to setup, you could use a Joby Gorillapod. The advantage of using something like this, is how lightweight and versatile it is. You can attach the Gorillapod to railing, trees, the back of a chair, and there are magnetic versions that could even work with vehicles under the right conditions. This is a go-to travel accessory used by vloggers such as Casey Neistat.
Is It Better to Stabilize Video in Production or Post?
Ultimately it is best to make your video as stable as possible when you are shooting it during production. However, even with stabilization, the results may not be perfect. There have been times where I have used slider footage, only to notice some minor shakes or bumps in the video and felt the need to correct it in post-production. While many creators will want their footage and photography to be perfect in camera, the reality is that post-production editing has its place, and is not something to be avoided, but rather a tool you can use to bring out the best result possible.