

Sharpen Photos Smartly
Using Photoshop CS2’s Smart Sharpen
It’s called Smart Sharpen, and in Advanced mode it uses state-of-the-art edge detection algorithms and a sophisticated deconvolving method to remove blur. In plain language, deconvolving means “reverse” — it attempts to identify the root cause of the blur and reverses the effect (Figure 12).
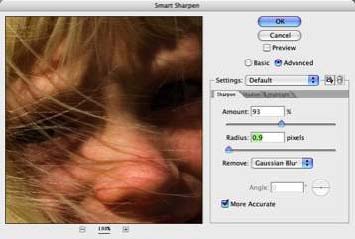
Figure 12. Using Photoshop CS2’s Smart Sharpen isn’t easy, but it’s worth the somewhat steep learning curve.
It also takes smarts to use it properly. I spent a lot of time with the primary engineers who created this marvelous addition to Photoshop CS2 and put my head together with photographer Bill Atkinson to gather empirical data and fully understand this filter. The bottom line: take some time to get to know this filter and you’ll be amazed at the results. When used at its More Accurate and Lens Blur settings it is slower than Unsharp Mask, However, the results can be far superior.
Fast Sharpening or Quality Sharpening?
Smart Sharpen has two speeds: relatively fast and slow. When you deselect More Accurate you are basically crippling some of Smart Sharpen’s most compelling technology, but things really speed up. From a technical point of view, the results are on par with what you’d get if you used the good old-fashioned Unsharp Mask, especially if you choose Gaussian blur as your Remove option. (With advanced settings selected, you also get control over highlight and shadow sharpening, something you don’t get with Unsharp mask.)
It’s your choice, but since I’m advocating Smart Sharpen for those special images, the ones that deserve a lot of your time and attention, I highly recommend you use Smart Sharpen in More Accurate mode.
Even if you decide not to use More Accurate, all the following information on using the filter applies. Just keep in mind that the required Amount percentage values will need to be slightly higher if you turn More Accurate off.
Now let’s throttle this baby to full power and see how to use it.
Speeding Up Smart Sharpen
To speed up the smart sharpen filter you have a few options: With the filter open, enlarge your preview window 100% or more and zoom in on a representative area that contains both detail and continuous tone areas. Now, turn off the preview option in the upper top corner. You won’t see the effects of your changes on the original image, but the changes will appear more quickly in the small preview window. You can also make a small representative selection of your image using a selection tool before opening the filter. Find the optimal setting, then close, deselect, and apply the filter to the entire image.
Selecting Proper Smart Sharpen Settings
Let’s walk through how to use the filter:
- Use Camera Raw to process your RAW data. Be sure to turn off all sharpening by sliding the Camera Raw Sharpen slider to 0. Leave the Camera Raw Luminous setting to 0 as well. For best results, keep your Depth set to 16 Bits/Channel.
- Open your image in Photoshop CS2. If you are working with multiple layers, select the layer you want to affect.
- Select the Smart Sharpen filter: Filters > Sharpen > Smart Sharpen from the CS2 menu bar. With the filter open, select More Accurate for optimal quality. When you select More Accurate the “intelligence” of Smart Sharpen is ramped up. As the engineers who wrote the software code explained to me, “You go from the capabilities of a third-grader to those of a college grad.”
- Next to Remove, choose between Gaussian Blur and Lens Blur. (Motion Blur, which is another Remove option is recommended only when the blur is caused by camera or motion blur, and isn’t relevant to our discussion.) Several things cause image blur. It can be caused by a Gaussian blur applied during the assembly of the RAW data. Adobe Camera Raw and other RAW processing applications do this to some degree to every RAW file. It can also be caused by poor camera optics or simply by poor focus. It can be caused by tiny micro lenses placed over digital camera sensors to minimize aliasing and color fringing. It might be caused by a subject or camera moving while the image is captured. The more you know about the source of image blurring, the better your chances of effectively undoing or removing the blur. This is where the different choices in Smart Sharpen come in. Unfortunately, image blurs are often caused by a combination of factors, so fixing them is not always that simple. You may find that, for some of your RAW images, the Gaussian blur option (with advanced settings checked) is the way to go. (Gaussian blur also processes much faster than Lens blur). Other images may benefit from the Lens blur option. You just have to experiment to get it right.
- Enlarge your image using the + – controls at the bottom of the preview window. Use your cursor — which turns into a Hand icon when placed over the preview window — to navigate to an area of your image that contains both edge detail and continuous tones.If you previously used the Smart Sharpen filter and increased the Highlight and Shadow Fade Amount from 0 to a higher value in the Advanced mode, be aware! Values are sticky; meaning that whatever values you set last time will still apply the next time the filter is opened. If you increased the Fade Amount from 0 to a higher value, you may get unexpected results when you work in the Sharpen mode. It’s best to make sure the Fade Amount for both the Highlight and Shadow controls is set to 0 — effectively turning these controls off — before working in the Sharpen mode. I told you they called it Smart Sharpen for a reason. You need to be smart!
- Make your adjustments according to the characteristics and resolution of your image. Images with fine detail and average resolution generally take a Radius of approximately 0.9-2.0. You can achieve a Radius value by sliding the slider or typing directly into the box. The coarser the detail, the higher the resolution, and the higher the Radius value. Your changes are reflected in the image preview window. You can compare the new values with the original unsharpened image by placing your mouse over the preview window and clicking and holding As soon as you release the mouse the preview will change to reflect the current settings.Don’t forget to wait until the flashing bar at the bottom of the preview window disappears before deciding on the correct settings. The larger the radius, the longer the process takes. (Remember, the Gaussian Blur setting is faster than Lens Blur.)
- Fine-tune your Radius settings with the Amount slider. Start at 100% and gradually increase the strength by moving the slider to the right (or by typing in a higher value). It’s useful to go too far, as I have done in Figure 13, to a point where noise appears in the continuous tone areas, and then back off. (I want to emphasize that I am just trying to make this image look right on my monitor. Output sharpening typically requires more aggressive sharpening, and often will appear overly sharp on a monitor.)
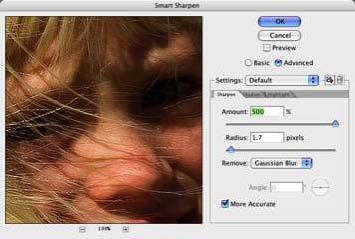
Figure 13. Exaggerate for the sake of learning what’s too much. - For the ultimate in control, click the Advanced radio button in the Smart Sharpen window. When you do this, tabs containing the words Shadow and Highlight appear. With these controls you can determine exactly how much sharpening is applied to areas of shadow and highlight. Commonly, these are areas that more readily exhibit sharpening artifacts.The user controls for these Advanced Settings are a bit confusing, so bear with me as I walk you step-by-step through the process:
a. Start by using the Sharpen controls to get your edge details correct. You’ll be working on removing the noise from shadows and highlight areas, so concentrate on edge detail and don’t worry about the rest. (Remember from before: it’s best to have the Shadow and Highlight settings disabled when removing noise. Check to make sure the Fade Amount for both are set to 0.)
b. Select either the Shadow or Highlight tab (Figure 14).
Figure 14. Smart Sharpen’s Advanced Settings give you fine control.
c. Navigate to the part of your image containing prominent shadows (or highlights, depending on what tab you selected.)
d. Set the Fade Amount to 100. This will enable you to readily see the effects of the Radius and Tonal Width. You can always throttle the effects back later.
e. Pick a radius. This is determined by the nature of the shadow areas. Larger areas require larger radius. Smaller areas require a smaller radius. Every new setting takes time to go into effect. (Be sure the flashing status line at the bottom of the Preview window is gone before making any final decisions.) Throttle the Fade Amount back and forth from 0 to 100 % to see the effects of different Radius settings (Figure 15).
Figure 15. Experiment with radius amounts.
f. The Tonal Width controls the diffusion of the tonal width as set by the Radius. The higher percentages spread the tonal borders. Smaller percentages shrink the tonal borders. Once you have set a Radius and the flashing status bar is gone, you should be able to see the effects of changing the Tonal Width and Fade Amount in real time. (Changing the Radius forces the filter to totally reanalyze the image, which is why everything slows down.). - Repeat the above steps using Highlight controls if necessary.
–>I find it useful to break sharpening down into three general categories.
Sounds like Bruce Fraser who years ago came up with a sharpening workflow:
/wp-content/uploads/sites/default/files/story_images/feature/20357.html