Setting InDesign’s Display Performance
I spend a lot of time helping people troubleshoot their InDesign files. I love trying to figure out a good mystery, so I’m always up for the challenge. One question I have been asked for years has to do with onscreen image quality. The question usually goes something like, “My images look really jaggedy onscreen, but print fine. What am I doing wrong?”
Fear not, you’re not doing anything wrong. The culprit here almost always turns out to be InDesign’s Display Performance settings, or how images display onscreen. When processors weren’t as robust as they are today, anything an application could do to conserve processing time was a boost to productivity. Though not as critical today, InDesign’s Display Performance still lets you decide how graphics will display, letting you set a happy balance between a sharp image and quick onscreen rendering of that image.
By default, InDesign is set to show images with a middle-of-the-road quality, using a screen resolution proxy, rather than a high-resolution image. If you know you’ve placed a high resolution image, seeing the jagged edges that proxy produces can be disconcerting.
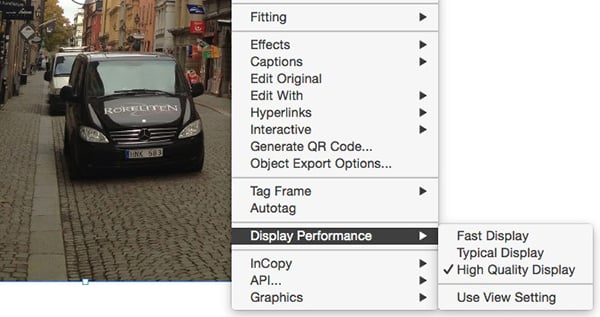
To change the quality of the display for the entire current document, make sure nothing is selected, then right-click or control-click on a page and choose a setting from the Display Performance menu. Alternately, you can choose Display Performance from the View menu.
A setting of “Fast” will gray out all placed images and turn off the display for transparency, while the “High Quality” option will use a high resolution version of raster and vector images, and use the highest quality in transparent effects. That “Typical” default setting uses a screen proxy resolution for images and medium quality transparency effects. If you want to change the display for individual objects, select one or more objects on a spread and choose the desired setting from either the contextual menu, or the View menu.
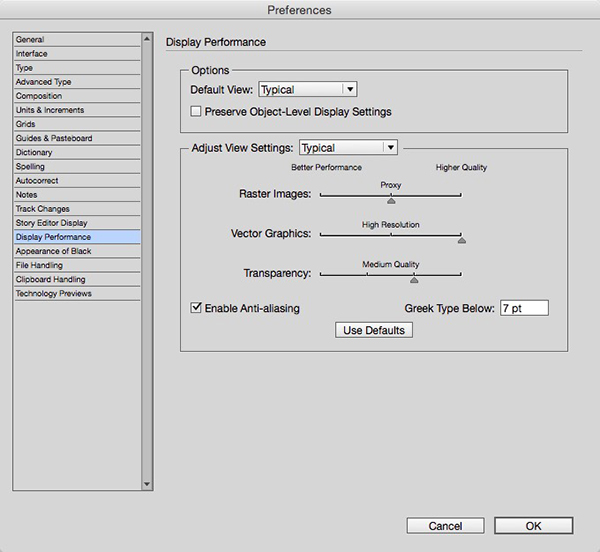
To customize the Display Performance settings, head over to InDesign’s preferences and select the Display Performance pane. You can change the default view for all new documents going forward here, as well as force InDesign to preserve object-level display settings, even after closing a file. If you don’t check this box, re-opening a file with revert all individual object view settings back to the default.
Lastly, you can define the parameters for rasters, vectors, and transparency for each display level using the sliders. If you want to view a document with all raster images grayed out (maybe to focus solely on type and graphics), but have placed vector graphics display, set up the Fast display raster slider to Gray Out, and change the vector slider to Proxy. Since rendering vector images really doesn’t take any processing power—by today’s standards, anyway—I have defined my Typical setting to show raster images at proxy quality, but my vector images at high quality and my transparency effects remain at medium resolution.

The current display setting shows raster images at screen resolution and vector images at high resolution.
Remember, the Display Performance settings only affect the way images look on-screen, not in print.


Thank you for the article. I was having an issue while placing an illustrator logo into InDesign and this definitely fix the issue. Keep up the good work.
This little thing trips a lot of people up. I often wonder why the default isn’t high res these days…the computers can keep up! Glad it was helpful!