

Out of Gamut: (Almost) Everything You Wanted to Know about Sharpening in Photoshop but Were Afraid to Ask


It’s a sad but undeniable fact of life: Whether you scan, shoot, or capture, the process of digitizing images introduces softness, and to get great-looking results, you’ll need to sharpen the great majority of digital images. This column is usually about color management, but for every screed that’s been written on tone and color correction or color management, there’s precious little about sharpening. This time around, I’ll outline some of my favorite sharpening techniques for Photoshop 5, 5.5, and 6.
The softness introduced during digitizing results from the very nature of the digitizing process. To represent images digitally, we must transform them from continuous gradations of tone and color to points on a regular sampling grid. Detail that’s finer than the sampling frequency gets “averaged” into the pixels, softening the overall appearance. For some types of output, particularly press halftones and inkjet or color laser dither patterns, further softness is introduced when the image pixels are converted to dots of ink or toner. As a result, just about every digital image requires sharpening, no matter what its source, to counteract the softness introduced both in the capture and output processes.
The good news is that the digital approach also provides a nice range of remedies for its slightly fuzzy thinking. My Photoshop favorites fall into three broad categories:
- Using the Unsharp Mask filter globally
- Sharpening on an adjustment layer
- Using the Unsharp Mask filter on a selection
Unsharp Mask
The oft-maligned Unsharp Mask filter is capable of producing excellent results, but to get them, you need to understand how it works, and a great many people don’t. The Unsharp Mask filter works by evaluating the contrast between adjacent pixels, and increasing that contrast when it’s relatively high. The idea is that a large contrast difference between adjacent pixels usually represents an edge. But the filter doesn’t really recognize edges, just pixel differences, so successful sharpening requires finding the settings that accentuate the edges in the image in a natural-looking way.
One important implication of this is that optimal settings for Unsharp Mask depend primarily on the image content, and secondarily on the resolution and the output process at which the image is aimed. Close subjects with soft detail need a very different treatment from distant subjects with lots of fine detail. Perceived sharpness is a function of local contrast.
Another key point is that judging sharpening from an image’s on-screen appearance is quite tricky. Here are some general guidelines that should help:
- Always evaluate sharpness by looking at the Actual Pixels (100%) view (known in older versions of Photoshop as 1:1). You can sometimes draw reasonable conclusions about sharpness from the 50% view, but all of Photoshop’s other zoomed-out views are heavily antialiased, so they don’t offer a particularly accurate impression of sharpness.
- For images destined for on-screen use, or for printing to true continuous-tone printers (dye-sublimation, LightJet 5000, Durst Lambda, film recorders), sharpen the image until it looks good on screen. For images destined for halftone (press) or dithered (inkjet) output, sharpen until the image looks slightly oversharpened on screen.
- Always sharpen the image at the final output resolution. If you resample the image (up or down) after sharpening, you’ll probably sample the sharpening halos out of existence, and you’ll need to sharpen the image again.
The key parameter in obtaining good results from Unsharp Mask is the Radius setting. The Radius needs to match the image content. It controls the width of the sharpening halo in a somewhat indirect way: Entering a Radius of 1 doesn’t produce a one-pixel halo; it just tells Photoshop to “look” one pixel outward as it evaluates each pixel for sharpening. That said, a large Radius setting produces a larger halo than a small Radius setting.
Next, set the Amount. Amount is the “volume control” for unsharp mask. It dictates the strength of the sharpening. A small Radius setting will need a higher Amount than a large Radius to produce the same degree of visual sharpness.
Last, set the Threshold. The Threshold control is basically a noise-reduction setting. It tells Photoshop to ignore a certain amount of difference between pixels when sharpening, and allows you to avoid oversharpening lightly textured areas such as skin tones.
How can you best balance the three settings? The procedure I recommend is to start with an Amount setting in the 200-to-300-percent range and a Threshold of zero, and work the Radius setting until it matches the image content. Then adjust the Amount setting until the desired degree of sharpening is obtained. Finally, if necessary, increase the Threshold to smooth out oversharpened areas of texture.
For Example
The best way to get a feel for the sharpening is to consider some examples.
Figure 1a shows an unsharpened image, Figure 1b shows reasonable sharpening settings, and Figure 1c shows the resulting sharpened image. In this case, the subject is close, with soft detail. We want to avoid oversharpening the skin texture, so a fairly low Amount and large Radius are called for, with some thresholding to smooth out the skin tones.
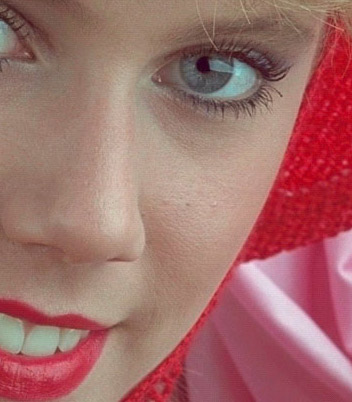
Figure 1a: Unsharpened

Figure 1b: Reasonable sharpening settings for the image in Figure 1a

Figure 1c: Sharpened
Compare this with the image shown in Figure 2a. Unlike Figure 1, it’s a “high-frequency” image with lots of fine detail, and it requires quite different sharpening. Figure 2b shows a reasonable set of sharpening settings that produce the result shown in Figure 2c. It requires a much smaller Radius, and hence a higher Amount. No thresholding was needed.

Figure 2a: Unsharpened

Figure 2b: Workable sharpening settings
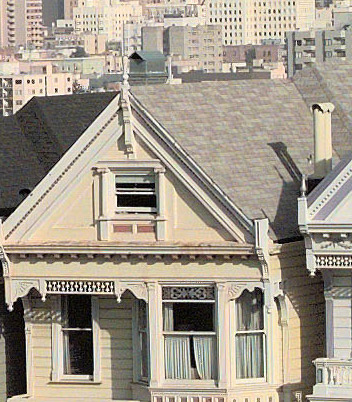
Figure 2c: Sharpened
Bruce, How about including a review of Nik Sharpener Pro in this article? Where does it replace Unsharp Mask and where does it complement it? Also, look out for typos and missing .JPGs–there are a few in this piece, e.g, figure 2a is incomplete.
Thanks, lad.
Thanks for the feedback. We have a review of Nik Sharpener Pro in the works: Keep an eye out for it in the coming weeks.
You’ll be glad to know that Bruce Fraser was not responsible for the typos you mentioned. We haven’t found a problem with Figure 2a. If you continue to have problems viewing it, please let us know.
Again, thanks for speaking up.
Mitt Jones
Senior Editor, creativepro.com
Excellent
useful info for me, a comparative novice at photoshop.
Would Bruce or anyone else please tell me why fractional radius values are used, since there is no smaller unit than the pixel and we are told to work at output resolution?
Excellent article! Perhaps the best, plain-English explanations of Radius, Threshold, and Amount I’ve yet to come across. Will highly recommend this article to those trying to decipher the intracacies of image sharpening.
My only criticism is that the High Pass filter should have been defined and explained with equal clarity.
This is information that I am currently using and have a need for.
more-more
Outstanding feature – useful and clear
Usual helpful words from an expert Bruce Fraser.
I especially liked the clear explanation of spot sharpening techniques. This is a tip that I will use again and again.
I wish all “how to” articles were this well written and useful.
I have never quite known what to do with the Unsharp Mask filter and High Pass filter. But now, I know how to use these tools effectively on all or just parts of an image which is extremely helpful.
As a scanning newbie USM was beyond me. This helped enormously. Thanks.
I am sorry to ask what may be a basic question for anyone who knows photoshop but I am a “traditional/Film” photographer who has been moving to digital (with great satisfaction I may ad) and who is learning the “trade”.
In the article Bruce talks of painting the sharpening with a soft-edged brush and I got lost and was hoping that someone may be kind enough to explain.
Otherwise I tried the two pass approach and this is absolutely great combined with unsharpen. I am anxious to try the technique described in “Out of Gamut: (Almost) Everything You Wanted to Know about Sharpening in Photoshop but Were Afraid to Ask”.
Thanks,
JT
This is an excellent essay on image sharpening.
My experience is that sharpening of the full RGB picture can interfere with the colours; this can be avoided by applying the unsharpen filter to the lightness channel only in Lab colour mode. As this requires a lot of mouse clicks I have programmed a function key to switch to Lab mode, select the lightness channel, apply the filter and then revert to RGB mode.
Edwin
Unfortunately, most digital photographers have learned sharpening by fixed rules that specify exact values to use in Photoshop’s filters, and therefore neither understand why professionals use the tools they do, or how they might be using them rightly or wrongly. Portrait and nature photographers have one thing in common: we hate seeing sharpening artifacts on large blocks of color. Any underlying noise in the image tends to bubble up to visible, and skies or skin tones with too much detail in them don’t look as good as gently gradated ones.
I personally found this well written and informative. As a “beginner” digital photographer, I’ll take any advice I can. It’s like that hobby that you feel you know everything about by simply reading the manual, then come to find out that it’s just scratching the tip of the iceberg. Great post, and very well written. I guess I’ll have something this winter after I visit some used car dealership in los angeles.
People know that it’s really important to get know about this good topic. Buy custom essay papers at the research paper writing service just about this topic, because this is really interesting topic.
Your 4-step procedure is simple and elegant, and shows a very solid understanding of your tools.
Like so much in Photoshop, this technique is relatively simple ONCE you understand how to do it. This is a great article, here’s a very helpful technique for the toolbox that would have taken years to eventually discover otherwise.
Thanks for your advice. I also use Photoshop in my work. Which monitor is better to use when working with graphics CRT or TFT? Thank you and respect Roman:buy essay
I love sharpening photos before usage on the web or printing them out, its always good to make sure you don’t ruin gradients though and remember that you want the final product free of compression blocking.
Many Photoshop users have, at some point, tried a multipass sharpening approach. A few have made it work, but the vast majority have wound up creating grossly oversharpened printed images, usually by falling into one or more of potential pitfalls. The good news is that all of these problems are avoidable given sufficient attention, care, and skill. Building a multipass sharpening workflow is not a trivial undertaking, but neither is it impossible otherwise we wouldn’t have bothered writing this site.!
Hi there,
I second the other voices — what a well written piece, brief and pragmatically to the point: what, why, and how — but I also do agree with a couple of other comments, that it would be fantastic if the workings of the High Pass filter were explained with the same clarity. Presume that dwelling into details of blending modes was beyond the scope, although I guess it would be helpful to understand how it comes into play as well (!)
Finally, at the end of his article, Bruce wrote “The third alternative, which we’ll examine next time, is to create a mask, load it as a selection, then apply the Unsharp Mask filter to the selection” — ‘next time’ is a broken hyperlink to https://creativepro.com/article/out-gamut-two-pass-approach-sharpening-photoshop — would anyone know where to find that article?
Cheers,
-Tomasz
Hi Tomasz,
The link to the 3rd method is https://creativepro.com/article/out-gamut-a-two-pass-approach-sharpening-photoshop
Terri Stone
Editor in Chief, CreativePro.com
Much appreciated!
Awesome Photoshop Tutorial, it helps PS fans from your platform i want to share a really good blog that i found few days back while searching on web Photoshop Tutorials for beginners Photoshop step by step Tutorials
Sharpening has the effect of increasing the contrast; it can also have the undesirable affect of causing a color shift along the different edges that are being sharpened. You have explained effectively about LAB sharpening, it is fairly easy to do. You have raised a valid point that many users like to convert the image to LAB and then sharpen only the lightness channel. I also agree that while sharpening images avoiding unwanted color shifts should be a primary concern.
I really hate exaggerated photoshop, but this looks amazing! thanks for share this :D binaere optionen